- Features by Edition
- Latest Features
- Licensing/Activation
- Installation
- Getting Started
- Data Sources
- Deployment/Publishing
- Server Topics
- Integration Topics
- Scaling/Performance
- Reference
- Specifications
- Video Tutorials and Reference
- Featured Videos
- Demos and screenshots
- Online Error Report
- Support
- Legal-Small Print
- Why Omniscope?
|
|
|
|||||
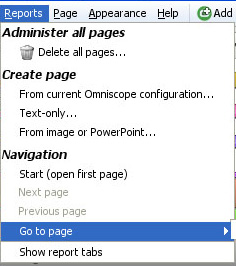
Report Pages (2.4)Creating and Managing Report Pages (2.4)Create a multi-tab interactive presentation with titles & annotationsRelates to version 2.4 only; from version 2.5 Report pages are referred to as Tabs. Any combination of views, settings, filters, titles and annotations can be saved as a persistent Report Pages that display on tabs across the top of the Main Toolbar. Tab names can also be displayed as buttons from the Sidebar Reports panel. Any number of different Report tabs can be configured, with individual or groups of Report Page tabs (sections) addressing the needs of different audiences among the users of your files. If you close and save an Omniscope file displaying a configured Report Page tab, this file will open next time displaying the same tab. Users of the file need simply page through the interactive Report Page tabs just as they would a presentation slide show. If displayed, page through their Report page tabs using the forward and back screen arrows in the lower left corner hover Reports Navigator (emulating PowerPoint) or use the right and left keyboard arrow keys (e.g. for live presentations). Below is a high-level introduction to Report Page tabs; how they are created, modified and navigated. More detailed documentation of the commands related to creating and managing Report Page tabs is available under the Main Toolbar Reports and Page menu commands. Creating Report PagesTo create a Reports pages, click on Reports on the Main Toolbar and choose one of the three options available under the Create Page heading:
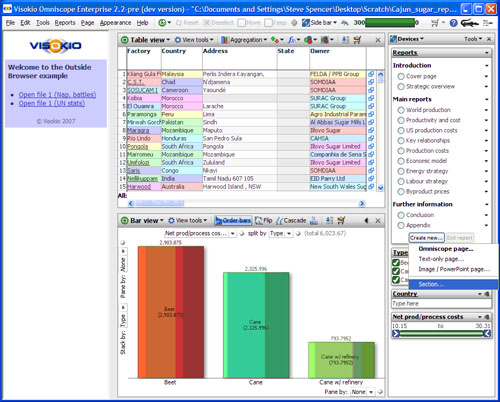
If you choose to create the new page from the current Omniscope configuration, the Create New Page wizard will display like this:
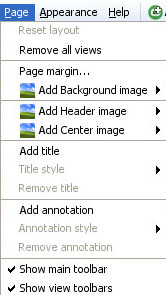
Once configured and named, each pre-defined, persistent Report page appears anytime the user clicks on the top report tab, or the button next to the Report page name in the Sidebar Reports Panel, or uses the Reports Navigator menu, which appears faintly in the bottom left corner of the display in Reports Mode (see Using the Reports Navigator below). Configure Report PagesThe Main Toolbar Page menu commands provide many options useful for creating self-explanatory Report Pages. The commands on this menu can be used to configure many aspects of the current display, whether that display will eventually be converted to a persistent Report Page or not. If you make changes to the current view using Page menu commands, then close and save the file, it will next open with those changes preserved in the current display.
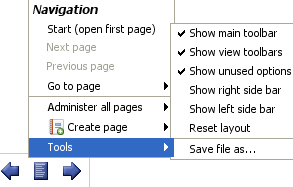
Page > menu commands apply to each Report page individually, and any changes must be Committed to become a persistent change, or Reverted to return the Report page to its default configuration/layout. For options covering aspects of the look and feel of Report pages that apply to more then one page, see the introduction to the Appearance command menu. Using the Reports NavigatorThe Reports Navigator menu appears in the lower left-hand corner of the display whenever Omniscope is in Reports Mode, meaning displaying a persistent Report Page. The Reports Navigator is faint until you mouse over it, at which point it appears clearly, with forward and back arrows pointing to either side of a reports document icon. Clicking on the forward or back arrows cycles through all the Report Pages already configured in the file. The same list as can be seen in the Side Bar Reports (or some other name if you have renamed the Reports heading) panel and under the Main Toolbar Reports Navigation section. Clicking on the Reports Navigator document icon at lower left reveals a menu listing a number of report navigation, creation, layout and reset options.
If the Commit and Revert modifications commands are solid, rather than greyed-out, it means that you have modified the current Report Page and must now either overwrite the previous settings with the new ones (Commit) or return the report to its original look, leaving the original settings unchanged (Revert). If the name of the Report Page is showing in red on the top report tab, this also means that you should either Commit or Revert your changes. If you have chosen to show the Side Bar Reports panel, these buttons also show in the Side Bar under the current Report Page whenever changes have been made to the current page, and the report titles will show in red until changes are either Committed or Reverted.
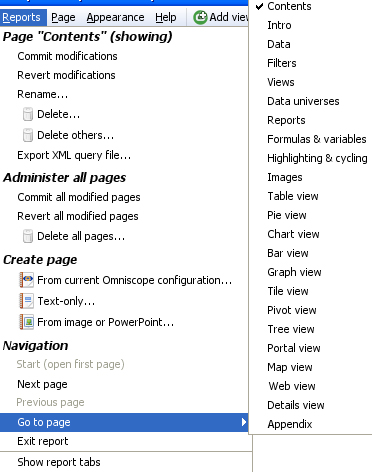
Reset Layout - returns the layout of the current Report Page to the default, with all the optional Show/Hide settings set to Show Save file as... opens the Export file wizard with the tab set to .IOK/.IOM files. Exit Report: - exits from Reports Mode and the Report Navigator menu disappears. Remember that it is usually better to Exit Reports Mode if not modifying existing Reports Pages. You can also Exit Reports Mode from the Main Toolbar Reports menu (see below) or from the Side Bar Reports Panel if you are displaying reports there. Managing Report PagesCommands required to manage all configured Report pages are available from the Main Toolbar Reports menu. In addition to many of the same commands as are available on the Reports Navigator menu, the Main Toolbar Reports menu includes commands such as Commit and Revert all modified pages that operate on all Report Pages simultaneously. When the Reports menu is opened, the title of the current Report Page is shown at the top in bold italics.
For more detail, see the sections documenting the Main Toolbar Reports and Page command menus Organising Report PagesThis refers to the functionality allowing Report pages to be organised into named sections (or "groups"). To date, Report page organisation has been implemented only in the Sidebar Reports panel. To show the Reports panel, the right-hand Sidebar must be showing. However, the Sidebar Reports panel is not displayed by default. Use the Sidebar button on the Main Toolbar to change this. Then, ensure the Reports Panel is ticked for display using the Devices drop-down on the Sidebar toolbar. When the Sidebar Reports Panel is displayed, the Report page tabs across the top of the display will disappear unless they have been explicitly shown. You can explicitly hide/show the Report Page tabs using Main Toolbar: Tab > Tab settings > Tab bar option. For more information, see the Appearance menu commands. Adding and administering report sectionsThe Sidebar Reports Panel must be expanded to show the Create new button at the bottom of the panel. Expand/collapse each device by clicking its title. Click Create new, choose Section and enter the section name when prompted. Drag the sections and Report Page titles around to achieve the desired structure. To manage existing section titles, click the black triangle on the right to show a drop-down menu, allowing you to rename or delete each section grouping.
|