- Features by Edition
- Latest Features
- Licensing/Activation
- Installation
- Getting Started
- Data Sources
- Deployment/Publishing
- Server Topics
- Integration Topics
- Scaling/Performance
- Reference
- Specifications
- Video Tutorials and Reference
- Featured Videos
- Demos and screenshots
- Online Error Report
- Support
- Legal-Small Print
- Why Omniscope?
|
|
|
|||||
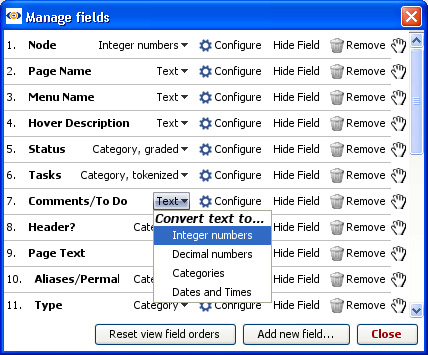
Manage FieldsData > Manage FieldsManaging settings for each column/field and the values withinThe Data > Manage fields dialog is the central menu for accessing almost all commands that relate to adding, naming, showing or hiding, and removing fields (columns) from your data set. All of the fields (columns) in your data set will be visible here, even if you have hidden them in some or all views. Data typing, which tells Omniscope how to treat the values it finds in each field (column), can be centrally managed from this dialog.
Note: Rename, Change Field type and Field options commands are also available from the Sidebar (right-click on filter device) and the Table View (right-click on column header). Changing field data typeFor each field, the Field Type drop-down allows you to change the data type from the default assumptions made by Omniscope when the data was imported. Depending on your data source, Omniscope cannot always automatically determine the most suitable data type. The Field type drop-down shows the current data type, which may or may not be optimal for your analysis and reports. Omniscope classifies all data columns as either Integer numbers, Decimal numbers, Dates and Times, or Text. In addition, if the number of unique values in a column is less than about 250, Omniscope can treat each of the unique values in that column as a Category. It is important to use the most suitable data type for each column to get the best results. Valid data types for values in each field (column) include:
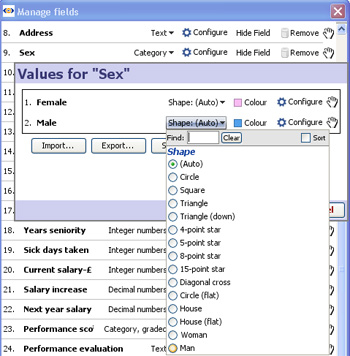
Categories are a useful data type whenever a field (column) contains only a limited number (say 200-250) unique values, although the total number of records (rows) can be any number. Typical examples are a 'Sex' column, which usually contains only two unique values; 'Male' or 'Female', or list of distinct colours, such as 'red', 'orange' and 'green'. On data import, Omniscope will count the number of unique values, and for text columns will usually set the data type to be Category by default. Category fields also have the following options: Graded (the values are ordered and colour options shown with a continuous green to red scale, and Tokenized, meaning each cell can contain a delimited list of multiple values. See the discussion of Tokenized data. Note: if you import data with a field containing a mixture of numbers and values such as "?", Omniscope will treat this as a Text or Category field. If you then convert the data type type to numbers, Omniscope will warn you before blanking out the "?" values. Re-ordering, Adding, Removing and Hiding fieldsOrdering and Resetting field orders- use the drag handles far right to re-order your columns from the default import order to the order you find most useful in the majority of the views. You can change this order view-by-view and in Reports Pages, but clicking on Reset field orders will return all views to this order, although hidden columns will remain hidden. Add new field- creates a new, blank field in your file after the end of the list of existing fields. Enter the name, which must be unique, and click OK. Initially, the field will be a Category field, and all values will be blank (empty, also called null and shown in grey). Use the Field type drop-down to change the data typing to the desired field type (described above). Use the drag handles to move it into position between other fields, then click Reset field orders. This will display the new field in the Table View in the correct location. Note: New fields will remain hidden in Report Pages already configured. You must visit each Report Page and use the Columns/Fields to show option in each view to reveal the new field, then Commit the changes to make them persistent.
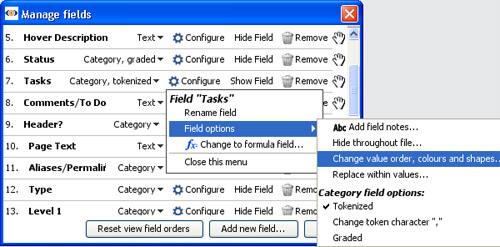
Configure fields menuClick the Configure drop-down for each field to get other actions and configurations related to a field. Rename field- often data sets imported from database tables rather than human-friendly views will have obscure field names which are not easy for those receiving your file to understand. Use this command to change the field (column) names in Omniscope...the data refresh process will not be affected. If you want to preserve the display of upper case acronyms, 'ISIN' rather than 'Isin'...be sure to tick the Preserve upper/lower case of field name option. Change to formula field- converts a column from input values to calculated values according to a formula you specify. See Formulas & Variables. Field Options sub-menuAdd field notes allows you to annotate a field; any text you enter here will appear in a tooltip whenever the mouse hovers over a Table View column header, or a Side Bar filter device. Use this to attribute the source of your data, clarify definitions, etc.
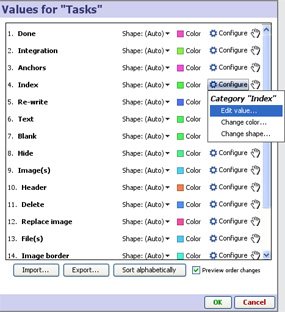
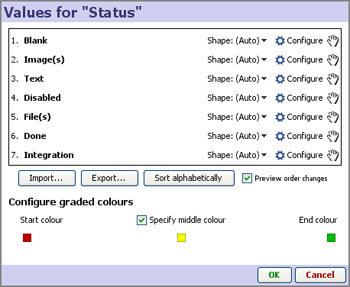
Hide throughout file- same as Hide Field, you will be asked explicitly if this applies to Report Pages already configured. If you do not want to hide the field in Report Pages where it is currently displayed, choose Skip Report Pages. Note: you can still reveal hidden fields in Side Bar filters using the Devices drop down. Replace within values- same as the command available on the Edit menu Change Value order, colours and shapesChanging values and value order-Edit value- Sometimes minor variations in spellings cause Omniscope to manage more distinct categories than actually exist. The Edit value command allows you to standardise spellings of potentially thousands of values in the data set in order to achieve the correct category listings. Value order- this option applies to Category fields, for which you usually need to define a sorting order. By default, category values are sorted alphabetically. For many categories, alphabetical order is not meaningful. In the example below, a sequence of tasks in creating a web site have been dragged into a new order using the drag handles at far right. The Task values will now display and sort in this new, non-alphabetical order in all views. If we now choose to convert this field to a Graded Category, the new top and bottom values will define the colouring range (see below). Note: If you set a category sort order from top to bottom, and find that some views display the values in a sequence opposite to your preference, try reversing the sort order by dragging the Category values from bottom to top.
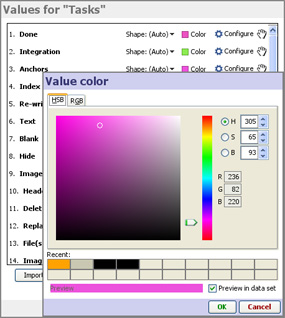
Import/Export- If you have a notepad file (.TXT) listing the values in correct business order, you can import the list and Omniscope will automatically arrange the sort order accordingly. You can also export a list showing the current sort order. Sort alphabetically- returns the sort order to the default Setting and changing coloursFor Category fields, if you don't like the colours chosen automatically for your Category values, or have specific colours you would like to use, click the square colour box next to the value you would like to change to display a Colour Chooser. This dialog enables you to select the colour associated with each Category value with great precision.
If your Category field is Graded (see above), you can't change Category values individually. Instead, you can choose start and end colours, and the values in between have a graded colour.
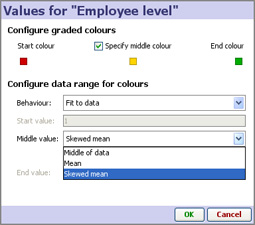
Date and Time, Integer and Decimal fields also allow you to change the gradation colours, with various options to achieve the best use of colour given any distribution of values within the field. You can specify the start and ending colours for the continuous range, and skew the colour spectrum by specifying the middle colour also.
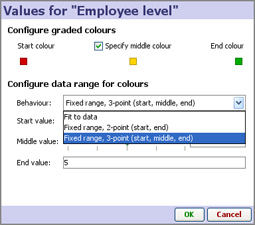
Numeric fields often have very skewed distributions due to extreme values, etc. and the resulting colour spectrum will be too uniform for most of the values. If you choose Fit to data behaviour, you can adjust for skewed data by selecting mean or skewed mean as a way of finding the 'middle' value for colouration purposes. If you have a more uniform distribution of values in your field, you may choose Fixed Range behaviour and specify Start, Middle and End values to achieve very precise colouring effects. Setting and changing shapesYou can assign marker shapes to category values, such that different shapes are plotted on the Graph or Map view, depending on the value for the specified Shape field in each record.
|