- Features by Edition
- Latest Features
- Licensing/Activation
- Installation
- Getting Started
- Data Sources
- Deployment/Publishing
- Server Topics
- Integration Topics
- Scaling/Performance
- Reference
- Specifications
- Video Tutorials and Reference
- Featured Videos
- Demos and screenshots
- Online Error Report
- Support
- Legal-Small Print
- Why Omniscope?
|
|
|
|||||
PrintingPrinting from OmniscopeExporting static, paper-based views{update to version 2.5 in progress} Omniscope offers options to print from individual views, or at the level of the entire file. In addition to printing only one view, or the current page, it is also possible to print some or all tabs as PowerPoint or Adobe Acrobat files, with many options to show or hide various aspects of the Omniscope display in the printed versions. Printing individual viewsSometimes, you may wish to print a single view on a single piece of paper. All views offer this option from View Tools > Capture Views > Print. Right clicking on views with backgrounds, like the Pie and Graph Views, also presents a view Print option. If you are running Windows, the individual view print option available from Capture Views > Print will launch the Windows Page Setup dialog enabling you to confirm the paper size, orientation and margins for the page you wish to print.
Note: When printing individual views, the view title does not print. Printing one or more pagesSometimes, you would like to print a paper copy of the entire page display, or multiple tabs, from Omniscope. On the Main Toolbar, File > Print opens a printing options dialog:
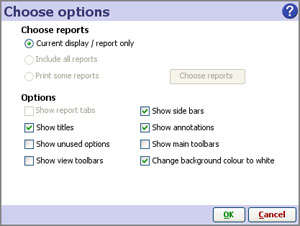
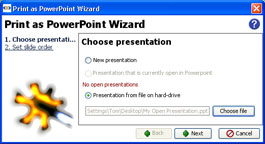
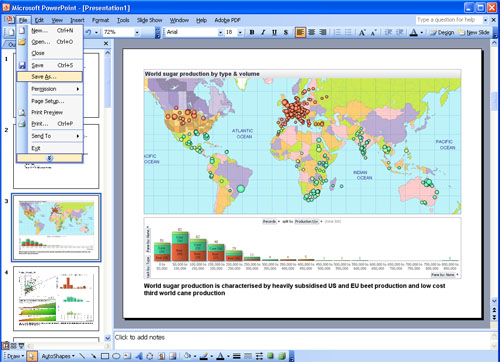
Choose reports: Current display/report only - prints only the current tab displayed in Omniscope Include all reports - prints all the tabs in the file. Print some reports - allows you to choose which tabs you wish to print from a drop-down pick list Display options: Show report tabs - unless ticked, Report Page tabs are not printed Show side bars - when ticked, Side Bars are printed on each page. Show titles - when ticked, the page titles are printed (view titles are always printed when printing pages) Show annotations - when ticked, prints the annotations below the views on each page Show unused options - unless ticked, does not print aspects of the display relating to unused options, e.g. Pane-by menus are not displayed in views with no active paning. Show Main Toolbar - unless ticked, the Main Toolbar does not print Show view toolbars - unless ticked, the View Toolbars do not print Change background colour to white - when ticked, substitutes a white background when printing Print as PowerPoint fileFile > Print as PowerPoint launches the Print Options dialog described above. You can choose to print the current display, or some or all the Report Pages configured in your file. Click on OK and Omniscope processes the pages you have selected. When it finishes, Omniscope displays the Print as PowerPoint wizard:
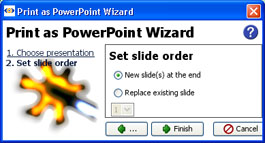
If you want to create a new PowerPoint file, choose New presentation. If you already have your PowerPoint file open, choose it from the list of open presentations. Otherwise, browse to and open the PowerPoint file you wish to add pages to. If you are adding pages to an existing PowerPoint file, you are asked where to insert them: Warning: If you specify Replace existing slide, make sure that the slide number choosen is a blank 'placeholder' slide or otherwise uneeded; it will be overwritten and all addtional pages inserted behind it. Subsequent slides will not be overwritten. Click on finish and Omniscope will open the PowerPoint file. If you wish to save or print this file, you can now do so from PowerPoint itself:
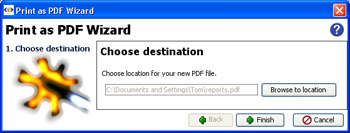
Print as .PDF (Adobe Acrobat file)File > Print as PDF launches the Print Options dialog described above. You can choose to print the current display, or some or all the Report Pages configured in your file. Click on OK and Omniscope precesses the pages you have selected. When it finishes, Omniscope displays the Print as PDF wizard:
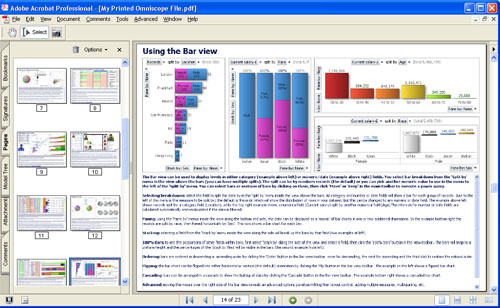
Specify the new file name and location you want to save this file. Open the file to access the full range of options for managing .PDF files, including printing.
|