The DataManager workspace also allows you to define any sequence of transformational operations by dragging Operations blocks onto the workspace. Operations blocks are also accessible from the Main Toolbar Data > Operations menu and are fully documented here.
Omniscope allows you to import data from a wide variety of data sources. Each source allows you to fine-tune how the data will be imported.
The File source lets you import data from a local file.
The file selection section allows you to choose what file you want to import. Click on the "Browse" button to select a file.
Omniscope supports the following file types:
The following options are available when you select a text based file type (CSV, TSV or TXT):
The following options are available when you select an Excel file type (XLS, XLSX).
The URL source allows you to import data from a remote file.
The File selection section allows you to select the URL you want to import. You should enter the web address in the "Address" text field. Examples of valid addresses include:
Select the "Requires authentication" option if the server requires a username and password in order to access the data.
The URL source supports all of the file types available in the File source. After selecting a file the configuration options for the selected file type will be shown. For more information on these options please see the File source help page. PENDING.
The Database table source allows you to connect to and import data from a relational database.
The connection details section of the panel allows you to select and connect to a Database. Omniscope supports a wide variety of different Databases. If your database isn't on the list then you should select ODBC or JDBC (Advanced).
After selecting a Database you need to configure the information required to connect to that database. Different databases require different sets of information. For example, when connecting to Microsoft SQL Server you should select a driver and the host, port, host (optional), database name (optional) and authentication information.
After entering the required connection information click on the 'Connect' button. If there are any problems connecting to the database an error message will be displayed. Successfully connecting to the database a list of the tables available to import will be displayed in the Table selection dropdown.
Advanced users can choose to import data using a custom SQL statement rather than by simply selecting a table.
The List of values data source allows you to enter one or more values that will be converted into a single-column Omniscope dataset. You can then use this as an input into any operation or feed in the DataManager workspace.
The List of values source is particularly useful as an input to a feed, such as the Twitter search or Yahoo search, where you want to supply a pre-defined set of search values.
The Sequence of values source generates a single-column Omniscope dataset containing a discrete sequence of values between a start and end value. You can use this source as an input into any operation or data feed.
Options
The File metadata source generates an Omniscope dataset that contains file metadata related to a subset of files in a specific directory. Each row in the dataset represents a different file.
Some examples of file metadata include:
Batch append files
The Batch append files data source allows you to append the contents of a set of data files within a designated folder.
The File selection section allows you to configure which files you want to append.
The Lookup data source allows you to pick an Omniscope lookup dataset. These datasets provide useful information that can be combined with your existing data sources to provide additional data. Examples of lookup datasets include postcode and country location data.
The Demo data source allows you to pick a demo dataset. You can use the demo data to test the functionality of the operation, feed and publisher blocks.
The OLAP cube data source provides connectivity to MDX-compliant multi-dimensional data secttructures (cubes) such as Microsoft SSAS and other cubes.
Omniscope DataManager workspace currently supports direct connections to Microsoft Analysis Services and some other MDX-compatible mutli-dimensional cube structures from other vendors.
In order to use the OLAP connector you will need to configure HTTP access to the MDX server. Most OLAP sources support this, however you may need to configure access on the server.
The following link [2]provides details on configuring HTTP access to SQL Server 2008 Analysis services. Information on configuring access to other cube providers can normally be found on the internet or by speaking to your system administrator.
Visokio made the decision to provide access cubes via MDX because it provided a generic solution, allowing connection to several different providers. The downside of this solution is that it does require some pre-configuration and data retrieval may be slower than a direct connector. Visokio intend to implement direct connectors for OLAP servers such as Microsoft SSAS in the future. This development will be dictated by demand from clients.
The connection details section allow you to specify how to connect to the OLAP server.
Formatting
The formatting secion determines how the data will be structured when it is imported into Omniscope.
The data feeds provide access to a number of online data sources. You can download data from these feeds directly into Omniscope.

Google Docs is a free, online, document storage service provided by Google. Users can create and edit documents and collaberate in real time with other users.
The Google Spreadsheets feed allows you to import either a spreadsheet from the Google Docs repository. You must have an internet connection to use this service.
The Login section allows you to specify your authentication information for retrieving the spreadsheet. You can choose to retrieve a spreadsheet from a private account or a public account. A private account requires an Email address and a password. A public account merely requires you to enter the spreadsheet link or key. Public spreadsheets are available to all users.
Once you have entered the login details click the Login button. If the login was successfuly the spreadsheets and worksheets available in the selected account will be downloaded.
The Worksheet section allows you to select the spreadsheet and worksheet that you want to download. These options will only be available after successfully logging into a private or public account.
The table data section allows you to select how the selected worksheet should be imported into Omniscope. These options are the same as the options available when importing an Excel spreadsheet.
The Email feed alllows you to import email data from a POP3 or IMAP email account.

Server information
A website map is a network of interconnecting pages within a specified website. A connection between two pages exists if the first page contains a link to the second page. You can use a website map to visualise the structure of a website.
A website map can prove useful in many different scenarios:
Web feeds, such as RSS and Atom, are used to provide users with news and other content over the internet.
The Custom feed allows you to import data from an RSS feed.
Facebook is a social networking service launched in 2004. As of January 2011 Facebook had more than 600 million active users.
The Omniscope Facebook feed allows you to download Facebook user, group, event, page, wall post and insight data associated with your Facebook account.
Click on the "Connect" button to allow Omniscope to establish your Facebook connection details. The connection is established through your web browser. If you are already logged into Facebook then your current connection is used. In order to connect to a different account you must log out through your browser before clicking the "Connect" button.
After connecting to Facebook you need to select what data you want to download in the "Report" dropdown. Omniscope currently provides six different reports: Users, Groups, Events, Pages, Wall posts, Insights. Each of these report types is outlined below.
The "Users" report allows you to download the details of all of the users associated with your account. At the moment this includes data on the logged in user and the friends associated with that user.
Each row of data represents a single Facebook user. For each user, Omniscope provides information including the user's name, activities, interests, music TV and profile photographs.
The "Groups" report allows you to retrieve the details of all of the Facebook groups associated with your account.
Each row of the data represents a single Facebook group. Omniscope provides information including the group name, type, website and recent news.
The "Events" report allows you to retrieve the details of all the Facebook events associated with your account.
Each row of the data represents a single Facebook event. Omniscope provides information including the event name, type, start and end time.
The "Pages/applications" report allows you to download the details of all the Facebook pages and Facebook applications associated with your account.
Each row of the data represents a Facebook page or a Facebook application. Omniscope provides data including the fan count, website and company information.
The "Wall posts" report allows you to download the wall posts for selected users, groups, events and pages. If you select more than one entity the wall posts will be appended into a single table. You can determine the entity name and type (user, group event or page) by referring to the "Entity name" and "Entity type" columns.
Each row of the data represents a single wall posting. Omniscope provides data such as the posting user, number of impressions, like count, comment count and message. The "
Select the "Download comments" checkbox if you want to download the comments (where available) for the postings.
Facebook insights provide Facebook page owners and application developers access to metrics about their content. You can use this data to analyse growth, demographics, consumption and creation of content.
The "Insights" report allows you to download Facebook insights data.
Salesforce [3] is an application that runs in the Force.com [4] online cloud-computing hosted platform, one of the largest and fastest-growing general-purpose SaaS platforms. Salesforce is widely used for CRM (Customer Relationship Management, composed of the 'Sales Cloud' and service/case management, aso know as the 'Service Cloud'). Almost any application can be written on the Force.com platform. If you have a Salesforce account, it is possible to access your Reports and Data Objects/Tables stored in Salesforce using either the Omniscope direct connector (File > Open online source > Salesforce) or the free web connector [5] your Administrator can install into your Salesforce account from the online AppExchange [6].
Salesforce web connector: the free Omniscope Connector for Salesforce [5] web service can be installed in your Salesforce account(s) from the AppExchange listing page [5] by your Administrator, unless you have a Group Edition. Instructions for installing in Group Editions are here. The web connector installation will add a new tab from which you can download reports and un-joined data objects using pre-configured templates to deliver files that will open in the free Viewer. An activated version of Omniscope is required to modify and save customised templates, which can then be uploaded to your account, adding new download and viewing options for different classes of users within your organisation. More on using the online Web Connector for Salesforce [7].
Salesforce direct connector: Omniscope Professional and Enterprise 2.5 (and later) enable to access your Salesforce reports and data objects directly. More on using the Direct Connector for Salesforce [8]to access, modify, edit and synchronise changes with your Salesforce-hosted data.
More detail and a solutions roadmap for making the most of the combination of Salesforce and Omniscope is here [9].
Google Analytics is a web analytics toolkit that allows users to access insights into website traffic and marketing effectiveness. For more information please visit the Google Analytics website [10].
The Omniscope Google Analytics feed allows you to download Google Analytics data.
Enter your Google Analytics username and password. This is the same username/password that you use to login to your online Google Analytics account. Once you have entered this data click the "Connect" button to connect to the Google Analytics server.
The "Report configuration" section allows you to select and configure the analytics data that you want to download.
Microsoft Atlas for advertisers and agencies allows users to manage digital marteting campaigns accross display banners, rich media, search, video and websites. For more information please visit the Atlas website [11].
The Omniscope Atlas connector allows you to download Atlas advertiser data.
Enter your username, password and developers token and click the "Connect" button. If you don't have a developers token you need to contact your Microsoft Atlas representative.
After connecting to the Atlas server you can configure the Atlas data you want to download. The configuration options are designed to mimic the options available in the online Atlas interface.
DoubleClick for Advertisers (DFA) is an ad management and ad serving toolkit that manages digital advertising programs. For more information about DoubleClick please visit their website [12].
The Omniscope DoubleClick feed allows you to download advertisment data from the DoubleClick server.

The DoubleClick interface has been designed to mirror the options provided in DoubleClick ReportCentral.
The connection section lets you specify the username and password to connect to the DoubleClick server.
Unfortunately the username/password that you use to login to the DoubleClick website will not work. Instead you need to create a new username and password to allow you to access the DoubleClick API. If you can't do this yourself you need to speak to your Google/DoubleClick TAM (Technical Account Manager). This policy has been enforced by Google.
After entering your authentication details click on the "Connect" button to login to the DoubleClick server.
After successfully connecting to the DoubleClick server you need to specify and configure the DoubleClick report you want to download. You can select the type of report in the "Query" dropdown. Omniscope currently provides 11 different reports. All of these reports are available in ReportCentral.
After selecting a query the relevent options for that query are displayed. These options are split into four sections: "Scope", "Filter criteria", "Main criteria" and "Spotlight information". The structure of these options should be near identical to the equivalent options in the ReportCentral interface.
Brandwatch offers a range of tools and services to monitor social media data. For more information please see the Brandwatch website [13].
The Omniscope Brandwatch feed allows you to download data from the Brandwatch server into Omniscope. In order to use the feed you must have an active Brandwatch account.

The Twitter search merging feed allows you to search for tweets matching one or more search terms.
The Download link text merging feed allows you to download the textual content of one or more URL values.

BloombergImport real-time data with live updates |
|
Bloomberg fields added can be added and refreshed directly into your Omniscope files, either on opening or on-demand using Refresh from Source (Ctrl+F5). This section documents the options for using the Bloomberg feeds block to import and refresh Bloomberg data within Omniscope files (not available in free Viewer).
Note: Omniscope will connect to Bloomberg only if Omniscope is running on a PC which has Bloomberg Terminal software installed, together with a local copy of Excel and the Bloomberg DDE Server and Add-In for Excel installed.
To determine if the Bloomberg Add-in for Excel is installed on your machine, follow these steps:
In Excel (pre-2007), click the Tools menu item, expand the menu fully, and select Add-In
In Excel 2007, click the Office Button > Excel Options > Add-ins > Manage > COM Add-ins > Go
In the Add-ins window, look to see if there is an item called “Bloomberg” and that it is ticked.
If the Bloomberg Add-in appears but is not ticked, then simply tick it and restart Excel. Otherwise, you will have to install the Bloomberg Add-in. Download and install the DDE Server and the Excel Add-in from the Bloomberg Software Support [15] page, then do the test above to determine if it has worked. If it has, then you are ready to use the Omniscope Bloomberg import and export functions via the DDE Server and Excel Add-in.
This method of importing data from Bloomberg outlined below is manual for simple cases only. More advanced users who are comfortable using the Excel Add-in for Bloomberg and want more automation options should use the method outlined under Alternative Bloomberg Import Method [16]. We are planning to upgrade the Bloomberg Connector in the near future, please contact us [17] if you have requirements not currently addressed.
You can manually add refreshable Bloomberg fields to your Omniscope files using the Bloomberg data import wizard.
The Bloomberg data import wizard is accessed from Data > Import from Bloomberg:
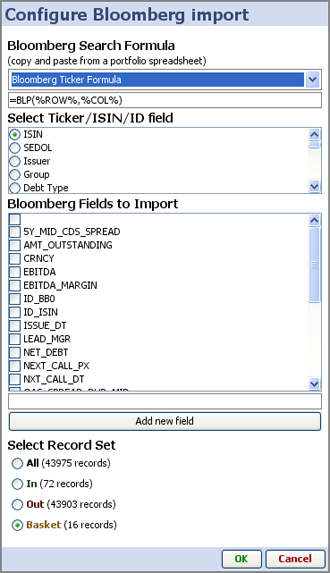 | Bloomberg search formula- choose from four common formulae, or cut and paste your own formula from a working spreadsheet. (each of the options is further explained below) Select Ticker/ISIN/ID field- your data set must contain a field that can be used by Bloomberg to match to their data. Securities identifiers like ISIN or SEDOLs, or Bloomberg tickers, etc. Bloomberg fields to import- depending on your licensing arrangements with Bloomberg, there are many thousands of fields of data you can import and refresh directly into Omniscope files: Add new field- type in the exact name of the Bloomberg field you wish to import and click add new field. It will be added to your list of import and refresh options and ticked. Select record set- select which data universe of data you wish to import the specified Bloomberg fields for. In the example at left, we are importing Bloomberg fields for only 16 securities in the basket, rather than the 72 in the IN universe or the 43,975 in this reference file for this class of instrument. |
When you click OK, the bloomberg data will be imported, which may take a little while.
Note: To refresh your Bloomberg fields with live Bloomberg data imported into Omniscope, you must use the Refresh command:
Data > Refresh Bloomberg data (or you can use the keyboard shortcut Ctrl+F6)
This works so long as the Omniscope file is open. If you close the Omniscope file and open it again later, you will have to use the Bloomberg Data Import wizard to add the Bloomberg fileds to your file again. This will change in future versions.
Choose the form of Bloomberg search/import formulae that best suits your data and requirements.
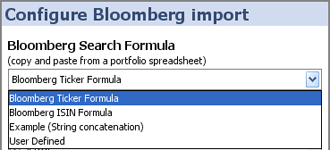
Bloomberg Ticker Formula - =BLP(%ROW%,%COL%)
Typical BLP string which submits the Omniscope field value selected for ID, then the Bloomberg field names being requested, i.e those ticked below
Bloomberg ISIN Formula - =BLP(CONCATENATE(%ROW%," Corp ISIN"),%COL%)
This formula is for submitting ISINs from Omniscope in the form 'XS0109263607 Corp ISIN', then the Bloomberg field names being requested, i. e. those ticked below
Example (string concatenation) - =CONCATENATE(%ROW%," ",%COL%)
This formula can be used to test/demonstrate this function on machines which are not actually running Bloomberg.
User defined - choose this option to specify your own formula, using %ROW% to represent the Omniscope column values selected under Select Ticker/ISIN/ID field, and %COLUMN% to represent the Bloomberg fields you have ticked under Bloomberg fields to import.
Note: If you are importing fields for many records, you may have to manually refresh several times to ensure that all values have been imported. See Refreshing data from Bloomberg below.
The best method of refreshing data, both in your own desktop, and in copies of the files you send to others who also have access to Bloomberg from their machines depends on your requirements, especially record (row) count, update/refresh speed and performance.
If you or recipients of your files want to refresh Bloomberg fields in Omniscope on a manual, as-needed 'pull' basis, using the Data > Refresh Bloomberg data should perform well enough. Indeed, when you first import Bloomberg fields into an Omniscope file, you may have to refresh manually a couple of times to fully populate the file. This form of refresh is best for small portfolios and for less-than real-time updates, for example daily closing prices.
Because persistent auto-refresh from Bloomberg has not yet been fully implemented in Omniscope, if you want to refresh a very large number of records on an automated 'push' real-time basis, use File > Export > Create Bloomberg spreadsheet to generate a stand-alone automatic price-monitoring Excel spreadsheet that may perform better for large portfolios requiring frequent real-time updates. This situation will change in future.
There is an alternative method for importing data from Bloomberg which by-passes the manual, non-persistent Importing using Bloomberg Data Import Wizard [19] method described above. System set up and requirements are the same.
To use this method you must also be permitted to run macros within Excel. Create an Excel spreadsheet using the template available here:
Sample Excel Bloomberg Import & Auto-refreshTemplate [20]
Within this spreadsheet you set up your Bloomberg data using the Excel Add-in for Bloomberg and set it to auto-refresh. The template contains a macro which will automatically save the file on a regular basis for as long as it is open. Once you are happy with the file, open it in Excel (permitting macros to run if asked) and you can minimise it to the bottom of your screen. Now launch Omniscope and open up the Excel file from the place on your hard-drive where you have it saved. When it is open you can set it to auto refresh and as the data in the Excel spreadsheet is populated from Bloomberg, the Omniscope will pull in that data and update to reflect it.
Alternatively, you can open an existing Omniscope file containing references such as ISINs or ticker symbols which are the same as those in your Excel spreadsheet and merge the values in. Then if you set up Live Update it will refresh the merge while retaining your own data.
The append operation allows you to append the data from two or more data-sets to create a single data-set.

In this example we are appending the data from 3 data-sets together. Each data-set contains spending data from selected days a single month. The first data-set contains data from January, the second contains data from February and the third contains data from March. The expense data is shown below.

We use an append operation to combine the data from each of these three data-sets. In this example we select all fields and change the name of the Source field to 'Date'. The DataManager configuration for this operation is shown below.

The Merge/Join operation allows you to merge the data from two data-sets together to create a single data-set.
In most scenarios merging two data-sets requires that the two tables have at least one common field, and that at least one of these fields contains no duplicate records. If you intend to merge on a Date/Time field the storage/display formatting of both merge fields must be identical.

Join by matching records where...
This allows you to specify the join criteria by selecting the matching fields from both datasets. You can define multiple join criteria; each criteria specifies a single match. To add a new join criteria click on the Add join criteria button. When you select a field to match on the number of unique records in that data-set are shown. In most cases one or both of the match fields should contain no duplicate values. If both fields contain duplicate values the merge may result in a huge number of records. Use the Accent sensitive and Case sensitive options to determine whether accent characters or case have a bearing on whether a value from the first data-set matches a value from the second.
This determines which records are included in the merged data based on the join criteria you specified. You can select any combination of these options.
This alllows you to determine what action Omniscope should take if there are any fields outside of the join criteria with matching names.
Select this option to create an additional field that lists the name of the input data-set each row in the data originated from. For merged records both data-sets will be listed.
In this example we will be merging the data of two tables. The first table contains a list of customers. The second table contains a list of transactions made by the customers during January. The input data for the Merge operation is shown below.

In order to merge these two data-sets we need to identify the join criteria. In this case both tables have a common field: Customer ID. We therefore need to create a merge operation with a single Join criteria, matching on records where Customer ID from the customers table matches Customer ID from the transactions table.
The DataManager configuration for this operation is shown below.

The Field Organiser operation allows you to manage the fields inside a data-set. You can add, delete, re-order and edit the properties of the fields.

The Field Organiser lists all of the fields in the data-set in the order that they appear. Each row of the list represents a single field.
You can add a field by clicking on the Add field button at the bottom of the operation. New fields will be added at the bottom of the list.
You can rename all of the fields by clicking on the Rename all button.
You can delete all of the fields by clicking on the Delete all button.
For each field Omniscope provides two sets of options:
These options are available for all field types.
 |
These options only appear in Decimal or Integer number fields.

These options only appear in Text fields.

These options only appear in Date fields.
![]()
Go Back to data-operations [21].
The summarise fields operation allows you to create a "Summary" field that combines the values from one or more fields into a single field.

The Summarise fields operation is useful when importing data-sets with a large number of fields. Trying to analyse such a data-set can be inefficient, particularly when the data-set also contains a large number of records. If these fields aren't required for analysis, but you still want to retain the data it may be beneficial to create a single summary field instead.
In this example we are importing a data-set that contains information about a set of employees in the company. A sample of this data is shown below.
![]()
This data contains some fields that are useful for analysis: Name, Date of birth and Position. The data also contains some fields that we don't need to analyse: Performance evalutation and Academic qualifications. We could simply remove these fields using a field organiser, but we still want to be able to view the data. In this scenario we could use the Summarise fields operation to create a single field containing the values from these fields. Doing so will improve the overall performance of Omniscope once we have loaded the data.
The DataManager configuration for this operation is shown below.

Go Back to data-operations [21].
The Record filter operation allows you to generate a subset of the rows in a table by applying one or more filter rules.

Filter rules
Each filter rules defines a single condition for selecting a set of records in the data. You can create multiple conditions by defining multiple filter rules.
To add a new filter rule click on the Add rule button in the bottom toolbar. There is no limit to the number of rules you can add in a single Record filter operation.
To remove a single rule click on the Remove button or click the Remove all button to remove all of the rules in the operation.
To view or edit the rule click on the expand button ![]() or click on the rule name. Each rule is comprised of 3 elements:
or click on the rule name. Each rule is comprised of 3 elements:
The match criteria options are shown at the top of the operation. They determine how the filter rules should be applied to the data. You can choose to either accept or reject the records that match all or any of the filter rules that are defines in the record filter operation.
In the following example we have a data-set containing a list of company employees. The data is shown below.

We will use the Record filter operation to retrieve all Female employees based in London. To achieve this we need to create two filter rules. In the first filter rule we want to obtain all employees based in London. This rule is configured as folllows:
The result of applying this rule is shown below.

Now we want to add another filter rule. In this rule we want ot obtain all female employees. This rule is configured as follows:

Go Back to data-operations [21].
The Random Sample operation generates a data-set containing a random sub-set of rows from the input data. This can be useful when you are working with very large data-sets, allowing you to work with a smaller sample of data while preparing and testing additional operations that need to be applied to the data.

Options
Example
The Random sample operation can be useful when you are working with very large data-sets. You can use the Random sample operation to generate a small sample of the data.This is useful because some operations can take a long time to execute on large data-sets. By working with a smaller data-set you can create, configure and test additional operations that you want to apply to the data much more quickly.
In this example we are working with a fairly large data-set containing approximately 1,000,000 records. We want to use a combination of the Random sample operation and the Input switch operation to switch the data between a small sample of 1,000 records and the full data-set without having to reconnect our workflow. A configuration that allows us to do this is shown below.

More on Operations [21]
The Input switch operation allows you to switch between two input data-sets.

The Input switch operation contains only a single option: the switch. Clicking on the switch allows you to select the data-set you want to use.
An example of using the Input switch operation can be found in the Random sample [22] operation documentation.

The De-duplicate operation allows you to remove or retain the duplicate records in a data-set.
The aggregate options allows you to define an aggregated transformation of the input data and to define the aggregation functiona applied accross the values in each field.


The Searh/replace operation allows you to replace all occurrences of one value inside one or more fields with another.

Each Search/replace operation allows you to define one or more search actions. The actions appear as a list and are executed on the data in the order they appear in the list. You can change the order of the search actions by clicking and dragging the hand icon. You can change the name of the search by double-clicking on the name.

Search options
You can view and edit individual search options by clicking on the name of the search action or by clicking on the expand button.
The Scramble operation allows you to scamble the text in one or more fields. This allows sensitive data to be removed without affecting the structure of your file.

The Expand values operation allows you to expand the values inside a single field into one or more new fields.

![]()
![]()
The Collapse values operation allows you to combine all of the values in one or more fields into a single new field.

The Sort operation allows you to sort your data by one or more fields.

The Text mine operation is used to extract and derive useful information from text in your data. The text mine operation currently provides three different mining algorithms; Top words, Word count and Sentiment.

Select which text fields you want to mine.
The Top Words algorithm extracts the most popular words from the selected fields. The popularity of a word is determined by the number of occurrences in a text cell. Short words such as "the", "and" and "or" are ignored.
The Word count algorithm counts the number of words and the number of unique words in a text cell.
The Sentiment algorithm attempts to determine the sentiment of the text. Sentiment is determined by counting the number of positive and negative words and calculating an overall score. A positive score indicates a positive sentiment whilst a negative score indicates a negative sentiment. The higher the score, the higher the sentiment.
The Google translate operation allows you to translate the text in one or more fields of a data-set from one language to another. It uses the Google translate service to perform the translation. You must have access to the internet to use this operation.
![]()
The File exporter allows you to publish data to a file on your computer or network.

The File selection section allows you to select the file you want to publish to.

The following options are available when you have selected an Omniscope file type (.IOK, .IOM).

The following options are available when you have selected a Text based file type (.CSV, .TSV)

The following options are available when you have selected a Microsoft Excel file type (.XLS, .XLSX).
![]()
The URL output block allows you to publish a data file to a remote address.


The DataPlayer publisher allows you to export your data as a DataPlayer2 Flash file.


Link content output
The Publish on "visokio.com" output allows you to publish your data to a server hosted by Visokio. This makes it easy to add a link to your data in a web page or to share the data with other users.
The Page options tab contains options for configuring the page that will host your data.
The File options tab contains options for configuring the file hosted on the page.
The Batch output allows you to publish your data to multiple locations as determined by a publish configuration in a batch control file.
The Command file selection allows you to specify the location of the batch command file. Click on the Generate command file to generate an empty command file or click the "Browse..." button to select an existing command file.
The Email connection details section allows you to specify the SMTP settings for publishing email data. You should only select this option if you have specified at least one email output in the batch command file.
The batch control file is an Omniscope IOK file that specifies how and where the data should be published. Each row in the control file contains the instructions for publishing data to one location. A single control file can be used to publish to any number of locations.
The structure of the control file is outlined below.
Column Name | Usage instructions | Description | Valid values |
| Output type | Required | The type of output you want to publish. | "File" to publish as a data file. "Email" to publish as an email message. "DataPlayer" to publish as a DataPlayer file. |
| File directory | "File" output type only. | The directory you want to publish the output file to. | |
| File name | Required | The name of the file you want to generate. Enter both the name and the extension. You can specify the type of file you would like to generate by changing the extension. | |
| Filename timestamp | If specified, output files will have a timestamp in the filename. The value should be a date/time pattern such as yyyy-MM-dd-HH-mm-ss. See Help with Date formats [23] for more information. Leave blank for no timestamp. | yyyy-MM-dd HH-mm-ss-SSS | |
| Email to | "Email" output type only. | List of "To" email addresses. Separate each address with the "," character. | |
| Email cc | "Email" output type only. | List of "Cc" email addresses. Separate each address with the "," character. | |
| Email bcc | "Email" output type only. | List of "Bcc" email addresses. Separate each address with the "," character. | |
| Email subject | "Email" output type only. | The email subject text. | |
| Email message. | "Email" output type only. | The email message text. | |
| Template file. | "IOK" files or DataPlayer output type. | The full path to the template file to be used when publishing the data. | |
| Preserve template formatting and formulas | Only used if Template file set. | Determines whether formulas that exist in the template file will be retained in the published data. If selected you must ensure that the published data as a field of the same name and type. If unselected, all fields in the template file will be replaced entirely. | "true" or "false". Default is "false". |
| Password | IOK files only. | The password to set on the published file. | |
| Column inclusions | A list of columns you want to include in the published data. Separate each column name with the "," character. Leave blank to include all columns. Use either Column inclusions or Column exclusions, but not both. | ||
| Column exclusions | A list of columns you want to exclude. Separate each column name with the "," character. Leave blank to include all columns. Use either Column inclusions or Column exclusions, but not both. | ||
| Filter condition | Determines the logic for applying the filter rules. | "Accept" or "Reject" to accept or reject all records matching your filter rules. Default is "Accept". | |
| Filter match | Determines the logic for applying the filter rules. | "All" to match on all filter rules, "Any" to match on any filter rule. Default is "All". | |
| Filter rules. | A list of filter rules you want to apply to the data. Used in combination with the Filter condition and Filter match. Separate each rule using the "," character. | Rules should be constructed as follows: [COLUMN_NAME]OPERATOR[VALUE] Some example rules are listed below: [SEX]=[FEMALE] [NAME]CONTAINS[CHRIS] [AGE]>[35] Valid operators for text columns are: has no value, has any value, =, does not equal, contains, does not contain, starts with, ends with. Valid operators for numeric and date columns are: has no value, has any value, =, does not equal, >, >=, =, contains, starts with, ends with. |
Links:
[1] http://www.mysite.com/example.iok
[2] http://bloggingabout.net/blogs/mglaser/archive/2008/08/15/configuring-http-access-to-sql-server-2008-analysis-services-on-microsoft-windows-server-2008.aspx
[3] http://www.salesforce.com/
[4] http://www.force.com/
[5] http://sites.force.com/appexchange/apex/listingDetail?listingId=a0N300000016cdWEAQ
[6] http://www.salesforce.com/appexchange
[7] http://kb.visokio.com/installed-salesforce-tab
[8] http://kb.visokio.com/salesforce-direct-connection
[9] http://kb.visokio.com/salesforce
[10] http://www.google.com/analytics/
[11] http://www.atlassolutions.com/
[12] http://www.google.com/doubleclick/
[13] http://www.brandwatch.com/
[14] http://www.bloomberg.com
[15] https://software.bloomberg.com/bb/service
[16] http://kb.visokio.com/bloomberg-advanced
[17] http://kb.visokio.com/contact
[18] http://kb.visokio.com/files/Resources/OUGuide/134_Connectors/01_Bloomberg133/BloombergDDEFields.iok
[19] http://kb.visokio.com/bloomberg-help
[20] http://kb.visokio.com/files/Resources/OUGuide/134_Connectors/01_Bloomberg133/AutoSaveTemplate.xls
[21] http://kb.visokio.com/data-operations
[22] http://kb.visokio.com/node/661
[23] http://kb.visokio.com/dates-and-times