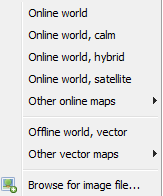
All options to import data present in Toolbar menu are the same options present in DataManager. Click Here [1] for more details. One Option has been Added: Open map This option allow the suer to Add Online Map: For more details of how to use Online world click Here [2]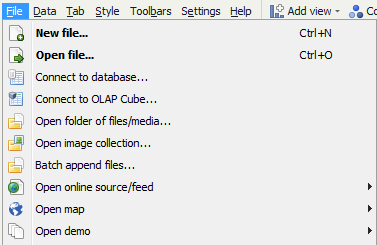
You can create a new Omniscope file 'from scratch' by entering data into the Table View, much as you would with a spreadsheet.
Populating data (brief guide) , Links to Editing topic,
Omniscope types uniformly empty (null) fields as 'Text'
Converting fields => Configuring data sub-topic
Omniscope can open most common delimited data files and tagged XML files suitably transformed. Clicking on File > Open file brings up the Open file dialog, which looks similar to a Windows file browse dialog:
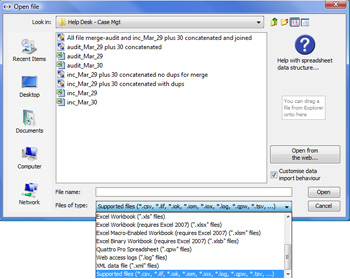 | File > Open dialog: Most source data files in Excel XLS, CSV, TSV and other common delimited text data file formats will open directly in Omniscope. The Help icon in the upper right displays a format guide [3] for importing spreadsheet files. Always confirm that your spreadsheets conform to this simple layout before trying to open them in Omniscope. If you have problems, such as all the values appearing in one column, you may need to change the delimiter or rename a tab-delimited file extension from TXT to TSV. If only some of the data fields (columns) have not separated cleanly, you can use the Expand or Collapse Values functions in the Table View Tools [4] menu to separate data into more columns or combine data from multiple columns into fewer columns. If you encounter problems importing data from one or more files, see also the KnowledgeBase section on importing and exporting data to and from supported data files. [5] Note: Importing XML files requires that the file be transformed to a single tabular structure in our schema (see below). |
 | Opening remote data files over the web -
|
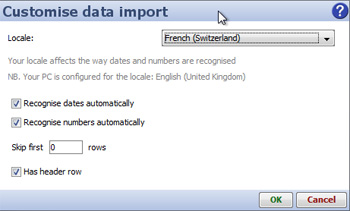 | Adapting to regional and non-standard data formatting - If you are repeatedly using/importing other peoples' spreadsheets, you can depart from the recommended standard spreadsheet layout somewhat by ticking the Customise data import behaviour option and providing Omniscope with additional information about the layout of the data you are importing. For example, sometimes you may have a CSV, TSV or Excel XLS file which does not have the column headers on the first row. Without customisation, Omniscope will assume the first row contains headers, and include the actual column headers as the first row of data. To skip any number of redundant upper rows on file import, use the Skip first ?? rows box to enter the number of redundant (usually formatting) rows in your data file to be skipped before trying to read in the headers. |
Data File delimiters - the CSV file extension stands for "Comma Separated Values", which means the cells in each row of the data table are separated by the comma character. However, if you are in a region that also uses the comma for the decimal point (e.g. several European countries, such as France) some versions of Excel create CSV files that use a semicolon as the separator character. Sometimes these files are saved with a TXT rather than CSV extension, even though they are multi-column tables. Omniscope is unable to detect these situations automatically. If you open such a file in Omniscope, your data will very clearly be wrong, with most columns appearing as text with semicolons. To import this kind of file, use the Customise data import option dialog to change the Separator character to a semicolon " ; ". Pipe "|" delimited files can also be imported, but first you must re-save the file with a CSV extension, then use the option that appears to change the delimiter to "|".
Dates & Numbers - if you are running on Windows, when importing data that is in a delimited text format which includes Excel, CSV and TSV (tab-separated values), Omniscope will use your Windows Regional Settings to try to automatically recognise data. For example, for a PC with United States Regional Settings, Omniscope will recognise "5/13/2005" as a date and "1,500.5" as a number. For some international users, however, this may not work as expected and the result will be an import of all columns as type Text (shown either as multi-coloured Category columns or white Text columns in Omniscope). If this occurs, you can usually manually convert numbers and dates & times fields using the Data > Manage fields dialog. for more information on formatting dates & times, and dealing with time zone issues, see the section on Dates & Times.
If you know your data has been formatted for a different region, change the Locale drop-down accordingly. For example, if you live in Germany but have received a CSV from an American customer, you should choose 'English (US)'. If you find Omniscope gets things wrong and your data is incorrectly recognised, you can disable auto-detection of dates and numbers by deselecting the two Recognise...checkboxes. All fields will open as Category or Text data and their text values will be preserved. See the KnowledgeBase section for more on information on dealing with International data issues. [6]
Importing XML files which have already been transformed to Visokio XML Schema [7] is the same as opening a CSV.
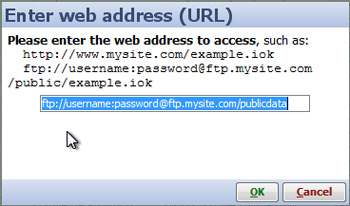
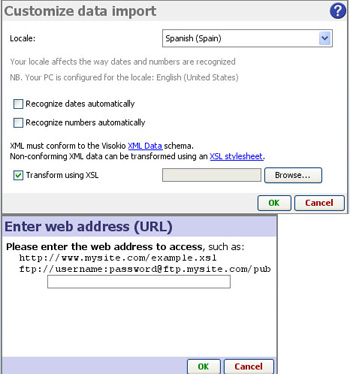 | Transforming XML into Omniscope Schema - If your XML file conforms to another schema, then you must prepare an XSL Transform [8]file, tick Customise data import and specify that file to transform the non-Visokio XML file to Visokio XML schema for import. Your XSL Transform stylesheet can be accessed from any location, including the web, using the Enter web address (URL) option to specify the online location of the XSL file.
Note: if your XML data set is not already in a tabular structure, you must array it into a tabular structure using your XSL file.
|
Omniscope DataManager workspace currently supports direct connections to Microsoft Analysis Services and some other MDX-compatible mutli-dimensional cube structures from other vendors.
MS SQL Server Analysis Services (SSAS) example [9]
Recent versions of Microsoft SQL Server 2008 includes Reporting Services (SSRS) and Analysis Services (SSAS).
Same as file metadata
Omniscope can treat any folder (and related subfolders) containing files as a data source using the File > Open folder of files/media connector. Omniscope asks for a starting folder, and will scan all files within the folder, representing each file as a record within the resulting data set. When Omniscope opens, you will see fields and corresponding filters realting to all the attributes of the files in the folder(s) - filenames, extensions, category, size, date, etc.
All supported media files will have not only their filenames but also their tags imported as additional columns. For example, the ID3 tags of an MP3 file, such as Artist, Album and Track Number will be imported, as will the meta data in a JPG photo file, including camera model, date taken, and geo-location (if available in the file). Tag fields will be available as Sidebar filters where commonly useful.
After import, Omniscope will show default Pie and Tile Views illustrating the types of files you have (such as audio and image), and a Table View showing the data, including colour-coded table headers for tags. The Tile View will also display the images for any image files.
Include subfolders - by default, this is ticked, meaning all subfolders and sub-subfolders (etc.) of the selected scan folder will also be processed. If unticked, only files directly in the selected folder will be processed.
Include files without extensions - by default, files that do not have a dotted extension such as ".txt" or ".jpg" are excluded. If ticked, files without any extension will be included. On Windows machines, most files already have extensions.
Customise which file types are included - by default all files are included. Tick this option to provide a comma-separated list of extensions to permit such as "jpg,mp3". All other files will be skipped.
Tags in filenames - you can also choose to include "Tags in filenames" from in the file chooser when browsing for a folder. This will prompt you to define the "Filename structure", which is the format of the filename as a series of delimited values, typically using a hyphen to separate them. Omniscope will then read each filename tag as an additional column. For example, you might standardise on naming your photo files according to the convention "1983-Paris-Jim's wedding", in which case you would use the format "YEAR-LOCATION-DESCRIPTION" and Omniscope would then create 3 editable fields accordingly.
You can edit the tag columns (shown in the Table View using colour-coded headers) like any other values in cells. Then, use File > Export > Apply tags to files to save your changes back to the individual files where they are stored. All filename tags will be applied (which will physically rename your files), but only supported media tags such as MP3 Artist will be applied. A comprehensive list of supported media tags for reading and writing is shown in each table column header's tooltip displayed by hovering your mouse over the column header.
Warning: The following text/screenshots apply to earlier versions of Omniscope and may be slightly out of date.
Opening a folder of files is similar to opening a folder of images. For example, Omniscope can be used to explore folders of files on part or even all of your PC or connected servers' hard disks. You can also use Omniscope to manage media file libraries (Audio, Video and related Images) including powerful options to modify and harmonise Tags as well as file naming conventions.
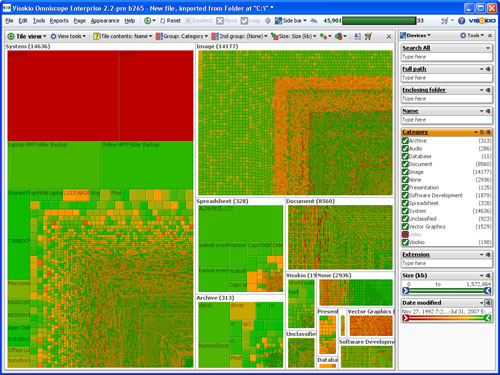
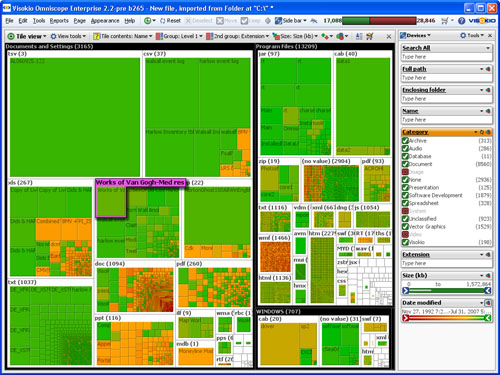
Choose File > Open folder of files/media. Browse to the top-level folder you want to explore (for example your entire C:/ root) and click Select. After a few moments, depending on the number of files scanned, you will see a Pie View on the left, a Tile View on the right and the right-hand Sidebar with filter/query devices showing both file attributes like Extension, Category and Size, as well as Tag: values. The Pie View is initally set to show the distribution of files by Category, whereas the Tile View represents each file as a tile, initially grouped by types of files (System files, Video files, Music files, etc.) and sized according to the size of the file. On opening, colour is used to show the date of each file. A green tile represents a recently modified file; red represents older files.
This view allows you to see at a glance where the space on your hard disk is allocated (by the size of the tiles), what sort of files they are (by the grouping) and how old the files are (by the colour).
The smallest tiles/files might not be clearly visible if they are much smaller than the biggest files. Use the Side Bar query devices on the right to filter and search for relatively smaller files. For example, on a Windows machine, certain very large system files have very old dates. Filter them out by excluding System files in the Side Bar. You may want to do the same for Video files. Now set the 2nd Group option to Enclosing Folder, enabling you to see the exact locations of your larger, older (non-system) files:
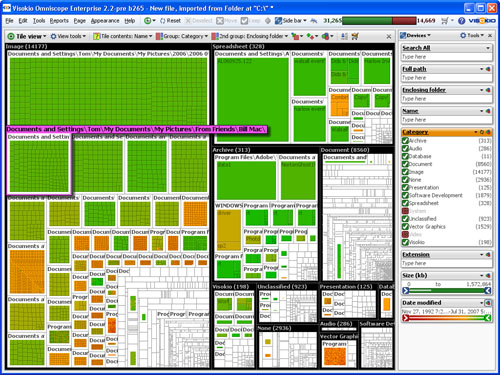
You can change the primary grouping (using the Group drop-down in the Tile view) to show Level 1, which groups the files according to the first level of folders in your directory structure. You can also change the 2nd Group option to Extension to gain an overview of your files by file type. After you have analysed your Images, for example, exclude them using the Side Bar filter to focus on other types of files which tend to be smaller. Instantly you will see the relative size of each top-level folder, excluding System, Video and Images.
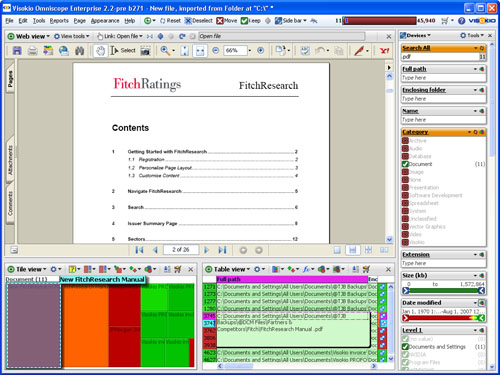
By filtering out all files that are not documents, you can use Omniscope as a document browser. For example, the Web View can display any Acrobat .PDF document. Saving this configuration as a Report Page with the filter set to Documents only permits any recipient of the file to browse the documents in a defined location (any network-accessible file server, not just their local machine as in this example).
This allows you to use Omniscope to explore and manage your photo collection. Using File > Open image collection, Omniscope will ask you for a starting folder, and will scan all images within the folder, representing each as a record within the resulting data file.
You will see a Tile view showing your images in a grid, a Table view showing the data, and a series of filters. The data and filters will include information about each file, including image tags such as width, height and GPS location (lat/lon, if available).
Opening image collections is very similar to opening folders of files. See Open Folder of Files [10] for more information about advanced options, tagged files and renaming / applying edited tags to files. The only differences between the two are:
Additional advanced options
Assume files without extensions are images: By default, only files with a supported image extension (such as ".jpg") are included. If this is ticked, Omniscope will also assume files without an extension are images also. Used for specific image servers which don't provide filename extensions. All image files on Windows usually have an extension.
Warning: The following text applies to earlier versions of Omniscope and is out of date.
Omniscope can be used as a photo browser, allowing you to explore and manage large folders of images, and to send selected, annotated collections to others in compact, searchable .IOK files with supplementary information on the photos, their locations etc.
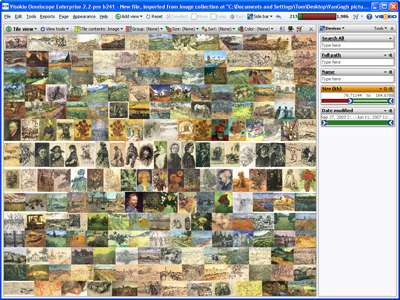
File > Open Image Collection opens a new Omniscope file in folder browser mode that allows you to point at any folder (with or without sub-folders) containing image files in .JPG, .GIF. .BMP, or .PNG format. Browse to the folder, select it and click Select.

Wait a few moments for Omniscope to import the pictures. The Tile View and left Side Bar will appear, with the images scaled down to display in the Tile View. The Side Bar filter/query devices allow you to Search All for a keyword, to filter the size of the files (and hence the quality/size of the picture), and to filter the date of the pictures. The Tile View initially shows all the pictures found in the folder chosen. As you filter, some pictures will disappear, and the remaining pictures will get bigger.
At this point, you might want to save a new .IOK file linked to this image folder. This will capture any settings you configure to the file. You do not have to embed the pictures in the file at this time. In future, you can use File > import into current file > Refresh from source to update the file to include any new photos added to the folder.
You can Select and Move pictures you want to exclude from further consideration, thereby enlarging the remaining pictures. When you see a picture you would like to add to a collection file (such as your 'holiday highlights'), click the picture to get the Details pop-window showing a larger view, then click Add to basket to save that picture in the BASKET universe. Carry on filtering and exploring your photos, adding more pictures selected for the collection file to the Basket.
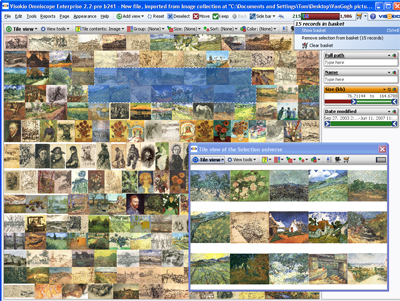
When you've finished selecting photos for the collection file, view the Basket by clicking the ![]() Basket button to the right of the Barometer on the Main Toolbar. A Table View of the BASKET universe will appear. Click Table View to display the View Chooser, and select a Tile View of the BASKET universe. For more detail, see Data Universes [11]
Basket button to the right of the Barometer on the Main Toolbar. A Table View of the BASKET universe will appear. Click Table View to display the View Chooser, and select a Tile View of the BASKET universe. For more detail, see Data Universes [11]
If you're happy with your BASKET of images, you might want to view a Slide show. See Viewing Details [12].
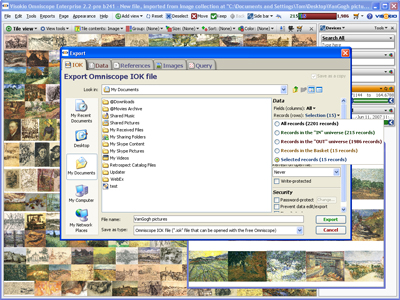
When you've finished reviewing the images you wish to save as a collection, choose File > Save as IOK/IOM. In the Save as dialog that appears, you will see a number of configuration options on the right-hand side.

Click Records (rows) and choose Records in the Basket (XXX records). This will create a new file with only the images you added to the Basket. When you make this change, the dialog will transform from a Save as dialog to an Export the images [13]dialog with the Images tab pre-selected.
Under Embed images, click Image sets and tick Image. This means the image set called 'Image' will be embedded inside the IOK file. In other words, the IOK file will be like a ZIP or archive, containing images. If your images are quite large, you may want to down-size them when embedding in the IOK file. If so, tick Reduce image sizes. A dialog for down-sizing the images will appear after you click Export. In Linked data source, un-tick Keep link to remove the reference to the original folder of images on your PC. Enter the name you want to save the file as, say 'My holiday snaps', and click Export.
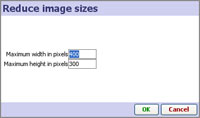
If you chose to reduce image sizes, enter the maximum dimensions you want for any image (in pixels), and all images exceeding these dimensions will be down-sized, preserving their aspect ratio, until they fit within these dimensions. You may have to wait a while down-sizing the images, but once done, you should have a simple and small (depending on the size and number of images) Omniscope file for sending to friends.
If you send an .IOK file, they only need the Omniscope free Viewer to open and view it, even export their own selected images if you have not locked the file.
Visokio supply zooming vector maps you can include in your files. Vector maps work offline, and zoom to show detail, although not down to city street level. If you send the file to someone who does not have the vector map already installed, it will be downloaded when they open the file, even if they are using a free Viewer or Omniscope Online [14], the 'zero-footprint' Java Web Start deployment of the Viewer.
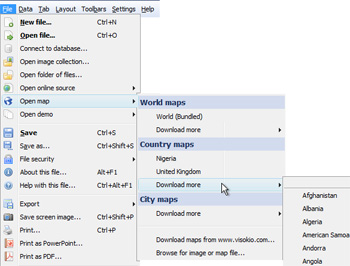 | World maps: these maps cover the whole world World (bundled) - every Omniscope contains a vector world map, but additional world maps can be added to any installation or file via download. Country maps: we offer a complete library of geo-coded country maps. Maps already installed will be listed, with more available for download. City Maps: we are in the process of adding geo-coded city maps to our library. Contact [15] us for the city you need. Alternatively, you can use static image screenshots from street-level mapping services like Google Maps (see below). Download maps - takes you to the Maps Library Browse for image or map file - any image can be used as a mapping background, and coordinates consistent with your data can be added to the image. The imported image file becomes embedded in the Omniscope file/DataPlayer and travels with the file. |
For more information on adding coordinate systems to imported images and screenshots, i.e. street level screenshots from Google Maps, etc. please see the KnowledgeBase sections on Using Maps [16] and Projection Transformation [17]
{in progress}
Links:
[1] http://kb.visokio.com/importing-data
[2] http://kb.visokio.com/file-open-map
[3] http://kb.visokio.com/files/222_annotated_spreadsheet.png
[4] http://kb.visokio.com/table-view
[5] http://kb.visokio.com/kb/data-file-formats
[6] http://kb.visokio.com/international-issues
[7] http://kb.visokio.com/xmldata
[8] http://www.w3schools.com/xsl/
[9] http://kb.visokio.com/ms-ssas-cube-example
[10] http://kb.visokio.com/open-folder
[11] http://kb.visokio.com/node/235
[12] http://kb.visokio.com/node/224
[13] http://kb.visokio.com/node/302
[14] http://kb.visokio.com/using-omniscope-online
[15] http://kb.visokio.com/contact
[16] http://kb.visokio.com/kb/using-maps
[17] http://kb.visokio.com/kb/projection-transformation