{update to 2.5 in progress}
Omniscope is not only for managing data, it is also for sharing data with others in a form that they can understand it fastest and make the best use of it.
There are three ways of adding your own text to your presentation:
 | To add a Title and Annotation to the Tab, the user can select the option “Style” from the main toolbar and then select “Title” or Annotation Option. To see how to edit Titles & Annotations visite T [1]ab-titles-annotations [1] . |
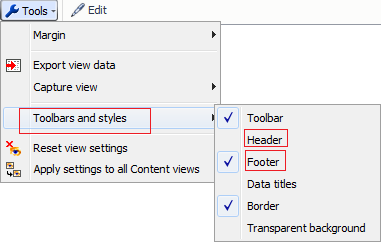
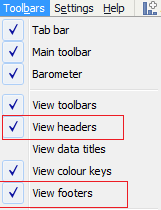
Displaying View Header & Footers
| The user can Add and Display a header & Footer, by selecting the option Tools>Toolbars styles>Header or Footer.
Those options are also available from the main menu under Toolbars. |
Footers are edited and styled using the Text Editor Menu bar [2]
Any number of Content Views can be added to each tab and sized the compliment the data-driven views. The Content View enables you to enter free text, incorporating dynamic formulae and links, images and other content to help make your report tabs come alive.
Free text entered in the Content View is edited and styled using the Text Editor Menu bar [2]
More on using the Content View [3]
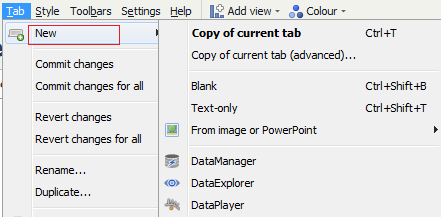
You can import PowerPoint slides and create new Text Tabs from Tab > New.
Images and PowerPoint slides arre not editable in Omniscope and are imported as is.
Free text entered directly int a Text Tab is edited and styled using the Text Editor Menu bar [2]
-----------------------------------------------------
Edit Annotation [4]
Formula [6]
Aggregate [7]
Subset: Filtered data [8]Aggregate [7]
Subset: Filtered data [8]
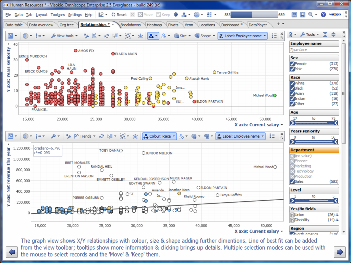
Like presentation packages, ach tab of an Omniscope file can be written as a presentation slidde, with top titles and bottom annotations.
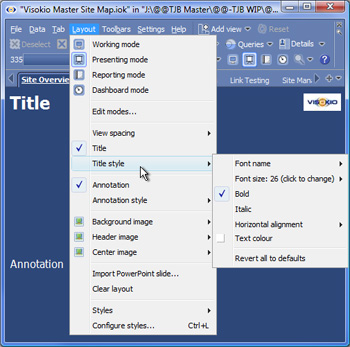
Create a Title
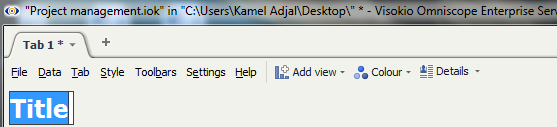 | To create a Title to the Tab, select “Style” from the main toolbar and then select “Title” A temporary name“Title” will automatically appear highlighted at the top of the screen. Type in the title you would like to give to your project and hit Enter. |
Back to the Top [9]
 | Omniscope gives the user the option to change : Style,colour, size and alignment of the font.. All these options are available under Title style Back to the Top [9] |
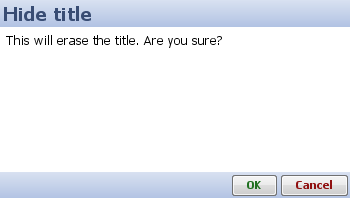 | The user can delete the title at any time. Select Style in the main toolbar and unselect the option “Title”. A pop up will appear with a warning message:
This will erase the title. Are you sure? - Press Ok to erase the title from your project.
-Press Cancel to keep the title in your project. Back to the Top [9] |
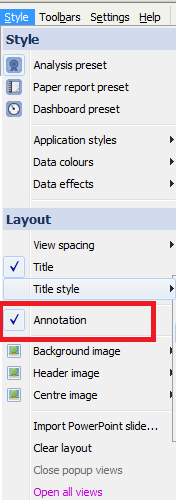 | Select “Style” from the main toolbar and select the Annotation option. A temporary name “Annotation” will automatically appear highlighted at the bottom of the screen. Type in the annotation notes you would like to add to your project and hit Enter. Back to the Top [9] |
To see how to edit /change the font/ insert image .... to the Edit box please click on this link: Text Editor [10].
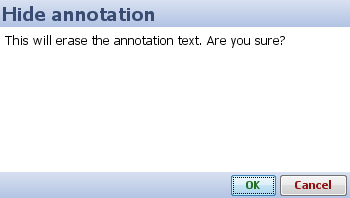 | This will erase the Annotation.Are you sure? - Press Ok to erase the title from your project. - Press Cancel to keep the title in your project. Back to the Top [9] |
Throughout Omniscope, wherever you have the option to add your own free-form text to the disply, the Text Editor Menu bar will display.
Click on Edit to edit the annotation.
![]()
Edit HTML Source

Remove formatting
Annotation allows the user to remove text formatting by selecting the text edited, and clicking ![]() button
button
This will turn the text back to the default setting.
The user is able to change the font of the text from Bold to Italic by using the button ![]() or
or ![]() .
.
Omniscope also allows the user to use key short cuts to turn the text to Bold (CRTL+B) or italic(CRTL+I).
The user can underline text by highlighting the text and selecting the button![]() or pressing (CRTL+U)
or pressing (CRTL+U)
The user can Strike through a text by highlighting the desired text selecting the button![]() or pressing (CRTL+G)
or pressing (CRTL+G)
The user can change the Font of the text by highlighting the desired text and clicking on ![]() .
.
The user can change the Font of the text by highlighting the desired text and clicking on ![]() .
.
The user can change the Text colour by highlighting the desired text and clicking on ![]()
The user can also highlight text by selecting the text and clicking on ![]() .
.
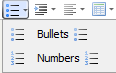
The user can insert bullets and numbers when selecting this button ![]() .
.
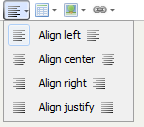
These options are available by clicking this Button ![]() .
.
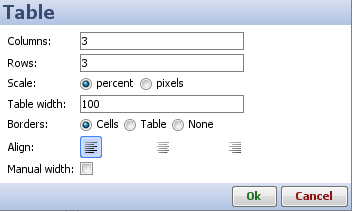
A pop up appears asking to configure the table: number of row/column/Scale/table width/ Borders
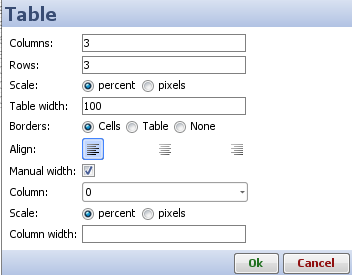
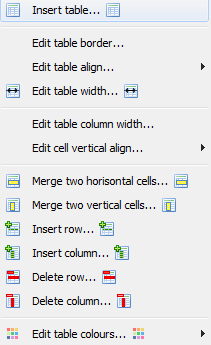
After a table has been created, the user can still modify its properties by selecting the table and pressing ![]() again, Options are:
again, Options are:
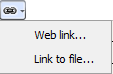
The user can enter an address (URL) to show a web based image:
All those options are available from Insert Image’s button

The user can link any web page or file into the annotation window
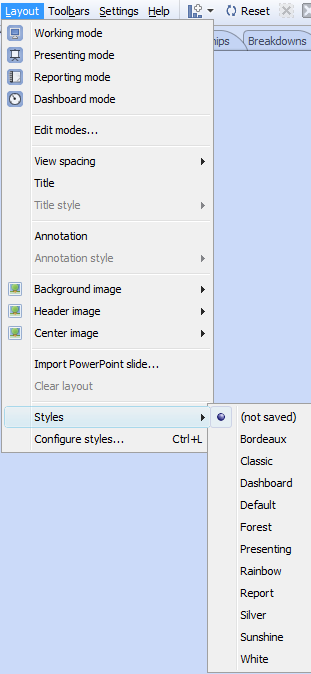
The Main Toolbar: Layout [11] menu groups most of the commands used to manage the elements of a tab outside of the views to be displayed on that tab.
 | Edit modes [12] - you can modify the default settings for layout modes and add you own to a given file.
|
 |
 |
 |
Import PowerPoint slide - you can import an existing PowerPoint slide into a tab
Clear layout - removes all the display elements outside of the views displayed on the current tab
Styles - combinations of settings that can be applied to a specific file, and also shared with other users. You can use standard pre-configured Styles, or create a custom organisational Style to apply to all Omniscope file created by a given organisation. For more information, see Styles & Configure styles [13]and also the KnowledgeBase section on sharing custom styles [14].
You can modify default Layout modes, and add your own Layout mode options to any given file. Layout modes can be applied to any or all the tabs in the file. You can show or hide Layout mode option icons on toolbars, and assign icons for exposing the options on the Main Toolbar. The Main Toolbar: Layout > Edit Modes... dialog is used to customise Layout modes:
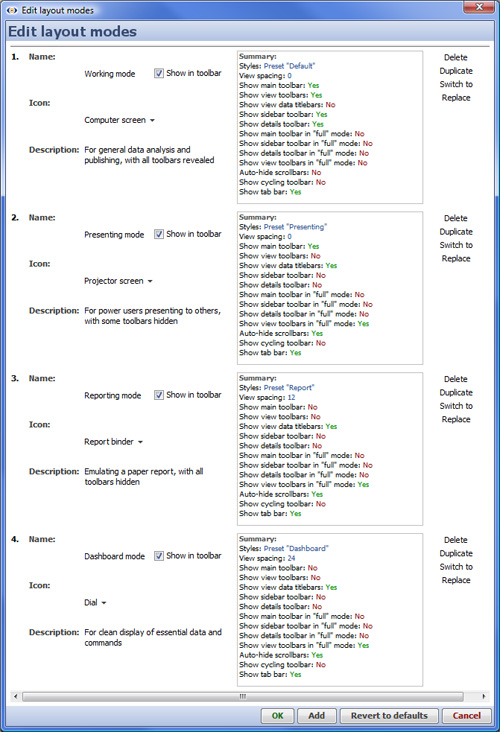 | Delete - deletes the corresponding Layout mode option from the current file. Duplicate - creates a new mode option below with the same settings as the existing Layout mode being duplicated. Active or Switch to - Active indicates which Layout mode settings are currently being displayed. If no options are showing Active, click Switch to next to the mode settings pane you wish to display, setting it to Active, then click OK. Replace - copies the currently active mode settings into the corresponding mode options pane [OK] - applies the selected settings and displays the Active Layout Mode [Add] - adds a new mode options settings pane at the bottom of the list [Revert to defaults] - returns all settings to their default values and deletes any additional Layout mode options you may have create [Cancel] - closed the dialog without saving any changes. |
Layout modes are not exportable for use in new files configured by others, and do not include the settings available when configuring Styles [13]. If you want to use a customised Layout mode option in a new file, delete the data from an existing file and change its source, thereby preserving the custom Layout. Options which can be changed to customise or define new layout modes are described below:
Styles -
View spacing -
Show main toolbar -
Show view toolbars -
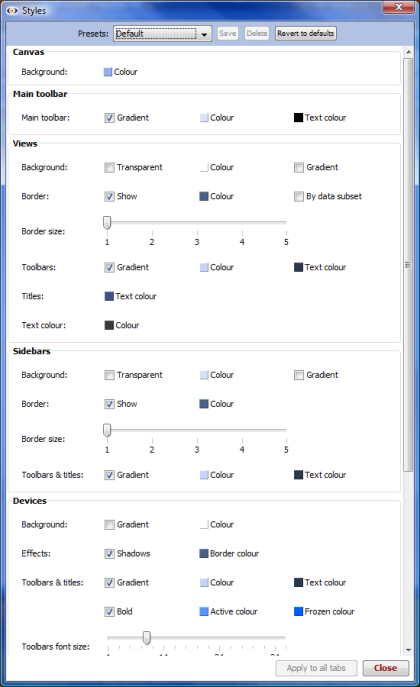
Omniscope enables anyone to create a corporate Style corresponding to your corporate colours and presentation standards, using a combination of official logos, font settings, colours and effects defined using the Layout > Configure styles dialog. Change the settings and observe the result interactively. Once you are satisfied with all the settings, name and save your custom Style preset and it will be added to your Layout > Styles menu. You can also copy this customised style preset to others in your organisation, so that the official corporate style becomes available in the same menu to everyone configuring files (see below).
Default style |
Presenting style | |
Reporting style |
Dashboard style |
Each of the default Layout modes also has a default style is optimised for the different uses:
Working mode: for general data analysis and file configuration, with all toolbars revealed.
Presenting mode: for power users presenting to others interactively, with some toolbars hidden.
Reporting mode: for routine reports and printing a static copies, with all toolbars hidden.
Dashboard style: use this for clean, remote displays with frequently refreshing data.
You can edit the default layout modes [12]on a file-by-file basis, but you cannot share these settings with others configuring new files as you can using custom Styles.
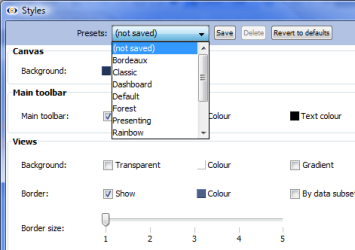
Styles are combinations of display settings you can change using the Layout > Configure styles dialog. These settings control most of the visible aspects of each file, outside of the controls available within individual views. A pre-defined Style called 'Default' is used for every file unless you make a change. A menu of alternative pre-defined styles is available under Layout > Styles. You can apply different 'looks' by changing the style applied to the open file.
 |  |
If you change any settings relative to the current style preset, the Preset selection drop down will show that the new altered preset is not saved. Click Save to give a name to the newly-modified style preset and save it to your installation, from which it will be available for future use, and transferable in the form of an .XML file you can copy across machines.
 | The settings corresponding to the new style preset are saved in a local .XML file named {YourPresetName}.XML. Anyone who creates a new file from an existing file can use the same style preset, which is part of the file. However, anyone creating a new file will not have access to the custom corporate style unless it is first copied to their machine [14].
|
Relates to version 2.4 only; from version 2.5 Report pages are referred to as Tabs.
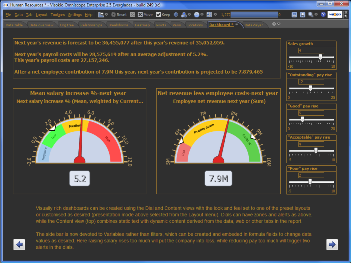
Any combination of views, settings, filters, titles and annotations can be saved as a persistent Report Pages that display on tabs across the top of the Main Toolbar. Tab names can also be displayed as buttons from the Sidebar Reports panel. Any number of different Report tabs can be configured, with individual or groups of Report Page tabs (sections) addressing the needs of different audiences among the users of your files.
If you close and save an Omniscope file displaying a configured Report Page tab, this file will open next time displaying the same tab. Users of the file need simply page through the interactive Report Page tabs just as they would a presentation slide show. If displayed, page through their Report page tabs using the forward and back screen arrows in the lower left corner hover Reports Navigator (emulating PowerPoint) or use the right and left keyboard arrow keys (e.g. for live presentations).
Below is a high-level introduction to Report Page tabs; how they are created, modified and navigated. More detailed documentation of the commands related to creating and managing Report Page tabs is available under the Main Toolbar Reports [15] and Page [16] menu commands.
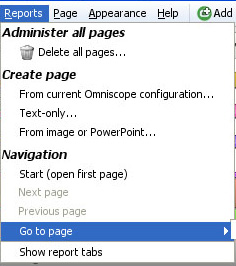
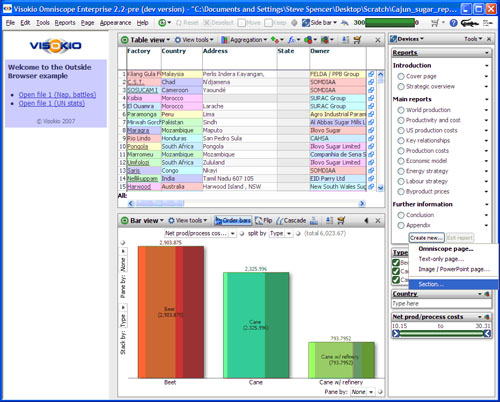
To create a Reports pages, click on Reports on the Main Toolbar and choose one of the three options available under the Create Page heading:
| If you are currently displaying a combination of views, queries, variable settings, etc. that you would like to make persistent, choose From current Omniscope configuration. You will enter Reports Mode and all your current settings will be copied to create a new Report page tab. In Reports Mode, any further changes you make will apply only to the open Report Page, and all subsequent changes must be Committed to become persistent (see below).
|
If you choose to create the new page from the current Omniscope configuration, the Create New Page wizard will display like this:
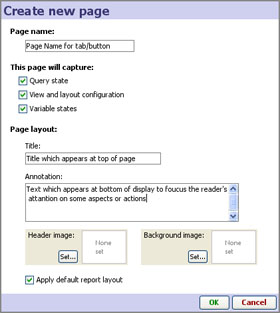 | Page name: this name appears on a report tab at the top of the display, or a button on the Sidebar Reports Panel if you provide access to Report pages there. Title: the title text that will appear at the top of the page...you can edit this at any time Apply default report layout: If you leave this box ticked, Omniscope will hide the View Toolbars and increase the margins around the views for a cleaner display. If you wish to preserve the existing settings, untick this box. |
Once configured and named, each pre-defined, persistent Report page appears anytime the user clicks on the top report tab, or the button next to the Report page name in the Sidebar Reports Panel, or uses the Reports Navigator menu, which appears faintly in the bottom left corner of the display in Reports Mode (see Using the Reports Navigator below).
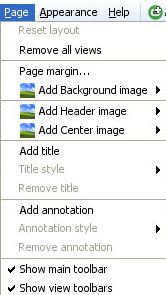
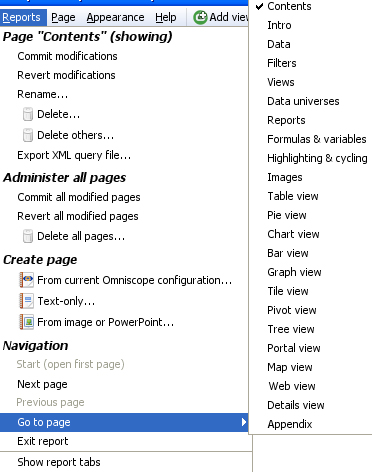
The Main Toolbar Page menu commands provide many options useful for creating self-explanatory Report Pages. The commands on this menu can be used to configure many aspects of the current display, whether that display will eventually be converted to a persistent Report Page or not. If you make changes to the current view using Page menu commands, then close and save the file, it will next open with those changes preserved in the current display.
| Page > menu commands can be used to: You can also tick/untick the options to display or hide the Main Toolbar and the View Toolbars on open views of the page. Toolbars are usually hidden if Report Page users are not expected to access the options available on them. Even when hidden, the Main Toolbar comes back into view whenever the user hovers the mouse near the top of the display. |
Page > menu commands apply to each Report page individually, and any changes must be Committed to become a persistent change, or Reverted to return the Report page to its default configuration/layout. For options covering aspects of the look and feel of Report pages that apply to more then one page, see the introduction to the Appearance [17] command menu.
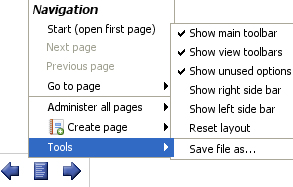
The Reports Navigator menu appears in the lower left-hand corner of the display whenever Omniscope is in Reports Mode, meaning displaying a persistent Report Page. The Reports Navigator is faint until you mouse over it, at which point it appears clearly, with forward and back arrows pointing to either side of a reports document icon. Clicking on the forward or back arrows cycles through all the Report Pages already configured in the file. The same list as can be seen in the Side Bar Reports (or some other name if you have renamed the Reports heading) panel and under the Main Toolbar Reports Navigation section.
Clicking on the Reports Navigator document icon at lower left reveals a menu listing a number of report navigation, creation, layout and reset options.
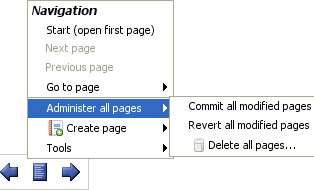 | Start; Next; Previous; Go to page...used to cycle through the Reports Pages already configured in the file. Administer all pages sub-menu: Commit all modified pages- makes all changes which you have made to your Report Pages persistent Revert all modified pages- returns all Reports Pages to their last persistent configuration Delete all pages- deletes all Report Pages currently configured |
If the Commit and Revert modifications commands are solid, rather than greyed-out, it means that you have modified the current Report Page and must now either overwrite the previous settings with the new ones (Commit) or return the report to its original look, leaving the original settings unchanged (Revert). If the name of the Report Page is showing in red on the top report tab, this also means that you should either Commit or Revert your changes. If you have chosen to show the Side Bar Reports panel, these buttons also show in the Side Bar under the current Report Page whenever changes have been made to the current page, and the report titles will show in red until changes are either Committed or Reverted.
| Tools sub-menu: Tick or un-tick to Show or Hide various toolbars. Note that these changes apply to the current Report Page only, and only if the modifications are Committed to make them persistent. |
Reset Layout - returns the layout of the current Report Page to the default, with all the optional Show/Hide settings set to Show
Save file as... opens the Export file wizard [18]with the tab set to .IOK/.IOM files.
Exit Report: - exits from Reports Mode and the Report Navigator menu disappears. Remember that it is usually better to Exit Reports Mode if not modifying existing Reports Pages. You can also Exit Reports Mode from the Main Toolbar Reports menu (see below) or from the Side Bar Reports Panel if you are displaying reports there.
Commands required to manage all configured Report pages are available from the Main Toolbar Reports menu. In addition to many of the same commands as are available on the Reports Navigator menu, the Main Toolbar Reports menu includes commands such as Commit and Revert all modified pages that operate on all Report Pages simultaneously. When the Reports menu is opened, the title of the current Report Page is shown at the top in bold italics.
For more detail, see the sections documenting the Main Toolbar Report [15]s and Page [16] command menus
This refers to the functionality allowing Report pages to be organised into named sections (or "groups"). To date, Report page organisation has been implemented only in the Sidebar Reports panel. To show the Reports panel, the right-hand Sidebar must be showing. However, the Sidebar Reports panel is not displayed by default.
Use the Sidebar button on the Main Toolbar to change this. Then, ensure the Reports Panel is ticked for display using the Devices drop-down on the Sidebar toolbar. When the Sidebar Reports Panel is displayed, the Report page tabs across the top of the display will disappear unless they have been explicitly shown. You can explicitly hide/show the Report Page tabs using Main Toolbar: Tab > Tab settings > Tab bar option. For more information, see the Appearance menu [19]commands.
The Sidebar Reports Panel must be expanded to show the Create new button at the bottom of the panel. Expand/collapse each device by clicking its title. Click Create new, choose Section and enter the section name when prompted. Drag the sections and Report Page titles around to achieve the desired structure.
To manage existing section titles, click the black triangle on the right to show a drop-down menu, allowing you to rename or delete each section grouping.
Applies to version 2.4 only
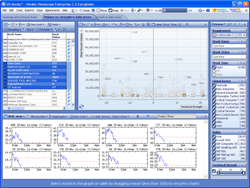
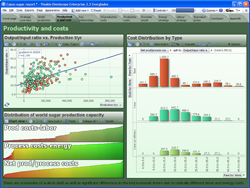
Omniscope enables you to deliver interactive, data-rich, visual presentations rather than dull, complex spreadsheets and/or static, non-interactive presentation slides. Omniscope also offers extensive options for branding your file, displaying advertising, focusing the end users' navigation options, and changing the layout, themes and colouring to match your organisation's standards for internal and external documents.
Commands/options relating to most of the elements of the display of pages/tabs in a given file are found under the Main Toolbar Appearance and Help menus. This page covers only two of the most commonly-used options; Branding and View restrictions. See Commands Reference 2-4 > Appearance [19]for a complete overview of commands on the Appearance sub-menu.
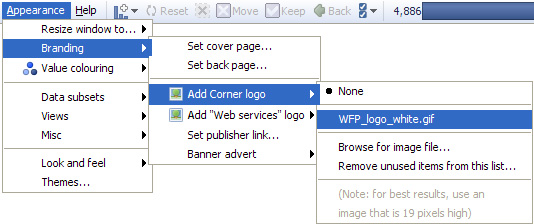
{Omniscope Professional & Enterprise only} The Branding sub-menu provides options to configure either of two informational pop-up screens presented on opening and closing a given file. It also provides the option to change the corner logo display from 'Visokio' to a logo of your own (with a link back to your own page), and to display banner advertising images and links in your downloadable Omniscope files.
There are two pop-up informational screens you can configure:
The Add Corner logo, Add Web Services menu logo, and Set publisher link options enable data publishers to further brand their files. The Banner advert sub-menu enables publishers to add advertising images and links to their files to fully integrate with the commercial aspects of their business. For more information, see Appearance Menu [19] and Advertising Options. [20]
Note: The Help page and banner advertising displays are currently the same for the working display and all the Report Pages in the file, rather than configurable for each Report Page. This may change in future versions. To edit the file specific Help Page, see Help > Create/Edit help page.
Clicking on the option to configure a Cover and Back informational screens launches a Set Page dialog that accepts your inputs from you. The dialogs used to create the Cover and Back informational pages are both similar to the one shown below:
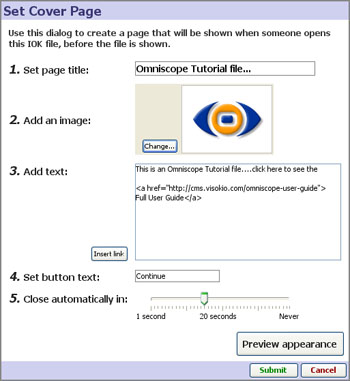
Note: Both information screens support some aspects of HTML text formatting, such as <b>, <i> etc. Currently, informational screens behave differently to the file-specific Help Page, which does not require hard returns and can be re-sized directly in preview mode.
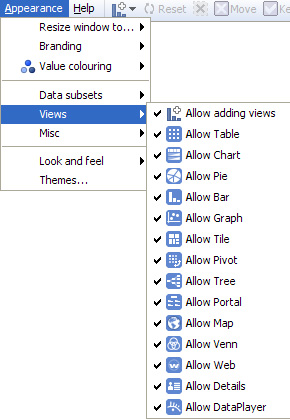
For any given data set, one or more of Omniscope's 14 different views may not be needed to best depict the data set and support user interaction. It may be that the data does not contain any fields (columns) useful to plot against other fields in the Graph View. Some files could have so many different unique Category values in different fields that the Tree View becomes slow to open and use. Whether for these or other reasons relating to simplifying the file, it is possible to hide selected views from the users' View Chooser menus by unticking the view on the list displayed under Appearance > Views > {view restrictions}:
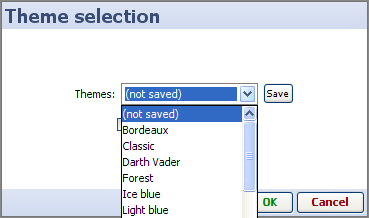
In addition to logos/background images and font selection, all the colours associated with an file can be managed using the options available under Appearance > Themes. There is a library of predefined Themes, and you also create your own combination of corporate colours and save the settings as your own named Theme which you can share with others. More on managing Themes [21].
Applies to Omniscope 2.4 only.
Themes are combinations of display settings you can change under Appearance > Look and Feel. These settings control most of the visible aspects of each file, outside of the controls available within individual views. By default, a built-in style called Default is used for every file. A menu of alternative pre-defined themes is available Appearance > Themes. You can see the different colouring effects by changing the style applied to the open file.
 Ice Blue | 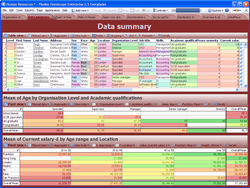 Bordeaux | 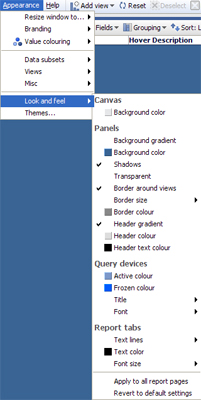 | |
 Forest | 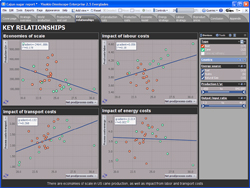 Darth Vader |
Create a corporate style corresponding to your corporate colours and general style of presentation, using a combination of official logos, font settings, colours and effects, which you can define using Appearance > Look and Feel. Once you are satisfied with all the settings, name and save your official style preset and it will become a new option on your Appearance > Themes menu. You can also copy this customised style preset to others in your organisation (see below), so that the official corporate preset is available in the same menu to everyone configuring files.
If you change any settings relative to the current style preset, the Preset selection drop down will show that the new altered preset is not saved. Click Save to give a name to the newly-modified style preset and save it to your installation, from which it will be available for future use, and transferable in the form of an .XML file you can copy across machines.
 The settings corresponding to the new style preset are saved in a local .XML file named {YourPresetName}.XML. Anyone who creates a new file from an existing file can use the same style preset, which is part of the file. However, anyone creating a new file will not have access to the custom corporate style unless it is first copied to their machine.
Currently, to make a style preset you have defined available to others, you need to find the file called {YourPresetName}.XML on your machine, send a copy of this file to others needing to originate (not view) files with his preset, and tell them the location on their machine to copy this file so that it will be available to them whenever they create a new Omniscope file.
The location to find/copy the .XML style preset files varies by version of Omniscope and your version of Windows, as described below:
Vista:
C:\Users\UserName\AppData\Local\VirtualStore\Program Files\Visokio Omniscope\UserThemes
Windows XP:
C:\Program Files\Visokio Omniscope\UserThemes
If your system is set to hide system-related files and folders, you may not see the above locations until you change this setting:
1. Open the folder options in Windows:
Windows XP:
Open menu [START] > Settings > Control Panel > Folder options
Windows Vista:
Open menu [START] > Control Panel > Appearance and Personalisation > Folder options
2. Click on the View tab and enable the option 'Show hidden files and folders'.
Links:
[1] http://kb.visokio.com/tab-titles-annotations
[2] http://kb.visokio.com/text-editor-menu
[3] http://kb.visokio.com/content-view
[4] http://kb.visokio.com/book/export/html/568#Edit Annotation
[5] http://kb.visokio.com/book/export/html/568#Web and File Link
[6] http://kb.visokio.com/book/export/html/568#Formula
[7] http://kb.visokio.com/book/export/html/568#Aggregate
[8] http://kb.visokio.com/book/export/html/568#Subset: Filtered data
[9] http://kb.visokio.com/book/export/html/568#Top
[10] http://kb.visokio.com/node/635
[11] http://kb.visokio.com/layout-menu
[12] http://kb.visokio.com/edit-layout-modes
[13] http://kb.visokio.com/configuring-styles
[14] http://kb.visokio.com/kb/sharing-custom-styles
[15] http://kb.visokio.com/reports-menu-2-4
[16] http://kb.visokio.com/page-menu-2-4
[17] http://kb.visokio.com/manage-appearance
[18] http://kb.visokio.com/export-files-2-4
[19] http://kb.visokio.com/appearance-menu-2-4
[20] http://kb.visokio.com/advertising-options
[21] http://kb.visokio.com/manage-themes