The experience of the users of your files can be augmented in many ways using Omniscope.
Throughout Omniscope, there are many drop-down menus enabling the file publisher to manage the visibility of fields (columns) in user-selectable lists. Beginning with version 2.5, the field selection drop-down menus have been standardised and improved to help you find, choose and show/hide less useful fields (columns) to improve performance and prevent users from seeing inappropriate or uninformative fields as options on View/Device drop-downs.
You will find the improved field selection and management drop-down menus in several places:
This page describes:
For help with the drop-downs specific to a given View Toolbar, consult the Views Reference [1] for the relevant view.
The Colour button is the only data drop-down on the Main Toolbar. It allows you to pick a field from all the fields in your file, and then applies application-wide data colouring to all views with that capability. To revert, select "None" which will remove the application-wide colouring setting. [link to Data colouring]
In progress...
Tooltips allow you to display field values for records whenever your mouse hovers over parts of views. They appear as an extra floating display on top of views. For example, when you hover over a marker in the Graph view, or when you hover over a row header in the Table view.
You use tooltips when you want to be able to find out more information than is showing without having to click, when you don't want to clutter the display with this information up-front.
If the user hovers over a visual element that represents more than one record, although not a large number of records, they will see a multi-record tooltip, as shown below:
Tooltips are an extremely useful way to help users understand the key attributes of any record just by pointing with the mouse. However, you should be very selective, since trying to display too many fields in the Tooltips pop-up results in large, cluttered displays that obscure other important aspects of your display tabs.
By default, no fields are selected for tooltips. To pick the fields you want to display, use Settings > Tooltips > Fields (version 2.5+) or (Tools > Tooltips > Fields (verson 2.4) and tick fields, or drag to re-order.
If you have a file with image sets [2] configured, you can also pick an image to show in the tooltip. Use Settings > Tooltips > Image (2.5+) or Tools > Tooltips > Image (2.4).
{update to 2.5 in progress}
Omniscope can be used to align a set of images in a folder with records (rows) relating to each image, such that the images associated with each record (row) can be displayed in various views:
Before you can display images, however, you must associate one or more folders of images with the .IOK file as named image sets. Preparation for this involves saving a set of images in a single folder with a consistent naming convention that matches the text values in one of the columns of your .IOK file (it may be a column included just to hold the names of the images).
To save you having to find a lot of pictures in order to try this, the example below will use an Omniscope embedded demo file 'Works of Van Gogh', and its associated high-resolution image set. To take this tutorial, first click on the link below to download a zipped folder containing the images for the "Works of Van Gogh" demo.
Van Gogh Demo Image Set [3]105.3 MB (about 4-5 minutes on broadband)
Note: this folder contains many high-resolution images, making the download quite large. In order to bundle the entire folder of images together, this is a .ZIP file; do not click 'Open', click 'Save'. Download and unzip the folder, and save the unzipped folder on your desktop. Once you have saved the unzipped folder of images, open Omniscope and click Files > Demo files and select 'Works of Van Gogh'.
The embedded version of the demo file does not have the associated image embedded in it. Go to Settings > Images and you will see there are two options for retrieving the images, an automated, online service, and the manual approach. For this tutorial, to gain experience using the Add Images wizard we will try adding the downloaded image set manually. Select Add more images.
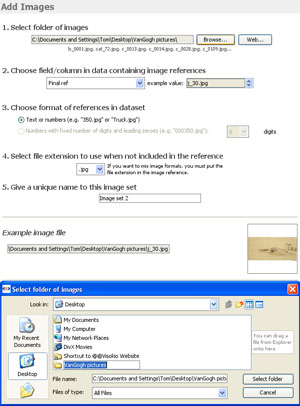
The Add Images Wizard will launch:
 | 1. Select Folder of images-Browse to the folder on your desktop containing the images and click select folder. 2. Choose field/column containing image references (the names of the image files)...in the Van Gogh demo this column is called 'Final Ref'. Select 'Final Ref' and you will see a sample image name displayed...in this case, a picture in the folder named J_30.jpg. 3. Choose format of references-Omniscope detects this automatically for demo files. 4. Select file extension to use...-this will show '.jpg' since all the images in the file already have this extension. 5. Give a unique name to this image set...change the suggestion from 'Images Set 2' to 'My Downloaded Images'. Check the example image at bottom right corner of the wizard and ensure that the correct image is displayed. Click OK to associate the named image set. |
To see your image set displayed, go to ![]() Add View on the Main Toolbar and add a Tile View. On the Tile View toolbar, click on the [ ? ] field (column) selector drop-down and select My Downloaded Images. You will see the images start to appear, but coloured. Go to the Colour selector to the right on the Tile View Toolbar and select 'none' to see the works coloured as van Gogh intended.
Add View on the Main Toolbar and add a Tile View. On the Tile View toolbar, click on the [ ? ] field (column) selector drop-down and select My Downloaded Images. You will see the images start to appear, but coloured. Go to the Colour selector to the right on the Tile View Toolbar and select 'none' to see the works coloured as van Gogh intended.
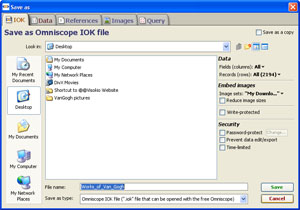
If you have an activated Edition of Omniscope (Professional or Enterprise) you can experiment with saving the file with your downloaded images embedded. At the same time, you can see the trade-offs between file size and image clarity/resolution that results when you reduce the image size to reduce the size of the .IOK file. To save a version of your file click File > Save as. The Export File dialog will appear:
 | Note the commands available along the right hand side: |
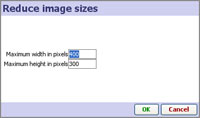
Tick the box 'Reduce Image size' . Give the new version of the file you are saving with embedded images a name, such as Works of Van Gogh 200x150.iok. Click Save and you will see an image reduction dialog that enables you to reduce the size of the images to reduce file size, but at some cost in terms of image clarity.
| Accepting the existing image sizes will result in a file of over 100 MB, so let's try reducing the dimensions of the pictures by 50%, to 200x150 (hence the name of the file we are saving). Change the maximum values to 200 wide and 150 high and click OK. Omniscope will save the file with reduced embedded images. The resulting file is about 14 MB, still large, but not bad for an entire art exhibition in a portable, searchable file! |
{update for 2.5} Open the new version of file and close all the open Views except the Tile View, which should be configured to display the now embedded image set My Downloaded Images. On the Tile View Toolbar, select the movie camera Slide show icon to the left of the Add to basket icon far right. Click 'Start slide show' and choose full screen sub-option. Look at the image quality on your screen. If it is acceptable for the audience/screen resolutions you intend, consider reducing the images more to reduce the .IOK file size further. If the image quality full screen is not acceptable, you may have to reduce the maximum size of the images less (increasing the file size), or configure the views such that images are never displayed so large. To do this, repeat the steps above, and set larger maximums in the 'Reduce image size' box.
Before you can display images related to your data set, you must first associate one or more image folders with your IOK file as named image sets. Preparation for this involves saving a set of images in a single folder with a consistent naming convention, such that one of the columns of your IOK file (it may be a column included just to hold the names of the images) contains the same text values as the file names of the images in the folder, i.e. 'picture1', 'picture2' etc. Any image naming convention can be used, so long as the same exact text strings are present in one of the columns of your data set. You can omit the file extension from the data column if all the images have the same extension, e.g JPG or GIF. If the images are mixed format, the names in the data column must include the file extension for at least one of the formats.
There are 3 ways to display images in Omniscope:
It is also possible for Omniscope to display multiple images per record, provided you have entered multiple values in the image reference cell by declaring the field (column) to be Tokenized (for more detail, see Tokenized data). [4] If you enter multiple image references per cell, the Tile View will show the first image by default, but you can change this in the Tile View View Tools > Advanced sub-menu. The Details View, pop-up windows and Slide shows will all display the tokenized images for each record.
The Tools > Images menu contains two options:
Add Image Set- launches the Add Image Set wizard documented below.
Modify Image Set (only visible if an image set is already associated with the file)- launches the Edit Image Set wizard, which is effectively the same as the Add image set wizard. The modify image set option is usually used to re-import or re-embed an image set using the Refresh embedded images button at the bottom. Warning: Only use this command if you are sure you know the location of a complete new image set, ideally containing images at the original resolution, so that you can remove the old one and replace it with a new one.
 | 1. Select Folder of images- Browse to the folder containing the images. If the file is located on a remote machine accessible via the web, click Web and enter the web address of the folder. 2. Choose field/column containing image references- specify which field in your data file contains the names of the image files, and confirm by cycling through a range of example values. 3. Choose format of references- specify which format the image names are in 4. Select file extension to use- for image sets with mixed formats (e.g. .JPG and .GIF), you must include the file extensions for the non-default format as part of the image names in the reference field, but you do not need to add the extension to the default format references. 5. Give a unique name to this image set- give each image set you create a descriptive name. Check the example image at bottom right corner of the wizard and ensure that the correct image is displayed. Click OK to associate the named image set with the open IOK file. |
To see your image set displayed, go to ![]() Add View on the Main Toolbar and add a Tile View. On the Tile View Toolbar, click on the [ ? ] field (column) selector drop-down and select 'My Image Set' or whatever unique name you have used. The Tile View should display all the images in the image set. Missing images will be substituted with a red tile, but you can create a special image to substitute the missing ones, give it a name, add it to the images folder, and add its name to the empty cells in the image reference column.
Add View on the Main Toolbar and add a Tile View. On the Tile View Toolbar, click on the [ ? ] field (column) selector drop-down and select 'My Image Set' or whatever unique name you have used. The Tile View should display all the images in the image set. Missing images will be substituted with a red tile, but you can create a special image to substitute the missing ones, give it a name, add it to the images folder, and add its name to the empty cells in the image reference column.
Once you have associated and image set, you can save the IOK file with your images embedded. You can also experiment with the trade-offs between file size and image clarity/resolution when you reduce the image sizes to reduce the size of the IOK file. To save a version of your file click File > Save as IOK. The File Save wizard will appear:
 | Note the commands available along the right hand side: |
If you embed large numbers of large images without reducing their size, the resulting IOK file can become far too big. In general, images can be substantially reduced from their original size without affecting the quality of the display on computer monitors. To test the effects of reducing the image file sizes, tick Reduce Image size. Give the new version of the file you are saving with reduced embedded images a name, such as 'My File with max picture size 200x150.iok'.
| Click Save and you will see an image reduction dialog that enables you to reduce the maximum dimensions of the images, thereby reducing the size of the IOK file, but sometimes at some cost in terms of image clarity. If you set maximum values for width and height, Omniscope will scale down any images with dimensions exceeding the maximum until the relevant dimension is within the maximum.
|
The size of the images displayed is not affected as much as the resolution, since Omniscope manages the sizing of the images dynamically within each display.
Open the new version of the file and close all the open views except the Tile View, which should be configured to display the now embedded image set My Downloaded Images. On the Tile View Toolbar, select the movie camera Slide show icon to the left of the Add to basket icon far right. Click Start slide show and choose full screen sub-option. Look at the image quality on your screen. If it is acceptable for the audience/screen resolutions you intend, consider reducing the images more to reduce the IOK file size further. If the image quality full screen is not acceptable, you may have to reduce the maximum size of the images less (increasing the file size), or configure the views such that images are never displayed so large. To do this, repeat the steps above, and set larger maximums in the Reduce image size dialog.
You can use Omniscope to manage large collections of images and other media by using your hard disk as a data source.
Visit File > Open image collection [5] or File > Open folder of files [6] to get started.
{update to version 2.5 in progress}
Links extend your file users' experience to include content not contained in the Omniscope .IOK file itself. By adding links, anyone can integrate other related content (documents, images, web pages, audio-video clips, etc.) into their .IOK files via their local network, and the open web. You can include full links in a column in your data, or specify data-driven (parametric) links that Omniscope composes on the fly, combining pre-defined strings with user-selected values in cells to create valid URLs.
Omniscope comes with a number of preconfigured links to free web services, such as a Google search, Wikipedia reference or Yahoo stock price charts. Once created, links can be attached to any field using the Links command available in many View Tools menus. Any number of Web Views [7] can be configured to display the results of selected links, or the users' default browser is used.
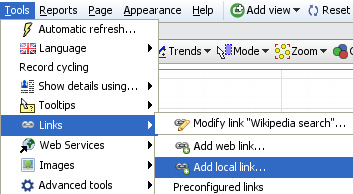
From the Main Toolbar, the Tools > Links menu enables you specify links and make them available for use within your .IOK file using the Add web link, Add local link and Preconfigured links dialogs:

The Add local link, Add web link and Preconfigured links dialogs are simple to use and allow anyone to create dynamic local and web links combining text strings typed in just once (like a network file server/folder locations or web site domain names) with the values of fields contained in the .IOK file. The result is user-selected, dynamic, data-driven links that extend users' access to related information dramatically.
File folders located on your machine (or on other machines accessible to you over your local networks) can contain documents, images, audio and video clips, practically any kind of digital content related to your data. For example, you may store a folder of documents on a remote file server that users of your .IOK file may wish to consult. If you have a reference name/number for each document (or the enclosing folder for groups of documents), including the references as a column in your .IOK file will permit users of your file to link to the folder or specific documents, audio or video clips, etc. inside.

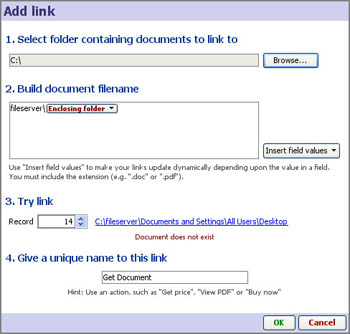
Using the Add local link wizard, you build up the link by:
1.) Browsing to the network location containing the files you are linking to,
2.) Building the file name by adding in any text that does not change (e.g. 'fileserver' in the example above) and specifying each of the fields in your .IOK file containing values that will add specificity to the location/document/file the user will be linking to. To delete, backspace and try again. Once have have fully specified the link to an existing file/document,
3.) Try the link across a number of different records ( in the example above, there was no document found)
4.) Name the link once you are sure that the link is correctly specified and working across the full range of records
Once the link is fully configured, it will appear with the name you have given it on all menus relating to links in the file. If you then assign the link to a field (column) in the data set, you can create an underlined link from all the values in that field that launches the link whenever the user clicks on a value in that field (column). You can assign a link to a field in several ways, the simplest being to open the Table View, then click View tools > Links and select the field from the list that appears. In the Table View, the values for that field (column) should become underlined once you assign the link. You can also display local links as action buttons/links in Details Views and pop-up windows.
Note: You can assign a link to any field (column), not just the fields whose values comprise part of the definition of the link. For example, you could define a link made up of the reference numbers of documents and some other text, but assign this link to the column containing the title of the document. Clicking on the title would launch the document, using the reference number from that record, (not the title) as an argument to complete the definition of the link.
Any resource available on the open web can be linked to an Omniscope .IOK file using the Add web link wizard.

The Add web link wizard process is similar to building local links. Use the drop-down to specify the web protocol for the resource (usually http://) then type in the part of the URL/web address that is not contained in one of the fields in you data set. Next, select one or more fields from your data set, typing in any necessary separators like /, %20, etc. between the inserted fields. To delete mistakes, backspace and try again.
Once you have configured a valid URL/web address, test the link by cycling through various record field values, and clicking on the displayed link. Once you are sure that it is working as you expect, give the link a name. The link will now be added to the list of links available in your file. In the same way as local links, you can associate web links with any field (column) and they can appear as action buttons/links in Details View and pop-up windows. Web links can also be associated with Web Views by selecting the links from the list in the Web View Toolbar drop-down. For more information, see Using the Web View. [7]
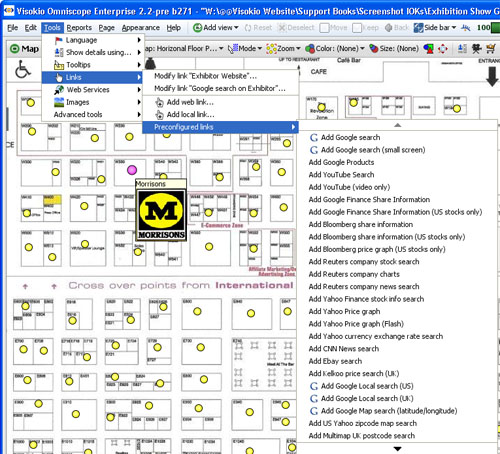
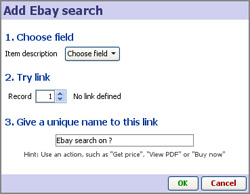
Omniscope contains a menu of preconfigured links to many free, popular web services you can add to your files for the convenience of file users.
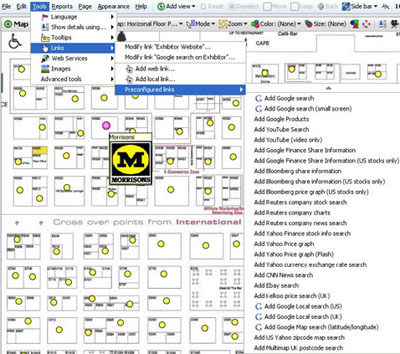
Free web services tend to expect a single cell value, such as a search term/string of text, a recognised identifying number like a stock ticker, CUSIP or ISIN (securities) or an ISBN number (books). If your data set includes fields (columns) that can be submitted to these or other web services (see Adding Web Services [8]), you should consider configuring these links in your files. You can set the results to display in one or more Omniscope Web Views [7], or the user's default browser.
{update to version 2.5 in progress}
Links extend your file users' experience to include content not contained within the Omniscope IOK file itself. By adding links, anyone can integrate related external content (documents, files and web pages) into their IOK files, with one-click access via their local network, and the open web.
Links in Omniscope allow you to link a single record to some related online content or service, optionally passing field values to the remote web server (in a single string), allowing you to reference content and even gather field values from external websites.
Note: If you need to post multiple records to a server, you need to use Settings > Web Services [9] instead.
You specify links and make them available for use within your IOK file using the Add web link, Add local link and Preconfigured links dialogs available from Settings > Links menu on the Main Toolbar.
The Add local link, Add web link and Preconfigured links dialogs are simple to use and allow anyone to create dynamic local and web links combining text strings typed in just once (like a network file server/folder locations or web site domain names) with the values of fields contained in the .IOK file. The result is user-selected, dynamic, data-driven links that extend users' access to information dramatically.
File folders located on your machine (or on other machines accessible to you over your networks) can contain documents, images, audio and video clips, practically any kind of digital content related to your data. For example, you may store a folder of documents on a remote file server that users of your .IOK file may wish to consult. If you have a reference name for each document (or the enclosing folder for groups of documents), including this information as a column in your .IOK file will permit users of your file to link to the folder or specific documents, audio or video clips, etc. inside.
Using the Add local link wizard, you build up the link by:
1.) Browsing to the network location containing the files you are linking to,
2.) Building the file name by adding in any text that does not change (e.g. 'fileserver' in the example above) and specifying each of the fields in your .IOK file containing values that will add specificity to the location/document/file the user will be linking to. To delete, backspace and try again. Once have have fully specified the link to an existing file/document,
3.) Try the link across a number of different records ( in the example above, there was no document found)
4.) Name the link once you are sure that the link is correctly specified and working across the full range of records
Once the link is fully configured, it will appear with the name you have given it on all menus relating to links in the file. If you then assign the link to a field (column) in the data set, Omniscope will create an underlined link from all the values in that field that launches the link whenever the user clicks on a value in that field (column). You can associate local links with any field (column) and they can appear as action buttons/links in the Details View and pop-up displays.
For more information on how Omniscope builds links, please see Absolute and relative links [10].
There are many free reference and look-up services available on the web. Omniscope includes a library of preconfigured links you can use to extend the reach of the users of your file, eliminating the need for them to re-type what could be long and complex codes or foreign languages in order to access a service.
Free pages tend to expect a single string of text, i.e. a search term/string, a recognised identifying number like a stock ticker, CUSIP or ISIN (securities) or an ISBN number (books). If your data set includes fields (columns) that can be submitted to these or other web pages (see creating custom links below) you should consider configuring these links in your files You can specify that the results be displayed in one or more Omniscope Web Views [7] or the user's default browser.
If you would like to offer other free preconfigured links to be added to the list included in Omniscope, or otherwise communicated to our users via our web site, please contact us [11].
Any resource available on the open web can be linked to an Omniscope IOK file using the Add web link dialog:
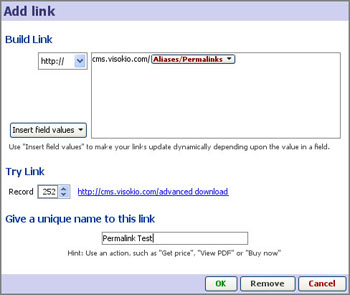
The Add web link wizard process is similar to building local links. Use the drop-down to specify the web protocol for the resource (usually http://) then type in the part of the URL/web address that is not contained in one of the fields in you data set. Next, select one or more fields from your data set, typing in any necessary separators like /, %20, etc. between the inserted fields. To delete, just backspace and try again.
Once you have configured a valid URL/web address, test the link by cycling through various record field values, and clicking on the displayed link. Once you are sure that it is working as you expect, give the link a name. The link will now be added to the list of links available in your file. In the same way as local links, you can associate web links with any field (column) and they can appear as action buttons/links in Details pop-ups and views. Web links can also be associated with Web Views by selecting the links from the list in the Web View > View Toolbar > Links drop-down. For more information, see Using the Web View. [7]
{update to version 2.5 in progress}
Omniscope is a universal web service 'hybrid' desktop/web client. Using the options available under Settings > Web Services, you can define standard web services in your IOK file, allowing your users to select some records and "post" them to a remote server which will process the request using the data, then present a results web page viewable in a Web View of the Omniscope file, or the users' default browser. A number of free web services are available preconfigured, or enter the details of a web service server yourself.
Note: Omniscope currently supports posts of values from a single column only. If you have a solution requiring multi-value, multi-column posts, please contact us [12].
Omniscope integrates with web services to offer a hybrid 'best of both worlds' combination of powerful desktop client/user interface with the ability to send user-selected or modified subsets of data (including user input data) back to remote servers for further processing. Corrections and updates can be sent back the the central data repository for refresh back into Omniscope, or remote server results can be immediately displayed using one or more Web Views [13] or the default browser on the users' machines.
Currently, Omniscope supports exporting to remote servers of any number of values (references) from a single field (column). Behind the scenes, Omniscope submits an POST to an HTTP server listing the record identifiers from a field of your choosing. You can define a formula field that collapses multiple user-changed fields into a single delimiter-separated column for posting back to the central data source. You can also write formulae files that return values read from remote web services. If you envisage a solution that requires posting a table of selected or modified values (more than one column) please contact us. [12]
Web services you want to make available from within each file are defined using the Main Toolbar Settings > Web Services dialog:
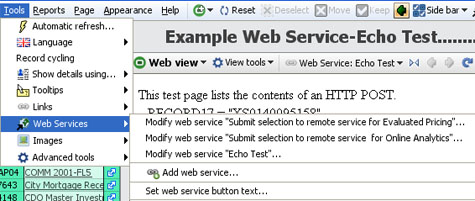
From the Main Toolbar, the Settings > Web Services menu offers the following options:
Modify Web Service- allows modification of all the parameters associated with any web service already configured in the file or remove the web service from the file. The parameters are the same as those shown below in the Add Web Service wizard: HTTP POST URL; Web Service name; ID field (the field (column) from which selected values should be exported) and the Record count limit, which sets the maximum on the number of values posted at a time.
Add Web Service- selecting the Add web service option opens the Web Service configuration wizard:
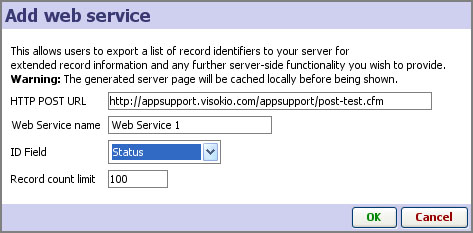
Add your own Web Service configuration to the file by supplying your own values for:
HTTP POST URL: the full URL of the server file/page responding to POSTs
Web Service name: Name you give that appears on the Omniscope Web Services menu. In the example above there are 3 names for 3 different services available from the file.
ID Field: the field (column) name in the Omniscope that contains the values to be exported to the Web service being configured. Can be different for each service
Record count limit: Can be any number of values, set to 100 by default
Omniscope includes a test web service that 'echos' whatever field (column) of values you choose to send. Try configuring this service using the URL given, with a name like Echo Test, and selecting a field in your data set. In one of the views in Omniscope, select less than 100 records, and in the Main Tool Bar, click on the 'Echo Test' web service. If you have not configured a Web View in Omniscope to display the results, the default browser will open and display the echo results. If you have configured a Web View to display the web service results, they will appear in that open Web View.
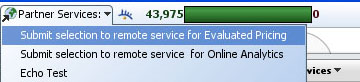
Set Web Service button text- Sets the display/hover value for the Web Services menu button...'Partner Services' in the example shown above.
For more discussion of options for building web-integrated data publishing solutions using Omniscope, consult our KnowledgeBase sections on Web Integration [14] and communicating with Web Services. [15]
Omniscope opens with a single default tab, but any number of tabs can be added as you evolve your file through various phases of the configuration checklist [16]. Any combination of views, settings, filters, titles and annotations can be saved on persistent Tabs displayed across the top of the Main Toolbar, or optionally on the Sidebar. Many settings are applied at tab level, and changes to tabs must be Committed using Main Toolbar: Tab > Commit changes before they become persistent.
If you close and save an Omniscope file displaying a given tab, this file will open next time displaying the same tab. Users of the file simply page through the tabs in order just as they would a presentation slide show. Using the Main Toolbar: Toolbars [17]command menu, additional navigation options can be displayed using Toolbars > Floating tab navigator or Next/previous buttons, to display either a faint, on-hover Reports Navigator in the lower left corner (that emulates PowerPoint), or forward and back screen arrows in the bottom corners, or both. The right and left keyboard arrow keys can also be used to page through the file when giving a live presentation for example.
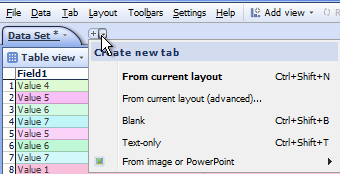 | Create new tab:
Text-only -
|
Note: For options covering aspects of the look and feel that apply to more then one tab, see the section on Reports & Presentations [18].
Sidebars are used to enable users to filter records (rows) quickly and easily. Sidebar settings are tab-specific, so you should configure the Sidebars on each tab to meet the needs of users on each individual tab.
{update to 2.5 in progress}
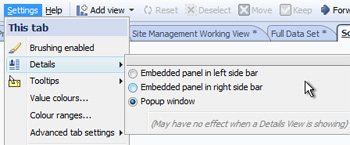 | Embedded panel in left sidebar -
Embedded panel in right sidebar -
Popup window - the default, floating display screen which can be re-sized.
|
As noted, on Tabs where the Details View [19]display is in use, some of these settings may have no effect to prevent redundent displays of information
Double-clicking on a Table View row hear will display the Details pop-up, with the configuration Details Toolbar displayed at the top by default. if you to not see athe configuration toolbar, check to see that the Main Toolbar: Toolbars > Details toolbar display option is ticked (the default setting for Working mode layout).
Applies to version 2.4 only
In addition to the Details View [19], Omniscope can display configurable record-level details as pop-up windows and embedded Sidebar panels. Open a Sidebars on your file and try each option for viewing details outside of the Details View.

Hidden by default, the Cycling Toolbar is revealed at the bottom of the display from Main Toolbar: Toolbars > Cycling toolbar
![]()
![]()

Applies only to version 2.4;
With the exception of the Table View, Omniscope views do not show the all the values associated with individual records (rows) or small groups of records. Once you have filtered down to a relatively small group of records of interest (using Selections followed by Moves and Keeps, instant Sidebar filter devices, or selecting a Named Query data subset) you have several highly-configurable options for viewing some or all of the details for one or a group of selected records.
If the Table View is open, and no Details View is open, selecting/double clicking on a row header (left-most part of a row) will display the details for that record- either as a separate pop-up window (the Details window) or as an embedded panel in the left or right Sidebar (you set this option from Main Toolbar: Tools > Show details using ).
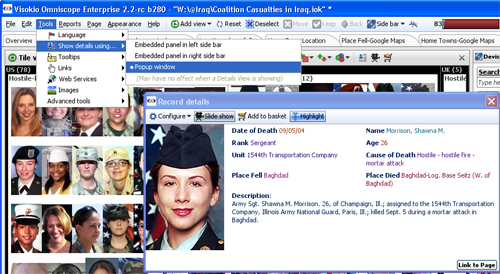
Whenever the Details View [19] is open, clicking on row headers or links set to display details will display inside the Details View. Only if the Details View is closed will the Details pop-up window or embedded panel options display. Whenever the Details View is open, the settings for that view (columns to show, etc.) will be used. When the Details View is closed, the settings for the pop-up Details Window or embedded Sidebar panel display will be used. Note that these settings are tab specific. If you wish to alter them in a given tab, you must open that page, make the changes and commit your changes to make them persistent.
Every View Toolbar has a View Details icon next to the Add to Basket icon on the right hand side. This command opens a tabular view of either the selected records in the view, or all data in the view, showing the fields set to be visible in the Table View, even if the Table View is not visible. The View Details option is like opening a temporary Table View. Like the Table View, double clicking on the row header, or on any underlined link set to open the Details Window/Side Bar panel, will display individual details for that record. You are always at most 2 clicks away from full details on any record using the View Details option on any View Toolbar, followed by clicking on the row header or details link in the View Details pop-up window.
Warning: The fields (columns) displayed in the View Details pop-up table window are the same (and in the same order) as the settings governing the Table View. For an given tab, you must configure a Table View (even if the Table View is not normally open on the Reports Page), in order to control the order of the visible fields in the View Details pop-up for that tab. If you do not do this, the settings for the Table View at the time the tab was created will be used. If you later change the settings for your working display Table View, the changes will not automatically be made in other tabs unless you select Apply these changes to all Table Views and then explicitly elect to apply the same settings to all tabs, or else you return to each tab and change the Table View settings individually.
If Settings > This tab > Brushing enabled (the fading of unselected records) is not enabled, whenever a single record is selected, the position of that record is highlighted in aqua-blue in all open views., as shown above. Open Table Views will scroll to reveal the selected record. Use highlighting to see the positioning of a record in plots, such as the Graph and Chart Views, and read off values for various fields of the selected record in all open views. If you are using a colour-by setting on the Sidebar, highlighted rows will be partially highlighted, so that you can still discern the colour assigned to the highlighted record (row). You can turn this feature off by clearing the Highlight button on the view/pop-up toolbar.
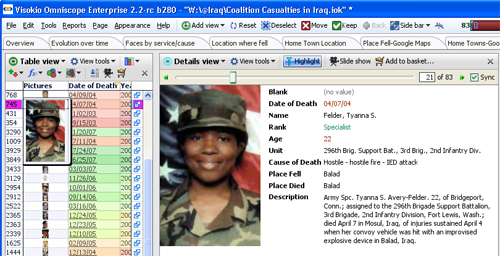
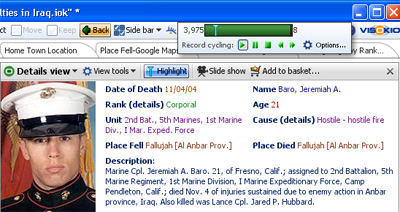
Hovering on the Main Toolbar barometer reveals the control panel for record cycling. Record cycling automatically steps through the records in the universe you select and displays the position of each record in all open views using highlighting. If you have a Details View open, or details windows showing on the Side Bars, then the details for each record (including any related images) will be displayed as cycling steps through. Cycling is turned on, paused, stopped, fast-forwarded and fast-reversed using the green control icons under the barometer.
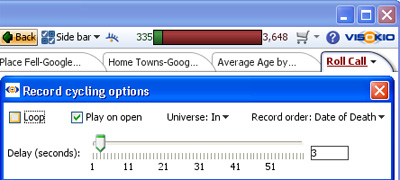
Clicking on the Options button displays the record cycling configuration panel. Options available include Loop, which plays the cycle continuously once started; Play on open, which starts cycling automatically when the file is opened; Universe: which selects the data universe from which the records will be cycled for display; and Record order which sets the field used to order/sort the records to be displayed.
Warning: If you have global record cycling enabled, and you turn off the Highlighting option, the record cycling will stop. To re-start record cycling, hover your mouse on the barometer to expose the global automatic record cycling menu, and click on the green forward arrow to re-start.
Note: Version 2.4 has improved control of cycling options, see using the Cycling Toolbar [21]
Most View Toolbars feature a Slide show option. This option is used in files with associated or embedded image sets to display the image(s) associated with each record in a special Slide show display window. This window can be any size and can be displayed on another monitor. Unlike record cycling with the details view, slide shows can show multiple images associated with each record using tokenized file names in the picture column. For more information, see Tokenized data [4]
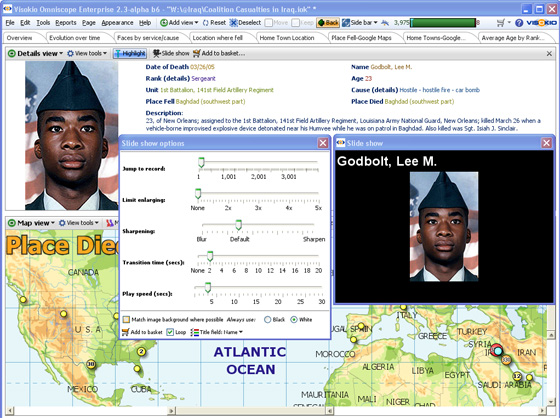
From the View Toolbar, click on the Slide show icon to reveal the configuration options panel. Options available on this panel include:
Links:
[1] http://kb.visokio.com/views-reference
[2] http://kb.visokio.com/add-image-sets
[3] http://kb.visokio.com/files/Resources/VisokioResources104/ImageSets323/VanGogh pictures.zip
[4] http://kb.visokio.com/node/272
[5] http://kb.visokio.com/open-image-set
[6] http://kb.visokio.com/open-folder
[7] http://kb.visokio.com/node/263
[8] http://kb.visokio.com/node/345
[9] http://kb.visokio.com/web-services
[10] http://kb.visokio.com/kb/abs-rel-links
[11] http://kb.visokio.com/company#contact
[12] http://kb.visokio.com/contact
[13] http://kb.visokio.com/web-view-services
[14] http://kb.visokio.com/kb/web-integration
[15] http://kb.visokio.com/kb/web-services
[16] http://kb.visokio.com/configuration-checklist
[17] http://kb.visokio.com/toolbar-menu
[18] http://kb.visokio.com/reports-presentations
[19] http://kb.visokio.com/details-view
[20] http://kb.visokio.com/node/196
[21] http://kb.visokio.com/cycling-options
[22] http://kb.visokio.com/node/365