Unlike free Viewers, an activated Omniscope can import data from any number of different sources, and can combine disparate, even unrelated tabular data sources into a single, in-memory Omniscope file. Current versions of Omniscope assemble data into one 'flat' tabular, in-memory structure (called a data set although any number of unrelated tabular data sets can be appended into one file). All source file locations, database connections, merges and appends and other transformations required to assemble and refresh a given data set are remembered and re-executed by Omniscope on file open or on refresh.
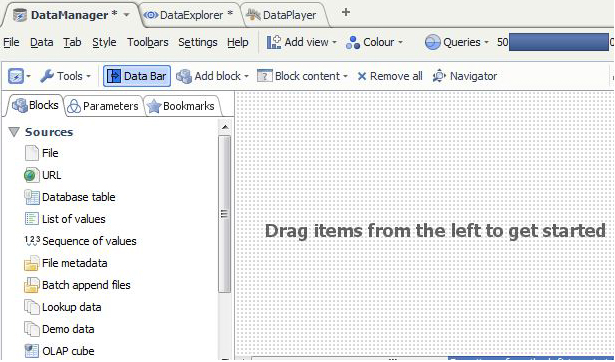
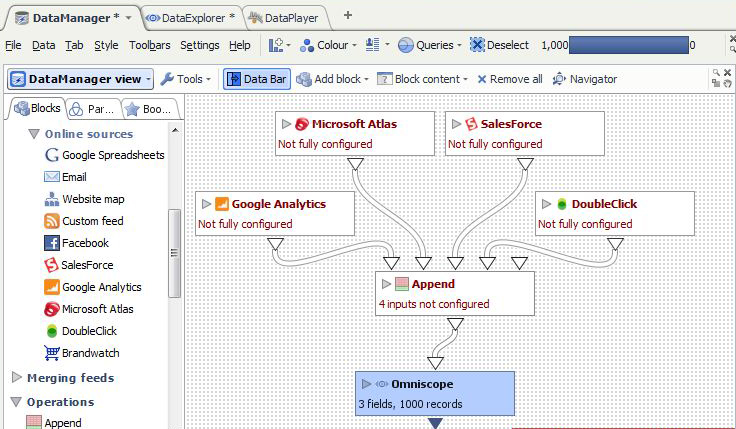
DataManager (2.6+) [1] The DataManager workspace usually appears on its own tab and provides a highly-visual drag-and-drop interface for defining and importing data from various sources. The same workspace can also be used to define how data is assembled and transformed prior to loading into Omniscope's in-memory structure, and how many output files and distribution delivery options are defined for a give Report IOK file. Many (but not all) of the options available via the DataManager workspace are also accessible from the Main Toolbar File: and Data: command menus. Operations defined in these menus are also visible by opening a DataManager tab from Tab > New > DataManager. A DataManager View workspace can be combined with other views by adding them to the DataManager Tab. By default, a Table View appears below the DataManager workspace, although it will not be populated until you select a data block to Load.
More on importing data using the DataManager Sources menu [1]
The same import blocks as are accessed via the Datamanager workspace can also be accessed from the Main Toolbar: File > menu
Open a new file and you will see a blank table similar to a spreadsheet where you can type or cut-paste data or text into cells. Populating your own small, experimental IOK file by typing in sample data is an excellent way to get started with Omniscope. You can also cut-paste tabular data sets from documents or web pages to provide a starting point. From the Main Toolbar File menu or Welcome Screen, select File > New [2] and specify how many blank rows and columns you will start with.
Omniscope can automatically open supported [4] delimited data files and import a copy of the tabular data, either locally, across the network or over the web using a URL. Using the DataManager tab workspace, drag a File Connector block from the Sources menu onto the workspace for each file you wish to import
Using either vendor-specific or generic ODBC or JDBC protocols, Omniscope can establish and refresh direct connections to relational database tables and reporting views. From the DataManager tab workspace, drag a Database Connector block onto the workspace and configure it for each table/reporting view you wish to import into the file.
See the KnowledgeBase [7] section on database connectivity for worked examples and more technical detail on advanced database integration options, e.g. parameter-passing to enable variable 'on-demand' data imports using parameter passing and parametric SQL statements to automatically vary the size/granularity of the data sets being imported.
The new Database Connector blocks replace the Database Connection Wizard (2.5) [8]
Batch append files [11]
See Using Connectors [13] for more detail on how to use specific Connectors
Open a map [14] - download a map, and add data to the file, including positioning record markers on the map
Beginning with version 2.6, Omniscope features a new drag-and-drop visual workspace enabling non-technical users to import, assemble, transform (aggregate, de-pivot, tokenise, etc.), filter, sample, scramble and export tabular data sets, with no knowledge of SQL.
File [15] | List of values [16] | Batch append files [17] | OLAP cubes [18] | Operations [19] |
| URL [20] | Sequence of values [21] | Lookup data [22] | Online Sources/Connectors [23] | Outputs [24] |
Database table (or view) [25] | File metadata [26] | Demo data [27] | Merging feeds [28] |
 | View Toolbar |
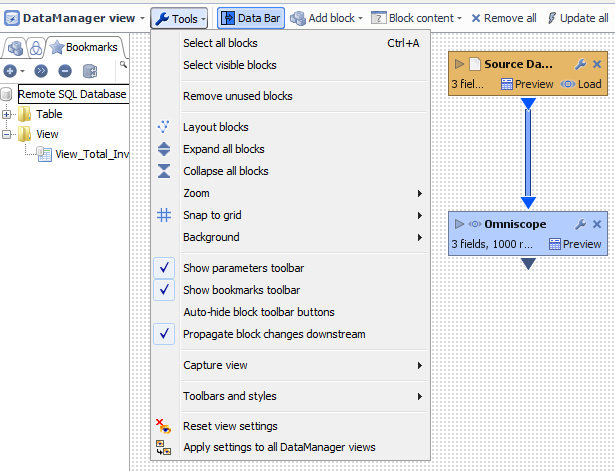
Block Tools: Block note: allows the user to insertcomment in the Block Rename: allows the user to Remane theBlock name Load into Omniscope : Load datainto Omniscope Update data: Load data from Omniscope(Table)to the block. Update Option: These settings allow you to customise howOmniscope checks for changes for this block. =>can be Never-Auto or Scheduled Preserve formulas output:Keep the formula when creating an output file. Create duplicate : does createa duplicate of the block Create a snapshot: Create asnapshot of the block Replace with snapshot: Replacethe block with a snapshot. Bookmark This block: will create a“shortcut” under Bookmark menu Explore to: Allow you to open a file Reset size: reduce the size of the block Maximize: Maximize the size of the window Remove others: Remove ALL of the blocks except for 'Rename(snapshot)'? Remove: Remove the block
Sources - using DataManager source blocks
Omniscope DataManager workspace opens to reveal a Data Bar/Blocks menu on the left side, and an Add Block menu is always available at the top of the drag-and-drop workspace.
The user can importe an Excel file including X number of worksheets, Omniscope will give the user the possibility to choose, individual, or a pair of working sheets:
 | -The name of the worksheet will appears under the buttonAll.
-The user can also create one block and append X number of Worksheet. or create one block for each worksheet |
By clicking on the block the user is able to:
-See/change the directory of the file.
-Change and modifythe setting of the Table Data
 |  |
Data Manager also gives the possibility to change thesetting of the table if the user use the option selects table data.
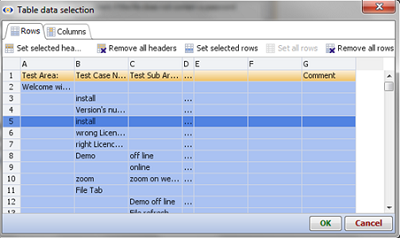 | This Option gives the possibility to Configure/Select or Remove any rows, column and Headers. |
URL
 | Data Manager can Import data from a remote data file such as an XML, CSV file or a SpreadSheet. |
To see how to configure the Database in DataManager click Here [6]
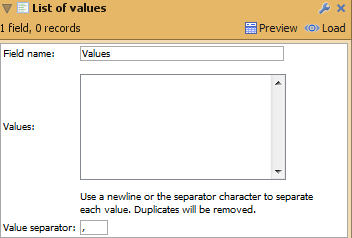 | List of values Block create a list of values that you can use as input to create any operation. |
Sequence of values
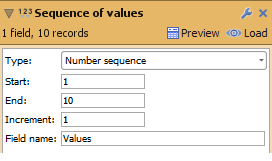 | Sequence of values generate a sequence of values betweenStart and End values. |
File metadata
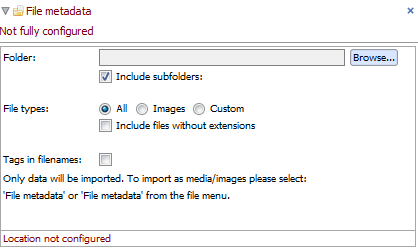 | FileMedia data Block, retrieves all information about all of the media files in afolder. |
Batch append files
location of data files to be automatically appended into a single data set.
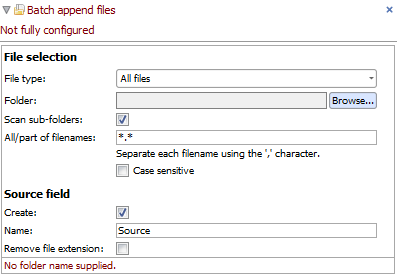 | Batch append files, appends a set of files whith in a designated folder |
Lookup data
useful data available for free
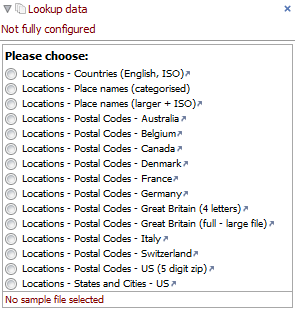 | Look up, Imports data from one of the Omniscope sample files to DM |
Demo data
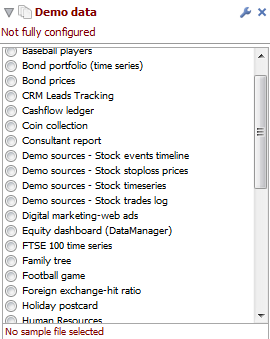 | Same as Look up option, Demo data Imports data from one of the Omniscopesample files |
OLAP cubes [9]
The OLAP cube source block provides connectivity to MDX-compliant multi-dimensional data structures (cubes) such as Microsoft SSAS and other cubes.
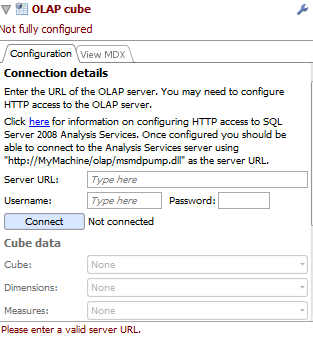 | OLAP cube, Import data from an OLAP Cube such as SQL Server Analysis Services. |
Online Sources/Connectors [13]
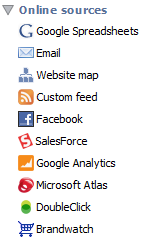 | Under the Blocks > Sources menu, the DataManager workspace provides access to a growing number of Online Sources/Connectors allowing you to control the import of data from remote sources to which you have access. Connectors enable Omniscope to access structured data sources unique to a publisher/platfrom or application directly via API calls, rather than via exported delimited data files or views/tables from relational databases imported using SQL statements and JDBC/ODBC protocols.
Note: Connectors for accessing, refreshing and synchronising with remote-hosted 'clouds' are available only from activated Omniscopes, not the free Viewer. |
Other Data Bar Blocks in DataManager:
 | Online data sources ranging from freely-available searchable sources like Twitter and web searches to premium real-time data feed services like Bloomberg. Using Merging feeds [29] |
Operations
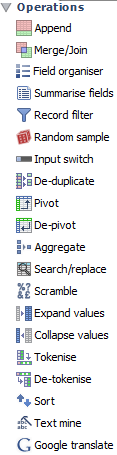 | The DataManager workspace also allows you to define any sequence of transformational operations by dragging Operations blocks onto the workspace. Operations blocks are also accessible from the Mani Toolbar Data > Operations menu and are fully documented here. Transforming Data [30] |
Outputs
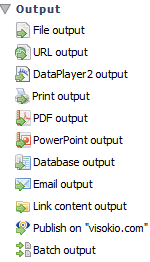 | Any number of different file output, publishing and distribution options can alo be defined using the DataManager data flow definition workspace. Output/export and disctribution/devliery options are fully documented here. Defining Outputs [31] |
Under the Blocks > Sources menu, the DataManager workspace provides access to a growing number of Online Sources/Connectors allowing you to control the import of data from remote sources to which you have access.
Connectors enable Omniscope to access structured data sources unique to a publisher/platfrom or application directly, rather than via exported delimited data files or views/tables from relational databases imported using SQL statements and JDBC/ODBC protocols.
Note: Connectors for accessing, refreshing and synchronising with remote-hosted 'clouds' are available only from activated Omniscopes, not the free Viewer.
 | The user is able toimports a worksheet Spread Sheets created on Google Spread sheet into DataManager: http://www.google.com/google-d-s/spreadsheets/ [32]
DataManager gives also the possibility to load and View a public spreadsheet by copy and past a Link/key. Google spreadsheets are on-linecollaborative tools for Gathering and maintaining structureddata sets.
How to use Omniscope with Google Spreadsheets [33]
|
Email Connector
 |
The user is able to imports email data from a POP3 or IMAP email account.
A list of server will appearwhen click on Mail Server option box, the user is able to select any Serverused. The user is able to setupthe Max number of messages he wants to seen in Omniscope. DataManager gives also thepossibility to load the Messages content and any attachements. How to use the
|
 | Datamanger allows the userto import data from FaceBook. Facebook [35] is a social networking applicationthat allows users to create networks of relationships centred on theiraccounts. How to use |
Google Analytics
 | The user can import report, data from Google Analitic, and also provideswebsite traffic and marketing information: http://www.google.com/analytics/ [37]
DataMager allow the user to filter the data by time/Visitor/content.
The Google Analytics import functionallows you to download and analyse Google Analytics data from within Omniscope. How to use
|
Web Mapping
A web site map is a network of interconnecting pages within a particular website. A connection between two pages exists if the first page contains a link to the second page. You can use the webmap functionality within Omniscope to visualise the structure of a website.
How to use Omniscope for Web Site Mapping [39]Salesforce [40] is an application that runs in the Force.com [41] online cloud-computing hosted platform, one of the largest and fastest-growing general-purpose SaaS platforms. Salesforce is widely used for CRM (Customer Relationship Management, composed of the 'Sales Cloud' and service/case management, aso know as the 'Service Cloud'). Almost any application can be written on the Force.com platform. If you have a Salesforce account, it is possible to access your Reports and Data Objects/Tables stored in Salesforce using either the Omniscope direct connector (File > Open online source > Salesforce) or the free web connector [42] your Administrator can install into your Salesforce account from the online AppExchange [43].
Salesforce web connector: the free Omniscope Connector for Salesforce [42] web service can be installed in your Salesforce account(s) from the AppExchange listing page [42] by your Administrator, unless you have a Group Edition. Instructions for installing in Group Editions are here. The web connector installation will add a new tab from which you can download reports and un-joined data objects using pre-configured templates to deliver files that will open in the free Viewer. An activated version of Omniscope is required to modify and save customised templates, which can then be uploaded to your account, adding new download and viewing options for different classes of users within your organisation. More on using the online Web Connector for Salesforce [44].
Salesforce direct connector: Omniscope Professional and Enterprise 2.5 (and later) enable to access your Salesforce reports and data objects directly. More on using the Direct Connector for Salesforce [45]to access, modify, edit and synchronise changes with your Salesforce-hosted data.
More detail and a solutions roadmap for making the most of the combination of Salesforce and Omniscope is here [46].
(experimental feature)
(experimental feature)
If you would like to discuss developing an Omniscope Connector for your remote data ASP/SaaS platform, client-premise installed application, or online data service, please contact us. [47]
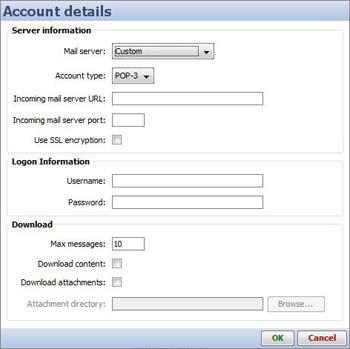
Omniscope version 2.5 and beyond include a connector that can import e-mail from any online email account supporting either the IMAP or POP-3 email management protocols. Most modern web-based email accounts support at least one of these protocols.
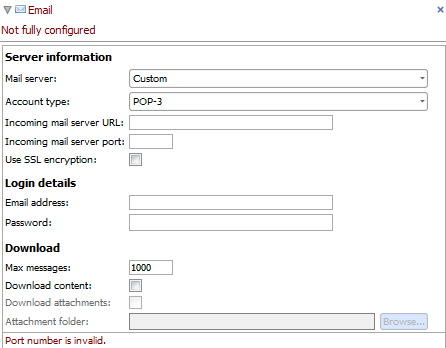
To import email data into Omniscope, select File > Open online source > Email. The Account details dialog will be displayed:
| Mail server - Select your email server. If your email server does not appear in this list you should select the 'Custom' option. Accounttype -This option is only enabled if you select the 'Custom' mailserver. Select the type of email account (either POP-3 or IMAP). Incomingmail server URL - This option is only enabled if you select the 'Custom'mail server. Select the address of the mail server. Incoming mail server port - This option is only enabled if you select the 'Custom' mail server. Enter the mail server port. UseSSL Encryption - This option is only enabled if you select the 'Custom'mail server. Check this box if your email server uses Secure SocketsLayer encryption. Username - Enter the username you use to log-in to your email account. Password - Enter the password you use to log-in to your email account. Maxmessages - Determines the maximum number of email messages that will bedownloaded. A value of '10' means the 10 most recent messages will bedownloaded. Download content - Check this box if you want todownload the message content. This will enable you to read messageswithin Omniscope but will also increase the size and amount of datadownloaded. Download attachments - Check this box if you want todownload message attachments. If this option is selected, then you mustalso specify a valid attachment directory. Attachment directory - This determines the folder attachments are moved to after they have been downloaded. |
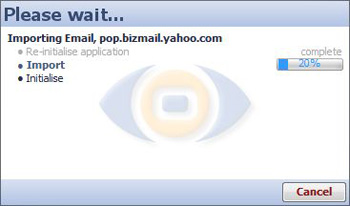
Once you have entered the relevant information click the 'OK' button to start downloading the message data. A status dialog will be displayed to show you how many messages have been downloaded and how many are still to come:
Google Docs and Spreadsheets [48]is a free service that enables anyone to create documents, spreadsheets and presentations online. You can import and collaboratively edit or publish from .doc, .xls, .csv, .ppt, .txt, .html, .pdf and other formats. You can export files for use with traditional desktop software as well.
Hosted online spreadsheets enable powerful new workflows with collaborative data compilation and editing options...no more playing 'file tag' with offline spreadsheet files circulating as e-mail attachments. These so-called 'cloud' solutions enable co-workers to share the same online copy of each document, spreadsheet or presentation. All revisions are saved and recoverable.
Omniscope will connect to any Google spreadsheet and edit it online in the browser or off-line in Omniscope. Changes will be synchronised between Omniscope and Google Spreadsheets in real time. The combination permits collaborative compilation and maintenance of data sets delivered in branded, highly-visual Omniscope files with the possibility of live refresh and banner ads inside the file.
Combining Google's free hosted online spreadsheets with Omniscope provides a 'best of both worlds' solution enabling many new workflow and publishing options. Data publishers and most businesses can benefit greatly by shifting most typical spreadsheet data compilation and maintenance workflows to an online spreadsheet linked to Omniscope.
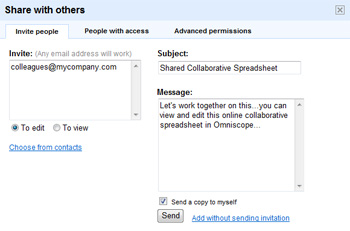
When you create a new Google Spreadsheet, there are two ways of inviting others to help compile, edit and maintain the data. For data being published to the public, you can define a link or key allowing anyone with the link to connect to the data using Omniscope, and optionally help to edit the data. Once this link is embedded in the Omniscope file, this source worksheet will be remembered and data refreshable in activated Omniscopes from the Omniscope file. For company internal data, you can use the more Google Docs Share with others dialog to determine who will have what type of access to the spreadsheet, who can make changes etc.
 |  |
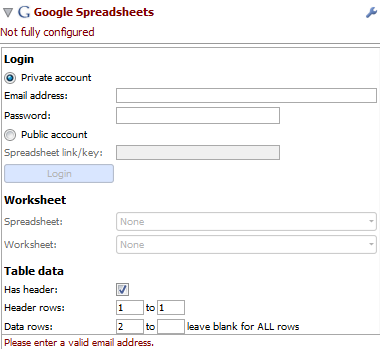
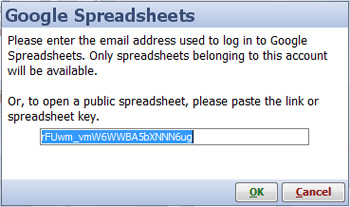
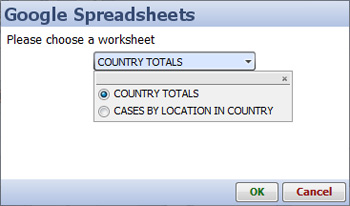
To create an Omniscope file from a Google Spreadsheets worksheet (either private or public) as a linked data source, go to File > Open online source > Google Spreadsheets. Enter your account details for private spreadsheets, or the link or spreadsheet key to use public spreadsheets. Once you have logged into your account or connected to a public spreadsheet, select the worksheet that will be the linked data source for this Omniscope file.
 |  |
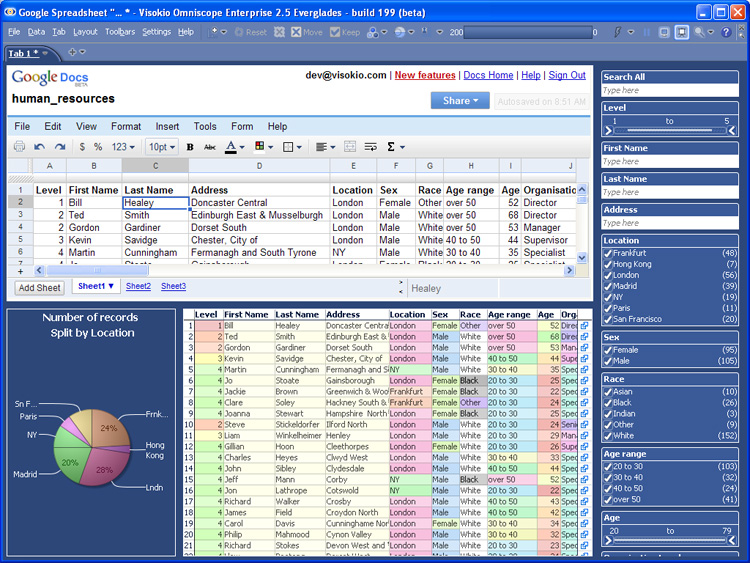
Omniscope will automatically import the data and open in the default layout. You can further configure the layout of the Omniscope file, then save it as an .IOK/.IOM file. The default refresh behaviour with online data sources is 'Never', since you may want to open the file while offline. If you or your colleagues have activated Omniscopes, while online you can use Data > Refresh from source for on-demand refresh, or you can go Data > Automatic Refresh to configure automated refresh based on frequency of polling timings you can configure. If you plan to always open the file while online, you may choose to save it with refresh set to 'Always'.
You can save an Omniscope file whose linked data source is a Google spreadsheet with the refresh behaviour set to 'Always', and the file will update itself with the latest data from the Google spreadsheet. You can also activate and configure Automatic refresh to keep the Omniscope file updated while open.
You can view the linked data source spreadsheet from the Omniscope file using the Web View. Files using the Google Spreadsheets connector open by default to display the linked spreadsheet in a Web View:
Google Analytics is a free online service that allows you to monitor various statistics about visitors to your website(s). In order to use Google Analytics you will need to sign-up and then configure your web-pages to generate the required information. Once you have signed up you can log-in to the Google Analytics website to view and analyse your website analytics data. To sign up for Google Analytics or to get more information click here [37].
Omniscope allows you to download Google Analytics data straight to your desktop. This means you can use Omniscope's powerful visualisation environment to quickly and effectively download and analyse all of the data for any Google Analytics report in one go.
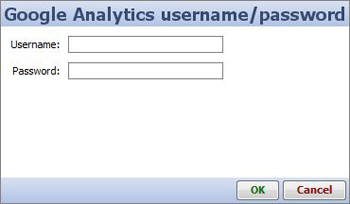
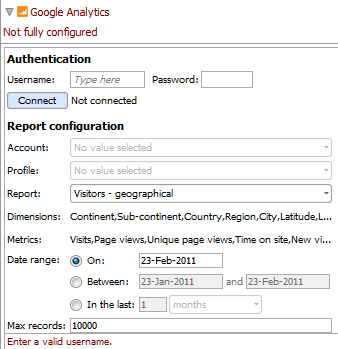
To import Google Analytics data select File > Open online source > Google Analytics. A dialog will be displayed asking you to enter your Google Analytics username and password. Enter the same username and password that you use to log-in to the Google Analytics website.
|
Once you have entered your username and password click the 'OK' button. Omniscope will attempt to contact the Google Analytics server. If the server was contacted successfully and your username and password are valid the report configuration dialog will be shown. This dialog allows you to specify what Google Analytics data you want to download.
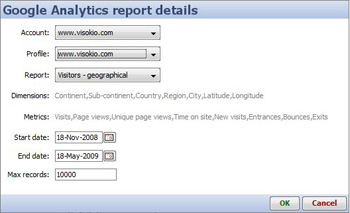 | Account - Select your Google Analytics account. Profile - Select your website profile. Report - Select from one of 8 pre-defined Reports or choose 'Custom' to generate a custom Report. With Custom Reports you can specify the information you want to download and how you want it to be organised. To configure a Report, select a combination of dimensions and metrics. Dimensions determine how the data is segmented, such as browser type, visitor city or language. Metrics provide data for the selected dimensions, such as the number of visitors, unique page views and bounce rate. Start date - Select the start date of your data. End date - Select the end date of your data. Max records - Define the maximum number of records you want to download at once. |
When you are happy with the configuration click the 'OK' button to download the data from the Google Analytics server into Omniscope.
New in 2.5... this page in progress
In Omniscope 2.5 and beyond you have the ability to generate a website map and view the site and associated data on content and structure in Omniscope.
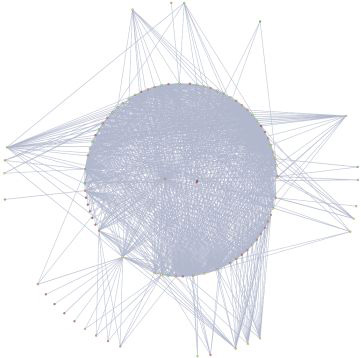
To generate a website map you need to provide Omniscope with one or more 'seed' URL's. Omniscope will 'crawl' and then download the contents of each of these URLs and extract all the links. The content of each of the linked pages is then downloaded and the content extraction process is repeated. The resulting data set contains the details of all of the pages downloaded and the connections that exist between these pages. This can be visualised in Omniscope using the Network View to show a 'map' of all the pages, with each node in the map representing a page and each line representing a link between from one page to another.
A website map can prove useful in many different scenarios:
To generate a web site map select File > Open online source > Website map.
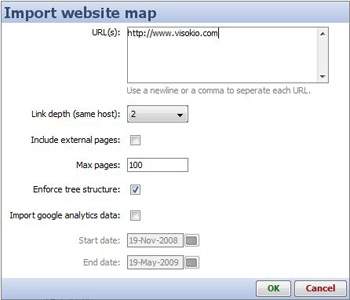 | URL(s) - Enter one or more URL's to use as a starting point for the website map. Include external pages - most web sites include links to pages on other sites. When ticked, this option includes pages from other sites referenced by links.
|
Import Google Analytics data - when checkedOmniscope will attempt to retrieve Google Analytics information for anyof the pages encountered that belong to one of the sites associatedwith a Google Analytics account to which you have access. If you select this option then youwill have to enter a Google Analytics username and password. Moreinformation on the Google Analytics functionality within Omniscope canbe found here [38].
Start date - only available if the 'Import Google Analytics data' option is checked. Select the start date for the Google Analytics data.
End date - only available if the 'Import Google Analytics data' option is checked. Select the end date for the Google Analytics data.
 |  | |
Enforce tree structure selected | Enforce tree structure unselected |
Using Omniscope with SalesforceAdd the perfect desktop/web compliment to Salesforce solutions |
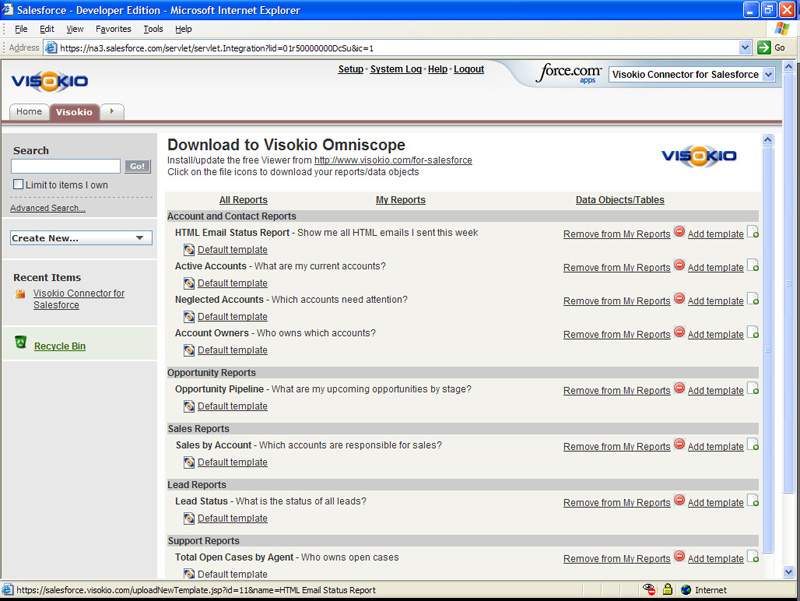
Omniscope is integrated with Salesforce and the Force.com [49] cloud computing platform and provides a low-cost, low-risk route to business intelligence reporting and data quality initiatives involving data hosted in Salesforce/Force.com. If you have a Salesforce account and security token, you can go to File > Open online source and choose to open either a Report (read-only) or Data Object/Table directly from Salesforce. Using the direct connector, you can you can visualise, analyse, save offline, add/edit data and synchronise your changes with Salesforce. There is also a free web connector for Salesforce listed on the AppExchange [42].Your Administrator can install a 'Visokio Reports' tab into your Salesforce accounts to enable pre-configured downloads of Reports and Data Objects/Tables that open in the free Viewer. Using an activated Omniscope, you can also modify the default templates provided for each Report and Data Object/Table, and upload your customised files to the'Visokio Reports' tab in Salesforce to modify the online DataPlayer displayed or provide alternative templates for future downloads. The free web connector can be installed in Group accounts, but the direct connector involves API access which Salesforce permits only to subscribers with Professional, Enterprise and Unlimited Editions.
Start by installing the free Omniscope Connector for Salesforce 2.1 [42] (a certified, AppExchange-listed application) into your Salesforce user accounts. Salesforce Administrators can do this automatically from the AppExchange if your organisation has the Professional, Enterprise or the Unlimited editions of Salesforce. If your organisation uses Salesforce Group Edition, any Administrator can install the Connector tab manually by following these directions. [50]
Installing the web connector will add a new 'Visokio Reports' tab to some or all of your user accounts. From this tab, users with the free Omniscope Viewer [51] installed can download, view, filter and query the data in their Reports. The look and feel of the files will initially be based on the standardised default Omniscope file templates provided for each Report or Data Object. During your free trial, you can modify these template files and upload them for others to use when downloading to the free Viewer. Users without the free Omniscope Viewer installed cannot open local copies of their data from the permissioned tab, but can still use interactive Flash DataPlayer 'dashboards' you can create and export from Omniscope to your Visokio Reports web tab. For more details, see using the web connector. [44]
If you install Omniscope [52], and you have Professional, Enterprise or Unlimited editions of Salesforce, during your free trial you can not only modify templates and save/archive secured copies, you can also access Reports and Data Objects directly using the File > Open online source > Salesforce login and download option (you will need to paste-in your security token). Using Omniscope Professional or Enterprise, you can connect to and edit Data Objects offline, then synchronise your changes with Salesforce using the Data > Synchronise with Salesforce wizard. For more details, see accessing Salesforce directly from Omniscope [45].
Once your 30-day free trial period has expired, upgrading your Omniscope from free Viewer to the Professional or Enterprise Edition enables you to continue modifying and uploading customised templates and DataPlayer 'dashboards', integrating/merging in data from non-Salesforce sources, saving and sharing secured Omniscope files offline, and synchronising offline changes back to Salesforce. Non-activated Omniscope installations will revert to being free Viewers able to download and filter/query default or customised files from the free web connector tab installed in the user accounts. No need to uninstall.
For the quickest start, maximum flexibility and lowest average cost-per-user in deploying your solution, use the Salesforce:
Installing the free Omniscope Viewer/Professional trial and the free Visokio Reports web tab from the AppExchange enables any organisation to embark on a simple, low-cost, low-risk, ‘tiny-steps' progression of continuous improvements, while delivering users live, working reports with many useful visualisations of their data beginning on Day One:
1. Install free Omniscope Viewers and add the free Visokio Reports web tab to user accounts
a. Download key reports/data objects from each user's account tab using the standard templates, enabling users to see, filter and sort all their data to find alert conditions, data errors & inconsistencies.
b. Ask users to start flagging incomplete, out-dated and erroneous data records/fields online in Salesforce using the unusual "!" character or similar
c. Download key data objects as Omniscope files and consult the Flagged Errors tab to view all the records which have been flagged for online correction/completion either online via Salesforce, or offline using an activated Omniscope Professional and the direct connector for Salesforce, available in the free 30-day trial.
d. Create custom reports containing the most useful joins...users can then download and view standard template versions of these reports using Omniscope.
e. File refresh & security - the data in Omniscope files downloaded in templates is always fresh, and cannot be exported or copied (not even cut-and-paste). Users of free Viewers cannot save the files...they must always return to their Salesforce account Visokio Reports tab to download fresh copies of the data or view online DataPlayers in sub-tabs.
2. Upgrade to Omniscope Professional (requires activation)
a. If your 30-day free trial has expired, contact us [47] to purchase a licensed activation key to upgrade from free Viewer to Omniscope Professional.
b. Now you can continue to modify and save files downloaded from your Salesforce account tab to fit the needs of your organisation - adding/changing report tabs to highlight key messages, introducing corporate branding, etc. Make multiple versions of each report/data object template to suit the needs of different classes of users.
c. Save your changed .IOK file(s), then upload one or more of your modified files from the Visokio Reports tab in your Salesforce account. Note: you can upload the file empty, with all data deleted... data in the uploaded template file(s) will not be synchronised with the online data.
d. Modify the standard Flash DataPlayers shown in the DataPlayer View tab of each template file downloaded, then export your new customised DataPlayer ‘dashboard' to web pages (including Salesforce tabs) and/or internal documents such as PowerPoint, Excel or .PDF.
e. The custom templates/DataPlayer configurations uploaded will be selectable for future downloads from the Visokio Reports tabs of authorised users, whether using the free Viewer or a Professional.
f. Data integration projects: download custom versions of your reports/data objects and then use Omniscope to merge in related data from other sources (spreadsheets, ERP databases, etc.) to create combined reports (using any number of joins)that can be circulated to users with the free Viewer.
g. Using Omniscope 2.5 or later, you can also login to your Salesforce account from inside Omniscope, connecting directly to reports or data objects using File > Open Online Source > Salesforce Table/Report
h. Use the powerful data cleansing/scrubbing and editing capabilities of Omniscope to make changes to your data and save local copies of files.
i. Using Omniscope 2.5 or later, use the Data > Synchronise with Salesforce command to make changes to both your local copies and the corresponding user-editable fields within your Salesforce organisation.
j. File refresh & security- Users with Professional Editions will be able to refresh directly from source on opening. Offline files sent to users with the free Viewer show configurable opening screen ensuring they do not use stale files.
k. Continue to optimise the configuration of templates for all your reports and data objects based on user feedback and the evolving needs of your business...enjoy the total flexibility of the hybrid solution you have created.
3. Automate refresh, archiving copies and distribution with Omniscope Enterprise Edition
a. Omniscope Enterprise edition is designed to automate the entire process of refreshing and distributing Omniscope reports and Flash DataPlayer inserts from a central 'always-on' server with access to all the required data sources, including Salesforce.
b. A single Enterprise Edition allows automated refreshes of files with data from Salesforce and other sources, plus distribution (via e-mail or FTP) of refreshed IOK files and DataPlayer dashboards either according to a defined schedule or on-demand using the Scheduler or the Generator, two automation tools included with Enterprise Editions.
c. File refresh & security - Enterprise installations offer the full range of file security options, including time-limiting and domain-locking of files (files will not open if user is not logged into specified site and download page e.g. Salesforce)
Using the Salesforce Visokio Reports TabInstall this free service in any Salesforce Edition, including Group Edition |
The Omniscope web connector for Salesforce is a certified, AppExchange-listed free service [42] that can be installed by your Salesforce Administrator in any Edition of Salesforce, including Group Edition. Once installed, the new web connector tab provides your users with one-click downloads of pre-formatted, filterable, highly-visual, offline copies of Salesforce Reports and Data Objects/Tables. The downloaded files can be shared as presentations with anyone using the Omniscope free Viewer. Each file download contains all the data [53], configured as multi-tabbed visualisations and report.
|
If you are running the Professional, Enterprise or Unlimited Edition of Salesforce, and you are logged into an Administrator account, you can install the free web connector service just by clicking the [Get It Now] [42]button. If you are running Group Edition of Salesforce, you can still install the web connector manually following these instructions [55]. Once installed, the web connector tab appears at the right-most end of your opening tabs, usually with the label 'Visokio Reports'. Click on the tab At the top of the tab is a link for all users to install a free Omniscope 2.5 [51] Viewer, with free 30-day trial of Omniscope Professional authoring capabilities anyone can use to modify the default templates. | |
| Select Report or Data Object/Table to download * not available when installed in Group Edition | |
| Your data will open in your installed Omniscope | |
| If you like, customise templates and upload Use Omniscope Professional to customise template files for different purposes or user groups. All template .IOK files can be downloaded and interacted with using the free Viewer, dramatically reducing average cost-per-seat of your Business Intelligence and reporting solution for Salesforce. |
WARNING: due to limitations imposed by Salesforce, when installed in Group Edition accounts, the Omniscope web connector does not support upload of customised templates, and displays All Reports, rather than the custom "My Reports" tab by default.
Group Edition installs are not done using the [Get it Now] button on the AppExchange. they must be done manually following these instructions:
To begin, go to www.salesforce.com [40] and make sure to login to an account with a System Administrator profile
Click "Setup" at top of screen
In left side panel under "App Setup" click "Create" to expand menu
In expanded section under "Create" click "Tabs"
In the middle "Web Tabs" (not "Custom Object Tabs" above or "VisualForce Tabs" below) box, inside the Web Tabs header, click the grey "New" button centre
Step 1. Choose Tab Layout, choose "2 columns with Salesforce sidebar"
Click "Next"
Step 2. Define Content and display properties > Tab Content definition > "Tab Type" choose "URL" from drop-down list
Under Display Properties:
1. In "Tab Label" type "Visokio Reports" or whatever label you want to appear on the new tab
Leave "Tab Name" blank
2. "Tab style" click magnifier to open a list of icon/style choices
Choose any style, for example, a desk indicating desktop reports
3. Leave the Content Frame height set to '600'
leave splash page set to None
4. Fill in the Description field with something that reminds users what the application does, like:
"Delivers Omniscope files to desktop"
Click "Next"
Step 3. Enter the URL Details
In the big white box with the title "Button or Link URL" paste:
https://salesforce.visokio.com/index2.jsp?sid=={!User.Session_ID}&apiurl={!API.Partner_Server_URL_70}
(clear the space first, and make sure to delete any duplication of the initial letters 'http')
Leave the encoding setting Unicode (UTF-8)
Click "Next"
Step 4. Add to Custom Apps make sure ALL options are ticked
Click "Save"
Make sure your users have Omniscope installed. They can now click on the new Visokio Reports tab and choose a default template to download.
Using an activated Omniscope Professional, anyone can modify and save a downloaded file for use as a new template, then upload it (not available for Group Editions of Salesforce) back to the Salesforce Visokio Reports tab to serve as an additional template option for future downloads of that Report or Data Object/Table.
In addition, if at least one DataPlayer is configured in the file, and the file saved with a DataPlayer tab as the open tab, then the file can be designated as the template for the DataPlayer to be displayed online whenever users click on that template. Also, to save storage space in your Salesforce account, you can upload the template file empty of all data...the file will be populated with the latest data each time a user downloads it.
To upload a new template file, click on +Add Template from the All Reports or My Reports pages and the upload new template dialog will appear:
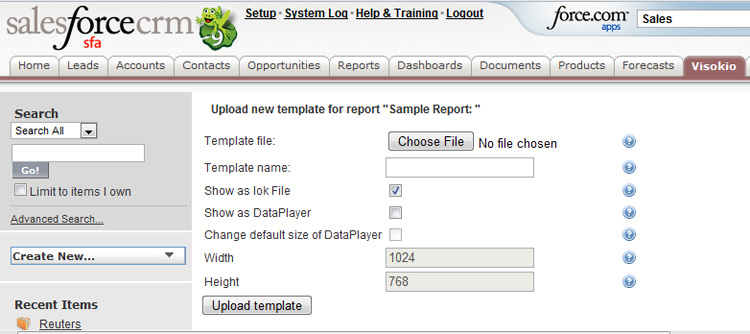
Choose file - opens a browse dialog that enables you to select the saved file that you want to upload.
Note: If you plan to use a DataPlayer configured in the file as an online displayable DataPlayer, you must save the file with the DataPlayer tab containing the preferred DataPlayer open.
Template name - choose a name that everyone will see on the tab...try to make clear who the template is internded for and avoid using spaces in the file name...like this: MyNewTemplateforSales.iok
Show as .IOK file - when ticked, this refreshable template file will be shown as a downloadable Omniscope option, which can be navigated in the free Viewer offline.
Show as DataPlayer - when ticked, this file will be displayed with the option of viewing the configured DataPlayer 'dashboard' online, just by clicking on the template icon. If you want this option to be available, you MUST save the file with the DataPlayer tab you want to display as the open tab.
Change default size of DataPlayer - DataPlayers can be sized in terms of pixel budgets for height and width. If you make larger DataPlayers, make sure you set the pixel budget associated with the DataPlayer in the file being uploades big enough to display it properly on the web tab, but not so big that user have to scroll sidebars to see and interact with it.
Upload template - your template should appear next to the Report or Data Object/Table it applies to. You cannot delete the default templates, but we welcome suggestions on how to improve the defaults to better serve your needs.
There are two default template files for every Salesforce Report and Data Object, each containing a tab with an exportable Omniscope DataPlayer interactive Flash 'dashboard'. The default DataPlayer template file contains the DataPlayer on the top tab. This DataPlayer configuration is used to generate the DataPlayer displayed online on the Visokio Reports tab in your Salesforce account. You can modify the default DataPlayer template file and upload a new version for automatic refresh and display if you have an activated Omniscope and a Salesforce Edition higher than Group Edition.
You can also use the Save/export menu options on the DataPlayer view toolbar of either template file to export DataPlayers to non-Salesforce web pages or offline documents, with full interactivity. For more detail see Exporting DataPlayers [59].
Direct Connection & Synchronisation with SalesforceOmniscope 2.5+ (all Salesforce Editions except Group Editions) |
Omniscope is the perfect complement to Salesforce/Force.com 'cloud-based' solutions, providing a general-purpose local client for improving data quality, facilitating offline data merges and management and providing end-users with refreshable analytic reports, highly-visual final management presentations. If you use the Salesforce Professional, Enterprise or Unlimited Editions, and you have installed Omniscope [52], during the free 30-day trial period you can access your Salesforce Reports and Data Objects directly. Using Omniscope, all standard and custom Reports can be accessed directly and most fields (columns) in the Data Objects can be edited/completed offline and changes synchronised back to Salesforce. Omniscope files scale to millions of records, yet are very compact, easily-shared and re-purposed interactive multi-tabbed highly-visual presentations.
Open Omniscope and go to File > Open online source > Salesforce. You will be presented with a log-in sequence requesting your User ID, password and security token, which you should copy-paste. All applications that connect directly to Salesforce must present a security token at login. You will need to set your own security token from your Salesforce account. Salesforce will send you the digital text string via e-mail. Save your token in a Notepad file, because you will have to paste it into Omniscope each time you login.
 |  |
Once you have successfully logged in to your Salesforce account, you can choose to import either an existing standard or custom Report data set, or an existing standard or custom Data Object. Report data sets can be configured, saved and shared with others, including additional data merged in from other non-Salesforce sources. However, copies of the data in Reports files cannot be edited offline such that the changes are synchronised back to Salesforce. Un-joined Data Objects contain many fields (columns) which can be filtered and corrected offline in Omniscope, and the changes synchronised back to Salesforce.
Note: some fields (columns) in every Data Object are Salesforce system-generated and cannot be edited offline. In addition, some records (rows) in Data Objects/Tables which have become interconnected with other Data Objects/Tables, such as converted Leads, cannot be edited/synced back to in their original Leads Data Object/Table, but the user-editable fields related to unconverted leads CAN be edited and the changes synced back to the Leads Data Object/Table.
 |  |
Use Omniscope to filter records (rows) for blanks, variations in spellings, inconsistencies among different records relating to the same account, and other typical data quality problems. Make systematic corrections, even across thousands of records, very quickly and easily in Omniscope, then synchronise the changes with Salesforce (see below). Regularly archive copies of all Reports and Data Objects/Tables. Quickly perform data integration by merging in data from other systems and/or stand-alone or collaborative spreadsheets.
If you open an online Report or Data Object/Table for the first time using the direct connector in Omniscope Professional 2.5, you will have to configure the Omniscope file report tabs yourself. However, if you have installed the free Omniscope (web) Connector for Salesforce [42]in your account(s), you can download an existing templated file for each standard Report or Data Object/Table from the 'Visokio Reports' tab, then follow these directions to change the file data source [60] so that you can start from an already templated reporting file. Once you have fully customised your copy of the pre-templated file, and synchronised any changes to the data with Salesforce, you can upload the file back to the Visokio Reports tab, adding a new, customised template download option for each Report or Data Object/Table. Colleagues will be able to download future fresh views of the data using the now customised template, even with the free Viewer.
Note: Uploading a populated customised file to the 'Visokio Reports' tab as a new template does not synchronise the data. Only the layout, report tab configurations and overall look and feel of the file is remembered. Each future download is fully re-populated with the freshest data from Salesforce.
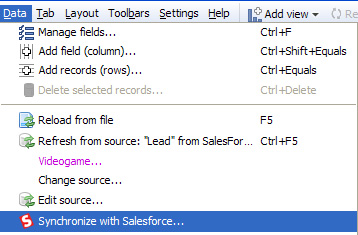
Once you have downloaded and added to or edited user-editable fields (columns) in Omniscope, you must synchronise these changes with Salesforce in order for your changes to become persistent in the online data. When you are ready to commit your changes to the online version of the Salesforce data, go to Data > Synchronise with Salesforce to launch the synchronisation wizard.
WARNING: If you close and open your local Omniscope file before you have successfully synchronised with Salesforce, be sure to skip or cancel the refresh, since this will overwrite any changes you made in the local file with values from the current online data set. You can avoid this risk by saving local copies with un-synchronised changes with the refresh option set to 'Never' until all changes have been successfully synchronised.
The Synchronisation wizard opens comparing the status of your local Omniscope version of the data with the then-current version of the Data Object/Table downloaded in Salesforce. In the example below, no new rows were added online while the file was being edited locally in Omniscope. Had new records been added by someone else online, they would show on the right current Salesforce pane in green, with the option to download the new records (rows) during synchronisation.
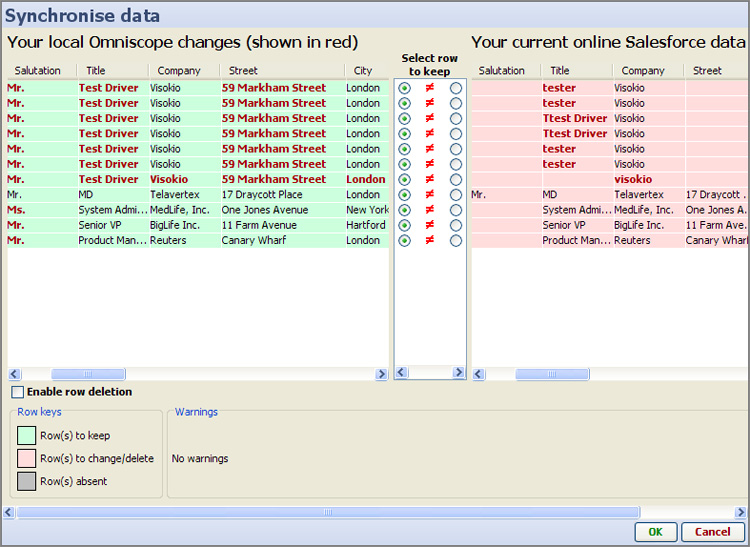
By default, there is a protective setting preventing online records from being deleted if they are not present in the local Omniscope copy. To change this, tick the option to Enable row deletion below the local changes listing.
More detail on synchronisation [61], best practices and common warning and error messages.
You can save time configuring Omniscope files for all your Reports and Data Objects if you start by downloading a copy of your data using the default templates available on the 'Visokio Reports' tab of the web connector tab for Salesforce, a certified, free AppExchange-listed application [42] your Administrator can install.
The templated files available via the web connector are downloaded without a linked source. To add/edit and synchronise data saved locally in Omniscope with your online instance of Salesforce, you first need to associate each downloaded file with the corresponding Salesforce online Report or Data Object directly.
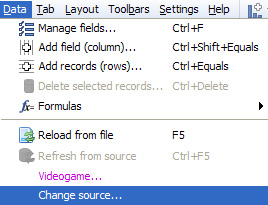
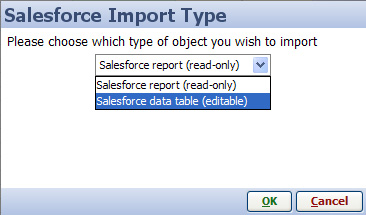
Changing the linked data source of a file is done from Data > Change source by selecting select Salesforce importer as the type of data source.
 | 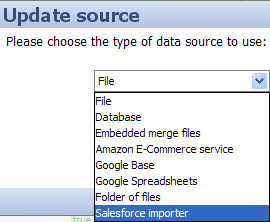 |
If you are working with a downloaded Report file, and are interested in live refresh of the data in the Report file, choose Salesforce report. The data in Reports cannot be edited directly, but can be refreshed on demand into Omniscope, and the configuration of the Omniscope file changed and saved/forwarded assuming you have an activated edittion of Omniscope (not the free Viewer).
If you are working with a downloaded Data Object/Table, and you wish to add/edit data then synchronise the changes with Salesforce, choose Salesforce data table, which are editable. You will then be prompted to login to your Salesforce account and asked to paste-in your security token. Note: Salesforce Group accounts do not support direct connections.
 | Please note: Some fields (columns) and some records (rows) within each Data Object/Table are not directly editable from outside of Salesforce. They may need to be edited from inside the web interface of Salesforce, or by reference to another Data Object/Table. Fields which are not editable are indicated in the heading. Rows which are not editable are usually screened out by filters set in the editing tab of the default template. |
{in progress}
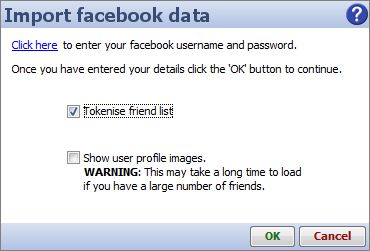
Omniscope 2.5+ provides a connector that allows you to download data from Facebook. Using the Network View, you can visualise the interconnections and relationships in your Friends list.
To import data from a Facebook account, select File > Open online source > Facebook.
| First, you must click on the link at the top of the dialog. This will take you to the Omniscope Facebook connector log-in screen. Enter your Facebook username and password and click 'OK'. Tokenise friend list - adds a separator beween each friend and enables Omniscope to treat each friend as tokenised text [62] Show user profile images - |
All options to import data present in Toolbar menu are the same options present in DataManager. Click Here [63] for more details. One Option has been Added: Open map This option allow the suer to Add Online Map: For more details of how to use Online world click Here [14]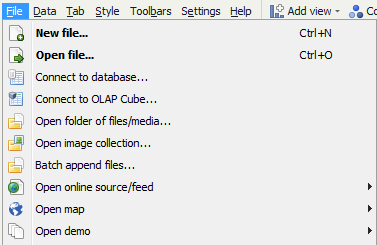
You can create a new Omniscope file 'from scratch' by entering data into the Table View, much as you would with a spreadsheet.
Populating data (brief guide) , Links to Editing topic,
Omniscope types uniformly empty (null) fields as 'Text'
Converting fields => Configuring data sub-topic
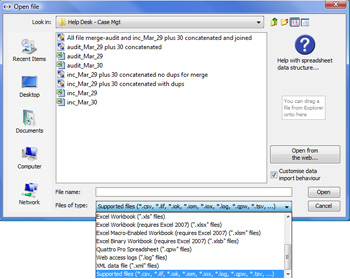
Omniscope can open most common delimited data files and tagged XML files suitably transformed. Clicking on File > Open file brings up the Open file dialog, which looks similar to a Windows file browse dialog:
 | File > Open dialog: Most source data files in Excel XLS, CSV, TSV and other common delimited text data file formats will open directly in Omniscope. The Help icon in the upper right displays a format guide [64] for importing spreadsheet files. Always confirm that your spreadsheets conform to this simple layout before trying to open them in Omniscope. If you have problems, such as all the values appearing in one column, you may need to change the delimiter or rename a tab-delimited file extension from TXT to TSV. If only some of the data fields (columns) have not separated cleanly, you can use the Expand or Collapse Values functions in the Table View Tools [65] menu to separate data into more columns or combine data from multiple columns into fewer columns. If you encounter problems importing data from one or more files, see also the KnowledgeBase section on importing and exporting data to and from supported data files. [4] Note: Importing XML files requires that the file be transformed to a single tabular structure in our schema (see below). |
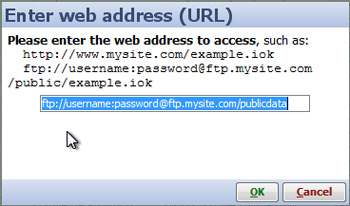 | Opening remote data files over the web -
|
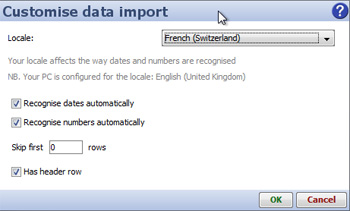 | Adapting to regional and non-standard data formatting - If you are repeatedly using/importing other peoples' spreadsheets, you can depart from the recommended standard spreadsheet layout somewhat by ticking the Customise data import behaviour option and providing Omniscope with additional information about the layout of the data you are importing. For example, sometimes you may have a CSV, TSV or Excel XLS file which does not have the column headers on the first row. Without customisation, Omniscope will assume the first row contains headers, and include the actual column headers as the first row of data. To skip any number of redundant upper rows on file import, use the Skip first ?? rows box to enter the number of redundant (usually formatting) rows in your data file to be skipped before trying to read in the headers. |
Data File delimiters - the CSV file extension stands for "Comma Separated Values", which means the cells in each row of the data table are separated by the comma character. However, if you are in a region that also uses the comma for the decimal point (e.g. several European countries, such as France) some versions of Excel create CSV files that use a semicolon as the separator character. Sometimes these files are saved with a TXT rather than CSV extension, even though they are multi-column tables. Omniscope is unable to detect these situations automatically. If you open such a file in Omniscope, your data will very clearly be wrong, with most columns appearing as text with semicolons. To import this kind of file, use the Customise data import option dialog to change the Separator character to a semicolon " ; ". Pipe "|" delimited files can also be imported, but first you must re-save the file with a CSV extension, then use the option that appears to change the delimiter to "|".
Dates & Numbers - if you are running on Windows, when importing data that is in a delimited text format which includes Excel, CSV and TSV (tab-separated values), Omniscope will use your Windows Regional Settings to try to automatically recognise data. For example, for a PC with United States Regional Settings, Omniscope will recognise "5/13/2005" as a date and "1,500.5" as a number. For some international users, however, this may not work as expected and the result will be an import of all columns as type Text (shown either as multi-coloured Category columns or white Text columns in Omniscope). If this occurs, you can usually manually convert numbers and dates & times fields using the Data > Manage fields dialog. for more information on formatting dates & times, and dealing with time zone issues, see the section on Dates & Times.
If you know your data has been formatted for a different region, change the Locale drop-down accordingly. For example, if you live in Germany but have received a CSV from an American customer, you should choose 'English (US)'. If you find Omniscope gets things wrong and your data is incorrectly recognised, you can disable auto-detection of dates and numbers by deselecting the two Recognise...checkboxes. All fields will open as Category or Text data and their text values will be preserved. See the KnowledgeBase section for more on information on dealing with International data issues. [66]
Importing XML files which have already been transformed to Visokio XML Schema [67] is the same as opening a CSV.
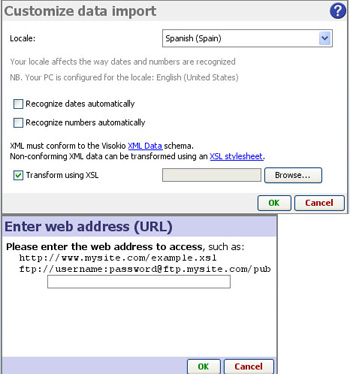 | Transforming XML into Omniscope Schema - If your XML file conforms to another schema, then you must prepare an XSL Transform [68]file, tick Customise data import and specify that file to transform the non-Visokio XML file to Visokio XML schema for import. Your XSL Transform stylesheet can be accessed from any location, including the web, using the Enter web address (URL) option to specify the online location of the XSL file.
Note: if your XML data set is not already in a tabular structure, you must array it into a tabular structure using your XSL file.
|
Omniscope DataManager workspace currently supports direct connections to Microsoft Analysis Services and some other MDX-compatible mutli-dimensional cube structures from other vendors.
MS SQL Server Analysis Services (SSAS) example [69]
Recent versions of Microsoft SQL Server 2008 includes Reporting Services (SSRS) and Analysis Services (SSAS).
Same as file metadata
Omniscope can treat any folder (and related subfolders) containing files as a data source using the File > Open folder of files/media connector. Omniscope asks for a starting folder, and will scan all files within the folder, representing each file as a record within the resulting data set. When Omniscope opens, you will see fields and corresponding filters realting to all the attributes of the files in the folder(s) - filenames, extensions, category, size, date, etc.
All supported media files will have not only their filenames but also their tags imported as additional columns. For example, the ID3 tags of an MP3 file, such as Artist, Album and Track Number will be imported, as will the meta data in a JPG photo file, including camera model, date taken, and geo-location (if available in the file). Tag fields will be available as Sidebar filters where commonly useful.
After import, Omniscope will show default Pie and Tile Views illustrating the types of files you have (such as audio and image), and a Table View showing the data, including colour-coded table headers for tags. The Tile View will also display the images for any image files.
Include subfolders - by default, this is ticked, meaning all subfolders and sub-subfolders (etc.) of the selected scan folder will also be processed. If unticked, only files directly in the selected folder will be processed.
Include files without extensions - by default, files that do not have a dotted extension such as ".txt" or ".jpg" are excluded. If ticked, files without any extension will be included. On Windows machines, most files already have extensions.
Customise which file types are included - by default all files are included. Tick this option to provide a comma-separated list of extensions to permit such as "jpg,mp3". All other files will be skipped.
Tags in filenames - you can also choose to include "Tags in filenames" from in the file chooser when browsing for a folder. This will prompt you to define the "Filename structure", which is the format of the filename as a series of delimited values, typically using a hyphen to separate them. Omniscope will then read each filename tag as an additional column. For example, you might standardise on naming your photo files according to the convention "1983-Paris-Jim's wedding", in which case you would use the format "YEAR-LOCATION-DESCRIPTION" and Omniscope would then create 3 editable fields accordingly.
You can edit the tag columns (shown in the Table View using colour-coded headers) like any other values in cells. Then, use File > Export > Apply tags to files to save your changes back to the individual files where they are stored. All filename tags will be applied (which will physically rename your files), but only supported media tags such as MP3 Artist will be applied. A comprehensive list of supported media tags for reading and writing is shown in each table column header's tooltip displayed by hovering your mouse over the column header.
Warning: The following text/screenshots apply to earlier versions of Omniscope and may be slightly out of date.
Opening a folder of files is similar to opening a folder of images. For example, Omniscope can be used to explore folders of files on part or even all of your PC or connected servers' hard disks. You can also use Omniscope to manage media file libraries (Audio, Video and related Images) including powerful options to modify and harmonise Tags as well as file naming conventions.
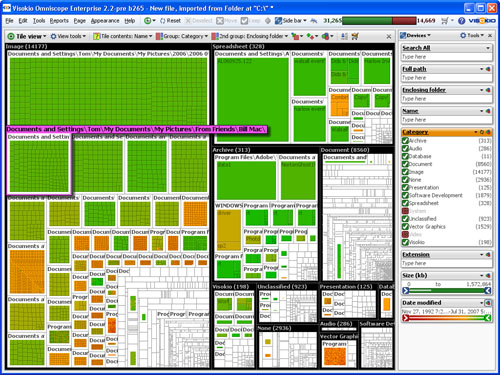
Choose File > Open folder of files/media. Browse to the top-level folder you want to explore (for example your entire C:/ root) and click Select. After a few moments, depending on the number of files scanned, you will see a Pie View on the left, a Tile View on the right and the right-hand Sidebar with filter/query devices showing both file attributes like Extension, Category and Size, as well as Tag: values. The Pie View is initally set to show the distribution of files by Category, whereas the Tile View represents each file as a tile, initially grouped by types of files (System files, Video files, Music files, etc.) and sized according to the size of the file. On opening, colour is used to show the date of each file. A green tile represents a recently modified file; red represents older files.
This view allows you to see at a glance where the space on your hard disk is allocated (by the size of the tiles), what sort of files they are (by the grouping) and how old the files are (by the colour).
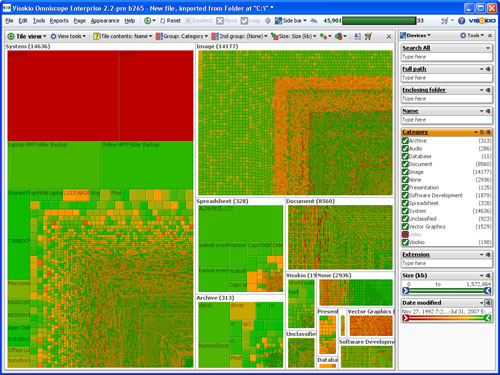
The smallest tiles/files might not be clearly visible if they are much smaller than the biggest files. Use the Side Bar query devices on the right to filter and search for relatively smaller files. For example, on a Windows machine, certain very large system files have very old dates. Filter them out by excluding System files in the Side Bar. You may want to do the same for Video files. Now set the 2nd Group option to Enclosing Folder, enabling you to see the exact locations of your larger, older (non-system) files:
You can change the primary grouping (using the Group drop-down in the Tile view) to show Level 1, which groups the files according to the first level of folders in your directory structure. You can also change the 2nd Group option to Extension to gain an overview of your files by file type. After you have analysed your Images, for example, exclude them using the Side Bar filter to focus on other types of files which tend to be smaller. Instantly you will see the relative size of each top-level folder, excluding System, Video and Images.
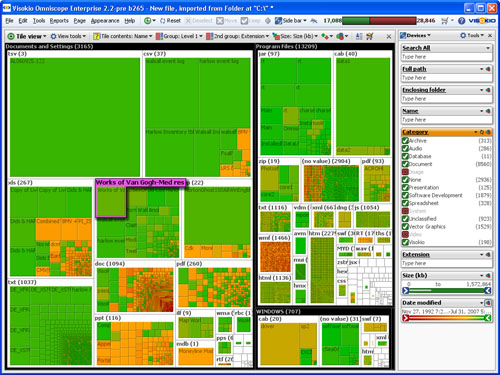
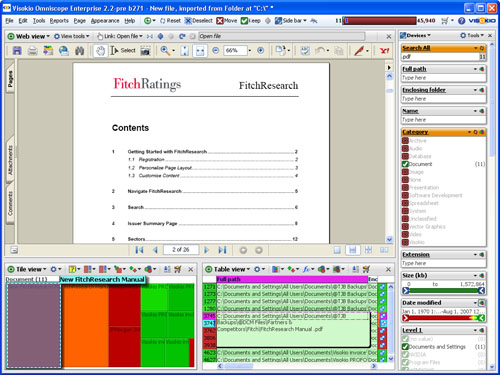
By filtering out all files that are not documents, you can use Omniscope as a document browser. For example, the Web View can display any Acrobat .PDF document. Saving this configuration as a Report Page with the filter set to Documents only permits any recipient of the file to browse the documents in a defined location (any network-accessible file server, not just their local machine as in this example).
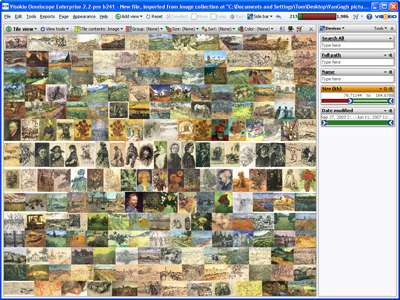
This allows you to use Omniscope to explore and manage your photo collection. Using File > Open image collection, Omniscope will ask you for a starting folder, and will scan all images within the folder, representing each as a record within the resulting data file.
You will see a Tile view showing your images in a grid, a Table view showing the data, and a series of filters. The data and filters will include information about each file, including image tags such as width, height and GPS location (lat/lon, if available).
Opening image collections is very similar to opening folders of files. See Open Folder of Files [70] for more information about advanced options, tagged files and renaming / applying edited tags to files. The only differences between the two are:
Additional advanced options
Assume files without extensions are images: By default, only files with a supported image extension (such as ".jpg") are included. If this is ticked, Omniscope will also assume files without an extension are images also. Used for specific image servers which don't provide filename extensions. All image files on Windows usually have an extension.
Warning: The following text applies to earlier versions of Omniscope and is out of date.
Omniscope can be used as a photo browser, allowing you to explore and manage large folders of images, and to send selected, annotated collections to others in compact, searchable .IOK files with supplementary information on the photos, their locations etc.
File > Open Image Collection opens a new Omniscope file in folder browser mode that allows you to point at any folder (with or without sub-folders) containing image files in .JPG, .GIF. .BMP, or .PNG format. Browse to the folder, select it and click Select.

Wait a few moments for Omniscope to import the pictures. The Tile View and left Side Bar will appear, with the images scaled down to display in the Tile View. The Side Bar filter/query devices allow you to Search All for a keyword, to filter the size of the files (and hence the quality/size of the picture), and to filter the date of the pictures. The Tile View initially shows all the pictures found in the folder chosen. As you filter, some pictures will disappear, and the remaining pictures will get bigger.
At this point, you might want to save a new .IOK file linked to this image folder. This will capture any settings you configure to the file. You do not have to embed the pictures in the file at this time. In future, you can use File > import into current file > Refresh from source to update the file to include any new photos added to the folder.
You can Select and Move pictures you want to exclude from further consideration, thereby enlarging the remaining pictures. When you see a picture you would like to add to a collection file (such as your 'holiday highlights'), click the picture to get the Details pop-window showing a larger view, then click Add to basket to save that picture in the BASKET universe. Carry on filtering and exploring your photos, adding more pictures selected for the collection file to the Basket.
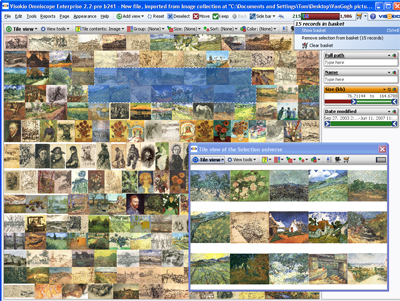
When you've finished selecting photos for the collection file, view the Basket by clicking the ![]() Basket button to the right of the Barometer on the Main Toolbar. A Table View of the BASKET universe will appear. Click Table View to display the View Chooser, and select a Tile View of the BASKET universe. For more detail, see Data Universes [71]
Basket button to the right of the Barometer on the Main Toolbar. A Table View of the BASKET universe will appear. Click Table View to display the View Chooser, and select a Tile View of the BASKET universe. For more detail, see Data Universes [71]
If you're happy with your BASKET of images, you might want to view a Slide show. See Viewing Details [72].
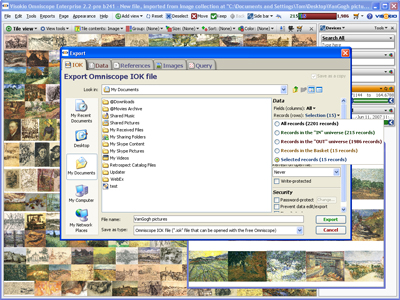
When you've finished reviewing the images you wish to save as a collection, choose File > Save as IOK/IOM. In the Save as dialog that appears, you will see a number of configuration options on the right-hand side.

Click Records (rows) and choose Records in the Basket (XXX records). This will create a new file with only the images you added to the Basket. When you make this change, the dialog will transform from a Save as dialog to an Export the images [73]dialog with the Images tab pre-selected.
Under Embed images, click Image sets and tick Image. This means the image set called 'Image' will be embedded inside the IOK file. In other words, the IOK file will be like a ZIP or archive, containing images. If your images are quite large, you may want to down-size them when embedding in the IOK file. If so, tick Reduce image sizes. A dialog for down-sizing the images will appear after you click Export. In Linked data source, un-tick Keep link to remove the reference to the original folder of images on your PC. Enter the name you want to save the file as, say 'My holiday snaps', and click Export.
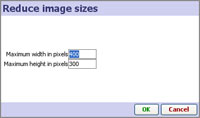
If you chose to reduce image sizes, enter the maximum dimensions you want for any image (in pixels), and all images exceeding these dimensions will be down-sized, preserving their aspect ratio, until they fit within these dimensions. You may have to wait a while down-sizing the images, but once done, you should have a simple and small (depending on the size and number of images) Omniscope file for sending to friends.
If you send an .IOK file, they only need the Omniscope free Viewer to open and view it, even export their own selected images if you have not locked the file.
Visokio supply zooming vector maps you can include in your files. Vector maps work offline, and zoom to show detail, although not down to city street level. If you send the file to someone who does not have the vector map already installed, it will be downloaded when they open the file, even if they are using a free Viewer or Omniscope Online [74], the 'zero-footprint' Java Web Start deployment of the Viewer.
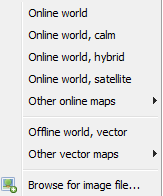
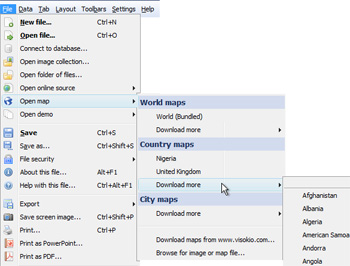 | World maps: these maps cover the whole world World (bundled) - every Omniscope contains a vector world map, but additional world maps can be added to any installation or file via download. Country maps: we offer a complete library of geo-coded country maps. Maps already installed will be listed, with more available for download. City Maps: we are in the process of adding geo-coded city maps to our library. Contact [47] us for the city you need. Alternatively, you can use static image screenshots from street-level mapping services like Google Maps (see below). Download maps - takes you to the Maps Library Browse for image or map file - any image can be used as a mapping background, and coordinates consistent with your data can be added to the image. The imported image file becomes embedded in the Omniscope file/DataPlayer and travels with the file. |
For more information on adding coordinate systems to imported images and screenshots, i.e. street level screenshots from Google Maps, etc. please see the KnowledgeBase sections on Using Maps [75] and Projection Transformation [76]
{in progress}
Links:
[1] http://kb.visokio.com/using-data-manager
[2] http://kb.visokio.com/create-new-file
[3] http://kb.visokio.com/file-open
[4] http://kb.visokio.com/kb/data-file-formats
[5] http://kb.visokio.com/import-data-phase
[6] http://kb.visokio.com/connect-to-database
[7] http://kb.visokio.com/kb/dbconnections
[8] http://kb.visokio.com/connect-to-database-2.5
[9] http://kb.visokio.com/connect-to-cube
[10] http://kb.visokio.com/open-folder-files
[11] http://kb.visokio.com/batch-append-files
[12] http://kb.visokio.com/open-data-connectors-feeds
[13] http://kb.visokio.com/using-connectors
[14] http://kb.visokio.com/file-open-map
[15] http://kb.visokio.com/book/export/html/563#File
[16] http://kb.visokio.com/book/export/html/563#List of values
[17] http://kb.visokio.com/book/export/html/563#Batch append files
[18] http://kb.visokio.com/book/export/html/563#OLAP cubes
[19] http://kb.visokio.com/book/export/html/563#Operations
[20] http://kb.visokio.com/book/export/html/563#URL
[21] http://kb.visokio.com/book/export/html/563#Sequence of values
[22] http://kb.visokio.com/book/export/html/563#Lookup data
[23] http://kb.visokio.com/book/export/html/563#Online Sources/Connectors
[24] http://kb.visokio.com/book/export/html/563#Outputs
[25] http://kb.visokio.com/book/export/html/563#Database table (or view)
[26] http://kb.visokio.com/book/export/html/563#File metadata
[27] http://kb.visokio.com/book/export/html/563#Demo data
[28] http://kb.visokio.com/book/export/html/563#Merging feeds
[29] http://kb.visokio.com/merging-feeds
[30] http://kb.visokio.com/transforming-data
[31] http://kb.visokio.com/defining-outputs
[32] http://www.google.com/google-d-s/spreadsheets/
[33] http://kb.visokio.com/use-with-google-spreadsheets
[34] http://kb.visokio.com/using-email-connector
[35] http://www.facebook.com/
[36] http://kb.visokio.com/using-facebook-connector
[37] http://www.google.com/analytics/
[38] http://kb.visokio.com/use-with-google-analytics
[39] http://kb.visokio.com/web-site-mapping
[40] http://www.salesforce.com
[41] http://www.force.com
[42] http://sites.force.com/appexchange/apex/listingDetail?listingId=a0N300000016cdWEAQ
[43] http://www.salesforce.com/appexchange
[44] http://kb.visokio.com/installed-salesforce-tab
[45] http://kb.visokio.com/salesforce-direct-connection
[46] http://kb.visokio.com/salesforce
[47] http://kb.visokio.com/contact
[48] http://www.google.com/google-d-s/intl/en/tour1.html
[49] http://www.force.com/
[50] http://kb.visokio.com/installed-salesforce-tab#group
[51] http://kb.visokio.com/for-salesforce
[52] http://kb.visokio.com/getomniscope
[53] http://kb.visokio.com/scaling-and-performance
[54] http://kb.visokio.com/files/Resources/OUGuide/134_Connectors/Salesforce/456_Installed_Web_Tab/456_SFAppExchangeListing_766x629.jpg
[55] http://kb.visokio.com/book/export/html/563#group
[56] http://kb.visokio.com/files/Resources/OUGuide/134_Connectors/Salesforce/456_Installed_Web_Tab/456_SFMyReports_800x600.jpg
[57] http://kb.visokio.com/files/Resources/OUGuide/134_Connectors/Salesforce/456_Installed_Web_Tab/456_LeadsScreenshot_800x600.jpg
[58] http://kb.visokio.com/files/Resources/OUGuide/134_Connectors/Salesforce/456_Installed_Web_Tab/456_SFUploadTemplate_750x334.jpg
[59] http://kb.visokio.com/export-dataplayers
[60] http://kb.visokio.com/change-sfsource
[61] http://kb.visokio.com/synchronise-changes
[62] http://kb.visokio.com/tokenized-data
[63] http://kb.visokio.com/importing-data
[64] http://kb.visokio.com/files/222_annotated_spreadsheet.png
[65] http://kb.visokio.com/table-view
[66] http://kb.visokio.com/international-issues
[67] http://kb.visokio.com/xmldata
[68] http://www.w3schools.com/xsl/
[69] http://kb.visokio.com/ms-ssas-cube-example
[70] http://kb.visokio.com/open-folder
[71] http://kb.visokio.com/node/235
[72] http://kb.visokio.com/node/224
[73] http://kb.visokio.com/node/302
[74] http://kb.visokio.com/using-omniscope-online
[75] http://kb.visokio.com/kb/using-maps
[76] http://kb.visokio.com/kb/projection-transformation