If you have received an Omniscope file, you may also have received a link to this page explaining how to interact with an Omniscope file using your free Viewer. Clicking on an Omniscope IOK file attached to an e-mail, a link to a file on a web page, or an IOK file saved in a network shared folder will open not only Omniscope, but the IOK file as well. Omniscope IOK files you receive should have been configured to anticipate your typical uses of the file. .
Omniscope free Viewers support the full range of interactions with the daa in the file, links and even submissions to web services. However, free Viewers cannot save changes to IOK files. To do this, you will need to upgrade your free Viewer to an activated Edition. The Enterprise Server Commercial Publisher Edition can produce/save IOK files that DO enable certain key features in the free Viewer, such as live data refresh, export of selected data subsets to Excel/CSV, etc. For more information, see the Edition comparison chart [1] or contact us [2]for advanced publishing options.
Navigating Omniscope files is easy and intuitive
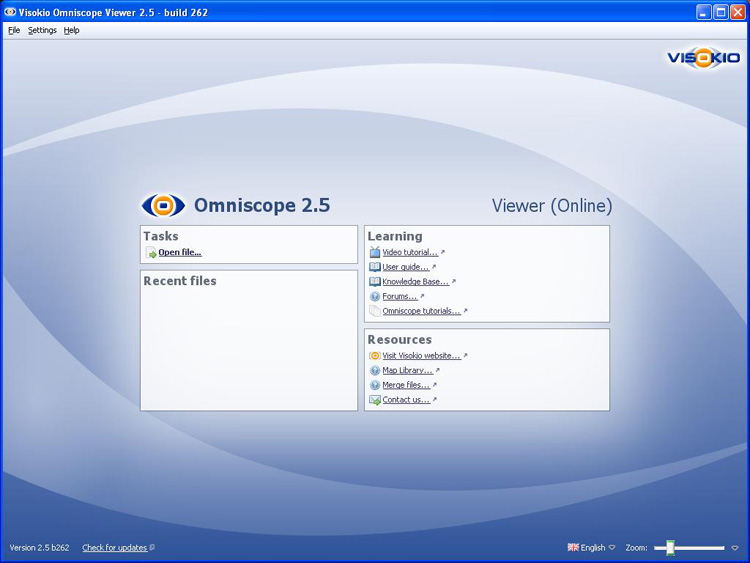
Welcome screen [3] - If you open your free Viewer from the desktop launch icon, or if you download Omniscope Online from a link without a linked data file, or if you close the file you are viewing, you will see the Viewer Welcome screen [3]. You can browse to and open any IOK file from the Welcome screen.
Omniscope files can be configured to open in Layouts with the Main Toolbar either displayed, or hidden, in which case it will drop down only when users hover thier mouse near the top of the display. All options are accesible from the Main Toolbar, but some options can be moved to the Sidebar [4] to permit users to interact with 'dashboard' Layouts, for example, without being confronted with the Main Toolbar.
Most filtering and searching of Omniscope files is done using the devices revealed on the right (and sometimes left) Sidebar. If the file is being delivered in Layouts with the Main Toolbar [5] hidden e.g. Dashboard mode, then key options may be displayed on the Sidebar(s).
Tabs are generally displayed across the top, or just under the Main Toolbar when it is visible. There is also an option to display lengthy lists of tab names grouped into sections in the Sidebar. A tab is a persistent combination of Views, Layout elements (including title and annotation text, graphics, etc.), filter settings and opening settings for formula variables defined in the file. The person who configured your file would have created and named the tabs, each focused on a different aspect of the data, or perhaps different users of the file.
If you open an Omniscope Viewer from a desktop launch icon or the Programs list, you will see the Viewer Welcome Screen. The Welcome screen displayed in the free Viewer, (either a permanent install or a temporary, zero-footprint install using Omniscope Online [6]) is less detailed than the Welcome Screen displayed by an activated installation:
{update to version 2.5 in progress}
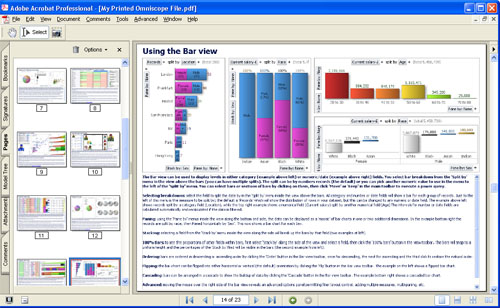
Omniscope offers options to print from individual views, or at the level of the entire file. In addition to printing only one view, or the current page, it is also possible to print some or all tabs as PowerPoint or Adobe Acrobat files, with many options to show or hide various aspects of the Omniscope display in the printed versions.
Sometimes, you may wish to print a single view on a single piece of paper. All views offer this option from View Tools > Capture Views > Print. Right clicking on views with backgrounds, like the Pie and Graph Views, also presents a view Print option.
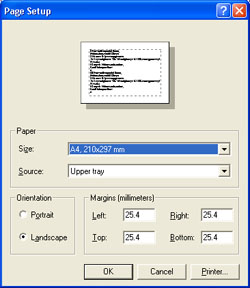
If you are running Windows, the individual view print option available from Capture Views > Print will launch the Windows Page Setup dialog enabling you to confirm the paper size, orientation and margins for the page you wish to print.
 |  |
Note: When printing individual views, the view title does not print.
Sometimes, you would like to print a paper copy of the entire page display, or multiple tabs, from Omniscope. On the Main Toolbar, File > Print opens a printing options dialog:
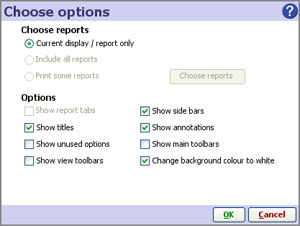
Choose reports:
Current display/report only - prints only the current tab displayed in Omniscope
Include all reports - prints all the tabs in the file.
Print some reports - allows you to choose which tabs you wish to print from a drop-down pick list
Display options:
Show report tabs - unless ticked, Report Page tabs are not printed
Show side bars - when ticked, Side Bars are printed on each page.
Show titles - when ticked, the page titles are printed (view titles are always printed when printing pages)
Show annotations - when ticked, prints the annotations below the views on each page
Show unused options - unless ticked, does not print aspects of the display relating to unused options, e.g. Pane-by menus are not displayed in views with no active paning.
Show Main Toolbar - unless ticked, the Main Toolbar does not print
Show view toolbars - unless ticked, the View Toolbars do not print
Change background colour to white - when ticked, substitutes a white background when printing
File > Print as PowerPoint launches the Print Options dialog described above. You can choose to print the current display, or some or all the Report Pages configured in your file. Click on OK and Omniscope processes the pages you have selected. When it finishes, Omniscope displays the Print as PowerPoint wizard:
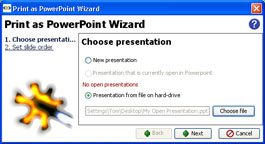 |  |
If you want to create a new PowerPoint file, choose New presentation. If you already have your PowerPoint file open, choose it from the list of open presentations. Otherwise, browse to and open the PowerPoint file you wish to add pages to. If you are adding pages to an existing PowerPoint file, you are asked where to insert them:
Warning: If you specify Replace existing slide, make sure that the slide number choosen is a blank 'placeholder' slide or otherwise uneeded; it will be overwritten and all addtional pages inserted behind it. Subsequent slides will not be overwritten.
Click on finish and Omniscope will open the PowerPoint file. If you wish to save or print this file, you can now do so from PowerPoint itself:
File > Print as PDF launches the Print Options dialog described above. You can choose to print the current display, or some or all the Report Pages configured in your file. Click on OK and Omniscope precesses the pages you have selected. When it finishes, Omniscope displays the Print as PDF wizard:
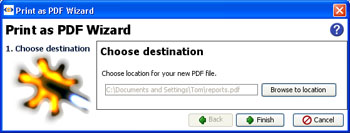
Specify the new file name and location you want to save this file. Open the file to access the full range of options for managing .PDF files, including printing.
Applies to versions 2.3 & 2.4
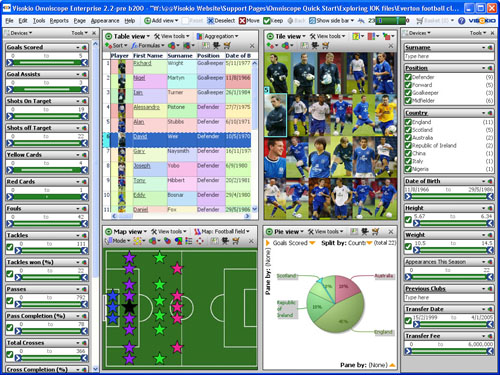
This section provides an introduction to 'navigating' or 'exploring' Omniscope files that someone else has prepared and sent to you. This section uses an Everton British football club file as an example, which you should download now [7].
Omniscope files always open as last configured and saved. In the case of the Everton file, it has many columns that could be used for filters, so it has been configured to open with four views and both the right and left Sidebars open:
The following sections discuss the navigational features on the Omniscope Main Toolbar, and the use of Sidebar filters and other devices that help you navigate any IOK file and select the records (rows) that you wish to see in detail.
![]()
The left side of the Main Toolbar contains top level command menus useful for preparing .IOK files. These are not needed to navigate .IOK files already prepared by someone else with your needs in mind. More detail on these commands, which are not specific to using individual views, can be found here [8]
To the right of the command menus, the Main Toolbar displays a number of useful icons/buttons that are used to aid exploration/navigation of the .IOK file:![]() Add View - Used to add an additional View to the current display. In the demo, try adding a Details View to the display. To remove a View from the display, click on the [X] in the upper right hand corner. To change one View to another, click on the View name and select the View you want from the drop-down menu. In the demo, try changing the Map View to a Graph View.
Add View - Used to add an additional View to the current display. In the demo, try adding a Details View to the display. To remove a View from the display, click on the [X] in the upper right hand corner. To change one View to another, click on the View name and select the View you want from the drop-down menu. In the demo, try changing the Map View to a Graph View.![]() Reset - Omniscope files are flat tables of data, with records (rows) and fields (columns). One of the objectives of navigating an Omniscope file is to select and focus on only a certain subset of records (rows), rather that the whole universe of records in the file. The Reset button removes all of the filtering criteria you may have expressed, and returns the current display views to show all the records. It is very important to always reset your data before filtering, so that all qualifying records will be considered in your subsequent query.
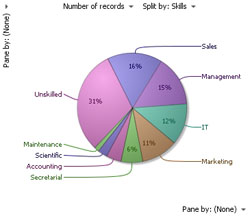
Reset - Omniscope files are flat tables of data, with records (rows) and fields (columns). One of the objectives of navigating an Omniscope file is to select and focus on only a certain subset of records (rows), rather that the whole universe of records in the file. The Reset button removes all of the filtering criteria you may have expressed, and returns the current display views to show all the records. It is very important to always reset your data before filtering, so that all qualifying records will be considered in your subsequent query.![]() Deselect - Omniscope navigation depends on 4 basic operations: Select (or Deselect), Move, Keep, and Reset. Every view provides ways of selecting one or more records. In the Everton demo file, look at the Table View and under 'Player', click on the first picture (Richard Wright). His record is now selected, indicated by blue animated shading, and his record is now highlighted in other views. In the Graph View, for example, we can see from the blinking highlight that like most goalkeepers, he had no goals or assists. Now click the Deselect icon on the main Toolbar, and this record is not longer selected. Try selecting, then de-selecting other players, or groups of players. For example, in the demo Pie View, click on Republic of Ireland. This will select two goal-scoring players from Ireland. Be sure to click Deselect before moving on.
Deselect - Omniscope navigation depends on 4 basic operations: Select (or Deselect), Move, Keep, and Reset. Every view provides ways of selecting one or more records. In the Everton demo file, look at the Table View and under 'Player', click on the first picture (Richard Wright). His record is now selected, indicated by blue animated shading, and his record is now highlighted in other views. In the Graph View, for example, we can see from the blinking highlight that like most goalkeepers, he had no goals or assists. Now click the Deselect icon on the main Toolbar, and this record is not longer selected. Try selecting, then de-selecting other players, or groups of players. For example, in the demo Pie View, click on Republic of Ireland. This will select two goal-scoring players from Ireland. Be sure to click Deselect before moving on.![]() Move - Selecting records is a precursor to deciding whether to Move these records OUT of further consideration. The Move Command moves all selected records OUT of consideration, where they stay until the display is Reset.
Move - Selecting records is a precursor to deciding whether to Move these records OUT of further consideration. The Move Command moves all selected records OUT of consideration, where they stay until the display is Reset.![]() Keep - the opposite of Move, the Keep command keeps only the selected records IN consideration, and moves all the other unselected records OUT of consideration.
Keep - the opposite of Move, the Keep command keeps only the selected records IN consideration, and moves all the other unselected records OUT of consideration.![]() Back - like a browser, you can go back to the previous display at any time by pressing Back.
Back - like a browser, you can go back to the previous display at any time by pressing Back.![]() Controls (2.3 Show Sidebar) - clicking this icon gives you the option to show or hide the Sidebars on one or both sides of the current display. Uses of the Sidebar are explained in the section on filtering.
Controls (2.3 Show Sidebar) - clicking this icon gives you the option to show or hide the Sidebars on one or both sides of the current display. Uses of the Sidebar are explained in the section on filtering.![]() Barometer - upon opening a file, it is useful to know how many records are in the data set. As you filter, it is useful to see how many records have been kept IN consideration, and how many moved OUT. The barometer is a visual gauge that shows the total, as well as the split between IN (green) and OUT (red). Click on the Republic of Ireland wedge of the Pie View in the demo. Notice how the barometer tells you that you have selected two players.
Barometer - upon opening a file, it is useful to know how many records are in the data set. As you filter, it is useful to see how many records have been kept IN consideration, and how many moved OUT. The barometer is a visual gauge that shows the total, as well as the split between IN (green) and OUT (red). Click on the Republic of Ireland wedge of the Pie View in the demo. Notice how the barometer tells you that you have selected two players.
Now click ![]() Move. Notice how the barometer tells you that you have excluded two players...just because they were Irish?
Move. Notice how the barometer tells you that you have excluded two players...just because they were Irish?
Since they were goal scorers, let's click ![]() Reset and put them back on the team!
Reset and put them back on the team!![]() {version 2.3 only} Basket - the basket is a 'parking place' where you can put selected records, such that they will stay there even if you Reset the display. At any time, you can open the Basket and see the records you have placed there. In the demo, go to the Table View and select the Position 'Goalkeeper' instead of Richard or Wright. Notice that unlike a spreadsheet, the Barometer tells you that you have selected 3 Goalkeepers, not just Richard Wright. Now click the Basket, and choose 'Add selection to basket'. The record count in the Basket changes to 3. To view the contents of the Basket, click on the icon. We have just put all 3 of our Goalkeepers on the market! Let's re-consider...click on the drop-down arrow to the right of the basket, then click Clear selection from basket, or Clear basket. More on Using the Basket [9].
{version 2.3 only} Basket - the basket is a 'parking place' where you can put selected records, such that they will stay there even if you Reset the display. At any time, you can open the Basket and see the records you have placed there. In the demo, go to the Table View and select the Position 'Goalkeeper' instead of Richard or Wright. Notice that unlike a spreadsheet, the Barometer tells you that you have selected 3 Goalkeepers, not just Richard Wright. Now click the Basket, and choose 'Add selection to basket'. The record count in the Basket changes to 3. To view the contents of the Basket, click on the icon. We have just put all 3 of our Goalkeepers on the market! Let's re-consider...click on the drop-down arrow to the right of the basket, then click Clear selection from basket, or Clear basket. More on Using the Basket [9].![]() Help screen - click on the help icon to see what the publisher or re-publisher of the file may have to say that will help you understand more about the file.
Help screen - click on the help icon to see what the publisher or re-publisher of the file may have to say that will help you understand more about the file.![]() Publisher logo link - if you are publishing or re-publishing a file, you can put your own logo here, and link it to your website.
Publisher logo link - if you are publishing or re-publishing a file, you can put your own logo here, and link it to your website.
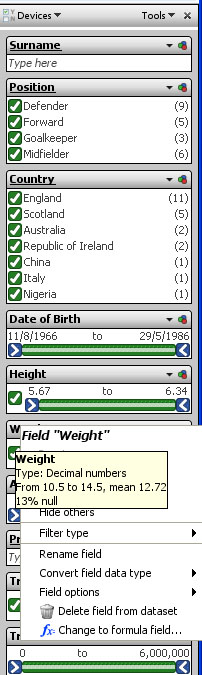
Most Omniscope files contain pages with Sidebars showing on the right, the left or on both sides of the display. At any time, you can reveal and configure Sidebars to help you and your readers navigate a file.
{version 2.4 only} The display of Side Bars is controlled from the Main Toolbar > Controls drop down menu. More infomation on configuring and using Sidebars [10] and using the Controls [11] drop-down.
| In the Sidebar text device labelled 'Surname', type a letter. Notice how all views update to display only players whose surnames begin with that letter. Back-space or click Right-clicking on a Sidebar device reveals a wealth of options to change things, such as resetting all the other filters or even hiding the filter. To return all Sidebar filter settings to their original state, click the global |
Links:
[1] http://kb.visokio.com/omniscope-editions-comparison-chart
[2] http://kb.visokio.com/contact
[3] http://kb.visokio.com/welcome-screen-viewer
[4] http://kb.visokio.com/viewer-using-sidebar
[5] http://kb.visokio.com/viewer-main-toolbar
[6] http://kb.visokio.com/using-omniscope-online
[7] http://kb.visokio.com/files/Resources/OUGuide/126_Use_IOKs/126_Everton_football_club.iok
[8] http://kb.visokio.com/commands-reference-2-4
[9] http://kb.visokio.com/node/365
[10] http://kb.visokio.com/side-bars
[11] http://kb.visokio.com/controls