Relates only to version 2.3 and earlier. Data Universes have been reclassified as Data Subsets selectable using the Data Subset drop-down selector in each individual View Toolbar, and configured using the Queries drop-down on the Main Toolbar (2.4)
When Omniscope filters records, where do the excluded records go? Don't worry...they are not deleted! Based on your filtering decisions, Omniscope classifies each record (row) in a given file as being in one or more Data Universes:
All of these Universes can be viewed at any time in any of the 12 available views in Omniscope. Click on ![]() Add View on the Main Toolbar, then select the Show other data universes option at lower right.
Add View on the Main Toolbar, then select the Show other data universes option at lower right.
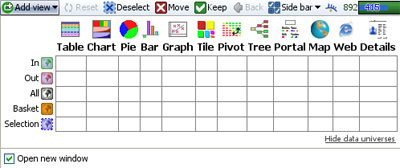
Tick the box representing any combination of Views and Universes to see the records (rows) currently in each universe in each view.
If you save an Omniscope file, the contents of the IN and OUT Universes will be preserved, and the file will open with the barometer showing the same IN/OUT split as when the file was last closed. However, the contents of the BASKET and SELECTION Universes will be re-set. Always remember to do something with the contents of your BASKET universe before you close the file, because this selection of records will not be there when you open the file again.
Let's explore the use of Data Universes in Omniscope, while re-visiting the filtering aspects of navigating .IOK files. Recall that there are 2 filtering approaches in Omniscope, which can be used interchangeably at any time, assuming at least one SideBar with instant filter/query devices is showing.:
For this tutorial, please download another, especially-configured version of the Everton Football Universes [1] file. This version of the Everton file has been configured to open with five Table Views, one for each Universe, and with only one Side Bar open:
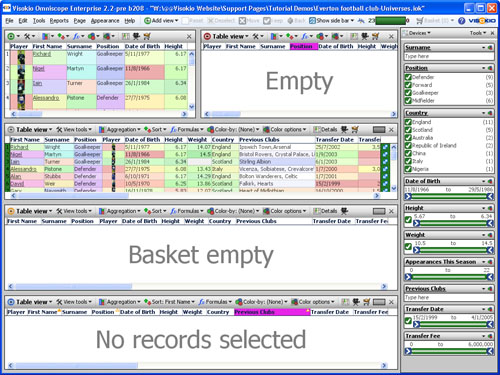
The View icons on the far left of each View Toolbar are coloured to show which of the 5 Universes is being displayed in the view. In this demo, the upper left-hand Table View is showing the green IN Universe, all 23 players. The upper right-hand Table View is showing the red OUT Universe, currently empty because no players have been filtered out. The full-width black ALL Universe Table View in the middle will always show all players, regardless of filtering. The gold BASKET Universe Table View is showing 'Basket Empty', since no players have yet been placed in the Basket. Finally, the bottom blue SELECTION Table View is empty, indicating that no records are yet selected.
Using the Side Bar, type the letter 'B' into the top text query device labelled Surname. Notice how the right-hand green IN Table View changes to display only the 3 players whose surnames begin with B, and the left-hand red OUT Table View now displays the records for the 20 players whose surname does not begin with 'B'. A glance at the barometer confirms that the green IN Universe contains 3 players whose surnames begin with B, and the red OUT Universe contains 20 players whose surnames all begin with other letters. In the Side Bar, back-space over the letter 'B' to clear the Surname query device, which will Reset the file, since this was the only extant query/filter setting.
Notice that when using the Sidebar devices, the bottom Table View showing the SELECTION Universe did not show any records being selected, and that moving 20 players to the OUT Universe was instant.
Now let's try using Selection, which can be very useful for drilling-down and confirming details before deciding whether to execute a Move or Keep operation.
Go to the upper right green Table View showing the IN Universe, and click on the Position category Defender, which will display an animated highlight in blue. This means you have selected all the players who are Defenders, and their records will now appear in the bottom blue SELECTION Table View. A glance at the barometer will confirm that you have selected 9 Defenders out of the 23 on the team.
Let's say you want to take a closer look at the Defenders. On the main/top Omniscope Toolbar, click on the green check-marked icon labelled Keep. This will keep only Defenders in the green IN Universe and move all others to the red OUT Table View to the right. Notice that the SELECTION Table View has been cleared, pending you next selection.
Let's say you want to put all the English Defenders on the transfer market (don't ask...). In the Sidebar, using the 3rd device labelled Country, click on the category name England. Notice that all other nationalities are X-ed out and all non-English Defenders are moved to the red OUT universe, leaving only the 4 English Defenders remaining in the IN Universe. Now go to the green IN Table View Toolbar, and find the Add to Basket icon right-most on the toolbar. Click the Add to Basket icon, and notice that the gold Table View showing the BASKET Universe now shows the 4 English Defenders.
Click Reset on the Omniscope Main Toolbar. This will return all players to the IN Universe, and empty the OUT universe, but leaves the 4 English defenders in the Basket, as can be seen also on the top/main Omniscope Toolbar Basket icon to the right of the barometer.
Let's save the youngest English Defender for the future. In the gold Table View showing the 4 English Defenders currently in the BASKET Universe, click on the column header Date of Birth. This will set a primary sort (see the orange downward arrow appear in the column header) sorting the players in the basket from youngest to oldest. Double-click on the row header of the youngest player, Daniel Fox. This will display the details window pop-up for Daniel Fox. Now click Remove from Basket to remove Daniel's record from the basket.
To clear the BASKET Universe completely, click on the right-most Clear basket icon in the gold Table View Toolbar, or use the Omniscope Main Toolbar Basket > Clear basket command on the drop-down menu. More on Using the Basket... [2]
Refers to version 2.3 and earlier. From Omniscope 2.4, the basket universe has been superceded by Named Queries [3] which are far more powerful. The terminology "Data universes" has also been dropped. Using Named Queries, multiple baskets can be used.
Omniscope classifies every record in the data set as belonging to various 'data universes'. In addition to being in either the IN or OUT Universe, all records are always in the ALL universe. At any given time, any selected records are in the SELECTION universe. Clicking ![]() Deselect, or executing a power query using
Deselect, or executing a power query using ![]() Move or
Move or ![]() Keep removes all records from the SELECTION universe and shifts records between the IN and OUT universes. Clicking
Keep removes all records from the SELECTION universe and shifts records between the IN and OUT universes. Clicking ![]() Reset moves all records from the OUT universe back to the IN universe.
Reset moves all records from the OUT universe back to the IN universe.
Version 2.3 and previous: Every View Toolbar (except the Web View) allows you to put all (or just one or more selected) records into the BASKET universe, building up a list of records in which you are particularly interested. The purpose of the BASKET universe is to allow you to collect a session-persistent subset of records (rows) that does not Reset. The Basket allows you to use many different Side Bar filter criteria or sequences of power queries to identify records of interest, placing each group of records in the BASKET for 'safekeeping' prior to executing a Reset and applying other filtering sequences or power queries to your data.
Although records in the BASKET are unaffected by Resets, the contents of the BASKET not saved on Exit. If you wish to save, share or reuse the contents of the BASKET, you must use the Export or Import basket references (or images) command options which appear on the View Toolbar whenever you are viewing the BASKET target universe:
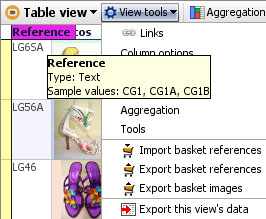
References are the values in a field (column) that are unique, that is, there is only one reference value for each record (row). (You should always test for duplicate references using the Table View Tools Tools > Select duplicate values option )
Import basket references- if you or someone else using data with the same unique identifiers have previously saved a reference list as the single column of values in a .TXT file, you can re-create the contents of the BASKET in your current Omniscope session using this command to import the external .TXT reference file. Omniscope will move all matching records (rows) into the BASKET universe automatically, and tell you if any references in the external file could not be matched.
Export basket references- typically, you use Side Bar filtering and power queries (together with geographic and image-based selection) to identify a sub-set of records on interest, and accumulate them in the BASKET universe. Before you exit, if you want to save (to share or re-use/re-create) the contents of the BASKET, you must use this command to export a .TXT file containing a list of the references currently in the BASKET.
Export basket images- Omniscope can be used to manage and select images grouped in folders (image sets) for web-sites, DataPlayers, and other uses. At any time, a selection of images in the BASKET can be exported as a new image folder using this command.
Export this view's data- used to export the entire contents of the BASKET universe in various file formats ( .IOK/.IOM, .XLS, .CSV, .TSV, .XML, etc.) using the Export Data wizard [4].
You can enable your users to browse the contents of the BASKET in any view(s), but given that they will have already selected these records and placed them in the basket for closer review, a free-floating instance of the Details View with the records navigation slider revealed can be the most effective.
To create a free-floating view, use ![]() Add View command on the Main Toolbar with the Open new window option ticked. From the Details View Toolbar, choose Show navigation controls to display the arrows and slider navigation at the top, and untick the Sync option, since this view is for user review of the BASKET universe only. Add a title, use the Links option to add buttons for the action links at the bottom, then hide the View Toolbar and users will be able to interact with their baskets record-by-record using a floating window something like this:
Add View command on the Main Toolbar with the Open new window option ticked. From the Details View Toolbar, choose Show navigation controls to display the arrows and slider navigation at the top, and untick the Sync option, since this view is for user review of the BASKET universe only. Add a title, use the Links option to add buttons for the action links at the bottom, then hide the View Toolbar and users will be able to interact with their baskets record-by-record using a floating window something like this:

Links:
[1] http://kb.visokio.com/files/Resources/OUGuide/235_Data_Universes/Everton_Universes_Tutorial.iok
[2] http://kb.visokio.com/using-basket
[3] http://kb.visokio.com/queries-subsets
[4] http://kb.visokio.com/export-files