{update to 2.5 in progress}
Omniscope can be used to align a set of images in a folder with records (rows) relating to each image, such that the images associated with each record (row) can be displayed in various views:
Before you can display images, however, you must associate one or more folders of images with the .IOK file as named image sets. Preparation for this involves saving a set of images in a single folder with a consistent naming convention that matches the text values in one of the columns of your .IOK file (it may be a column included just to hold the names of the images).
To save you having to find a lot of pictures in order to try this, the example below will use an Omniscope embedded demo file 'Works of Van Gogh', and its associated high-resolution image set. To take this tutorial, first click on the link below to download a zipped folder containing the images for the "Works of Van Gogh" demo.
Van Gogh Demo Image Set [1]105.3 MB (about 4-5 minutes on broadband)
Note: this folder contains many high-resolution images, making the download quite large. In order to bundle the entire folder of images together, this is a .ZIP file; do not click 'Open', click 'Save'. Download and unzip the folder, and save the unzipped folder on your desktop. Once you have saved the unzipped folder of images, open Omniscope and click Files > Demo files and select 'Works of Van Gogh'.
The embedded version of the demo file does not have the associated image embedded in it. Go to Settings > Images and you will see there are two options for retrieving the images, an automated, online service, and the manual approach. For this tutorial, to gain experience using the Add Images wizard we will try adding the downloaded image set manually. Select Add more images.
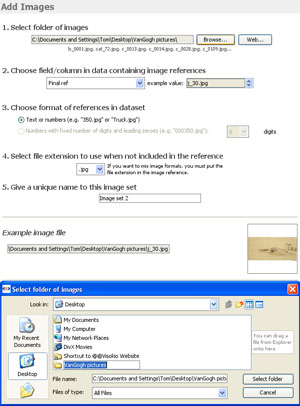
The Add Images Wizard will launch:
 | 1. Select Folder of images-Browse to the folder on your desktop containing the images and click select folder. 2. Choose field/column containing image references (the names of the image files)...in the Van Gogh demo this column is called 'Final Ref'. Select 'Final Ref' and you will see a sample image name displayed...in this case, a picture in the folder named J_30.jpg. 3. Choose format of references-Omniscope detects this automatically for demo files. 4. Select file extension to use...-this will show '.jpg' since all the images in the file already have this extension. 5. Give a unique name to this image set...change the suggestion from 'Images Set 2' to 'My Downloaded Images'. Check the example image at bottom right corner of the wizard and ensure that the correct image is displayed. Click OK to associate the named image set. |
To see your image set displayed, go to ![]() Add View on the Main Toolbar and add a Tile View. On the Tile View toolbar, click on the [ ? ] field (column) selector drop-down and select My Downloaded Images. You will see the images start to appear, but coloured. Go to the Colour selector to the right on the Tile View Toolbar and select 'none' to see the works coloured as van Gogh intended.
Add View on the Main Toolbar and add a Tile View. On the Tile View toolbar, click on the [ ? ] field (column) selector drop-down and select My Downloaded Images. You will see the images start to appear, but coloured. Go to the Colour selector to the right on the Tile View Toolbar and select 'none' to see the works coloured as van Gogh intended.
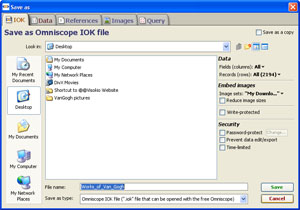
If you have an activated Edition of Omniscope (Professional or Enterprise) you can experiment with saving the file with your downloaded images embedded. At the same time, you can see the trade-offs between file size and image clarity/resolution that results when you reduce the image size to reduce the size of the .IOK file. To save a version of your file click File > Save as. The Export File dialog will appear:
 | Note the commands available along the right hand side: |
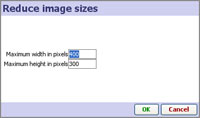
Tick the box 'Reduce Image size' . Give the new version of the file you are saving with embedded images a name, such as Works of Van Gogh 200x150.iok. Click Save and you will see an image reduction dialog that enables you to reduce the size of the images to reduce file size, but at some cost in terms of image clarity.
| Accepting the existing image sizes will result in a file of over 100 MB, so let's try reducing the dimensions of the pictures by 50%, to 200x150 (hence the name of the file we are saving). Change the maximum values to 200 wide and 150 high and click OK. Omniscope will save the file with reduced embedded images. The resulting file is about 14 MB, still large, but not bad for an entire art exhibition in a portable, searchable file! |
{update for 2.5} Open the new version of file and close all the open Views except the Tile View, which should be configured to display the now embedded image set My Downloaded Images. On the Tile View Toolbar, select the movie camera Slide show icon to the left of the Add to basket icon far right. Click 'Start slide show' and choose full screen sub-option. Look at the image quality on your screen. If it is acceptable for the audience/screen resolutions you intend, consider reducing the images more to reduce the .IOK file size further. If the image quality full screen is not acceptable, you may have to reduce the maximum size of the images less (increasing the file size), or configure the views such that images are never displayed so large. To do this, repeat the steps above, and set larger maximums in the 'Reduce image size' box.
Before you can display images related to your data set, you must first associate one or more image folders with your IOK file as named image sets. Preparation for this involves saving a set of images in a single folder with a consistent naming convention, such that one of the columns of your IOK file (it may be a column included just to hold the names of the images) contains the same text values as the file names of the images in the folder, i.e. 'picture1', 'picture2' etc. Any image naming convention can be used, so long as the same exact text strings are present in one of the columns of your data set. You can omit the file extension from the data column if all the images have the same extension, e.g JPG or GIF. If the images are mixed format, the names in the data column must include the file extension for at least one of the formats.
There are 3 ways to display images in Omniscope:
It is also possible for Omniscope to display multiple images per record, provided you have entered multiple values in the image reference cell by declaring the field (column) to be Tokenized (for more detail, see Tokenized data). [2] If you enter multiple image references per cell, the Tile View will show the first image by default, but you can change this in the Tile View View Tools > Advanced sub-menu. The Details View, pop-up windows and Slide shows will all display the tokenized images for each record.
The Tools > Images menu contains two options:
Add Image Set- launches the Add Image Set wizard documented below.
Modify Image Set (only visible if an image set is already associated with the file)- launches the Edit Image Set wizard, which is effectively the same as the Add image set wizard. The modify image set option is usually used to re-import or re-embed an image set using the Refresh embedded images button at the bottom. Warning: Only use this command if you are sure you know the location of a complete new image set, ideally containing images at the original resolution, so that you can remove the old one and replace it with a new one.
 | 1. Select Folder of images- Browse to the folder containing the images. If the file is located on a remote machine accessible via the web, click Web and enter the web address of the folder. 2. Choose field/column containing image references- specify which field in your data file contains the names of the image files, and confirm by cycling through a range of example values. 3. Choose format of references- specify which format the image names are in 4. Select file extension to use- for image sets with mixed formats (e.g. .JPG and .GIF), you must include the file extensions for the non-default format as part of the image names in the reference field, but you do not need to add the extension to the default format references. 5. Give a unique name to this image set- give each image set you create a descriptive name. Check the example image at bottom right corner of the wizard and ensure that the correct image is displayed. Click OK to associate the named image set with the open IOK file. |
To see your image set displayed, go to ![]() Add View on the Main Toolbar and add a Tile View. On the Tile View Toolbar, click on the [ ? ] field (column) selector drop-down and select 'My Image Set' or whatever unique name you have used. The Tile View should display all the images in the image set. Missing images will be substituted with a red tile, but you can create a special image to substitute the missing ones, give it a name, add it to the images folder, and add its name to the empty cells in the image reference column.
Add View on the Main Toolbar and add a Tile View. On the Tile View Toolbar, click on the [ ? ] field (column) selector drop-down and select 'My Image Set' or whatever unique name you have used. The Tile View should display all the images in the image set. Missing images will be substituted with a red tile, but you can create a special image to substitute the missing ones, give it a name, add it to the images folder, and add its name to the empty cells in the image reference column.
Once you have associated and image set, you can save the IOK file with your images embedded. You can also experiment with the trade-offs between file size and image clarity/resolution when you reduce the image sizes to reduce the size of the IOK file. To save a version of your file click File > Save as IOK. The File Save wizard will appear:
 | Note the commands available along the right hand side: |
If you embed large numbers of large images without reducing their size, the resulting IOK file can become far too big. In general, images can be substantially reduced from their original size without affecting the quality of the display on computer monitors. To test the effects of reducing the image file sizes, tick Reduce Image size. Give the new version of the file you are saving with reduced embedded images a name, such as 'My File with max picture size 200x150.iok'.
| Click Save and you will see an image reduction dialog that enables you to reduce the maximum dimensions of the images, thereby reducing the size of the IOK file, but sometimes at some cost in terms of image clarity. If you set maximum values for width and height, Omniscope will scale down any images with dimensions exceeding the maximum until the relevant dimension is within the maximum.
|
The size of the images displayed is not affected as much as the resolution, since Omniscope manages the sizing of the images dynamically within each display.
Open the new version of the file and close all the open views except the Tile View, which should be configured to display the now embedded image set My Downloaded Images. On the Tile View Toolbar, select the movie camera Slide show icon to the left of the Add to basket icon far right. Click Start slide show and choose full screen sub-option. Look at the image quality on your screen. If it is acceptable for the audience/screen resolutions you intend, consider reducing the images more to reduce the IOK file size further. If the image quality full screen is not acceptable, you may have to reduce the maximum size of the images less (increasing the file size), or configure the views such that images are never displayed so large. To do this, repeat the steps above, and set larger maximums in the Reduce image size dialog.
You can use Omniscope to manage large collections of images and other media by using your hard disk as a data source.
Visit File > Open image collection [3] or File > Open folder of files [4] to get started.
Links:
[1] http://kb.visokio.com/files/Resources/VisokioResources104/ImageSets323/VanGogh pictures.zip
[2] http://kb.visokio.com/node/272
[3] http://kb.visokio.com/open-image-set
[4] http://kb.visokio.com/open-folder