All Omniscope Server Editions include additional automation and hosting tools designed to run on 'always-on' server machines that do not log-in/log-out or shut down at any time. Server Editions used for hosting web browser versions typically require much more RAM than Desktop Editions, since Desktop Editions generally open only one IOK file at a time for analysis and configuration, whereas Server Editions may need to open and keep in memory the data associated with ALL the IOK files being accessed remotely via browsers that cannot work from a local copy of the reporting data set, as the free Viewer can.
If you are running a Server Edition, you can access these services in two ways:
From inside Omniscope:
Settings > Server > Omniscope Server will open the Server interface shown below
Settings > Server > Edit Server configuration opens the Scheduler Task List administration interface directly (see blow)
Alternatively, you can open Server from the Windows Start menu..there is a separate listing for Omniscope Server, and create a desktop icon to launch the Server interface.

Server log folder URL: Click the "Log Folder" link to see a web page (only available locally) listing the latest output of the Server processes. Use this log page to watch the Scheduler working away (hit refresh in your browser frequently to look for error/success messages).
Displays the server port, log file location and allows you to manage the verbosity (detail) recorded in the logs.
Caution: Log files running at maximum detail can grow in size very quickly...

============================================================================
All Server Editions contain 3 additional processes that automate file operations and distribution, and that host web browser versions for deployment to devices that do not support Java and cannot manage a local copy of the reporting/dashboard data set using the free Viewer.
The Scheduler performs the merge, refresh and publication or distribution tasks defined inside each IOK file according to a defined chronological Task List. The Omniscope Server Scheduler is a mouse-driven administration interface requiring no development skills.
The Scheduler Task List acts on already-configured IOK files which usually operate as a multi-file 'chain' involving, for example, server-based 'datamart' files and user desktop 'child' files that are refreshing automatically from the 'datamart' IOK file. Files for refreshing can be empty of data, or contain stale data as templates configured exactly as you want future, fully-populated and refreshed user report files to appear. The Scheduler can then be configured to populate/refresh the template files from their linked data source(s) according to a defined time schedule. You can also use Scheduler commands to distribute the refreshed file(s) to file-sharing folders, or by email or FTP to a website, add time stamps, archive copies, etc. Files configured using parameters can have their parameter values changed by the Scheduler, but generally the Scheduler actions/operations do not make changes to the internal configuration of template/stale IOK files used in the chain. More on Using the Scheduler [1]
Omniscope Web Server is a separate program that is included in all Server Editions. It enables you to deploy HTML5 browser versions of your IOK report/dashboard files as interactive interfaces only, with the reporting data set retained and live on your hosting Omniscope Server. Omniscope Server Editions are priced based on maximum numbers of simultaneous browser sessions that can be supported on a single server machine. Most Server Editions support 50 concurrent browser sessions per machine, machine resources permitting. Spare Server keys can be used to add machines and increase concurrent users by distributing reports/sessions across more than one machine.
The ability of Omniscope to remotely host the data set while deploying an interactive visual interface anywhere over the Internet is a major advantage. This increases the 'reach' of your reporting to include legacy 32-bit machines that cannot hold the reporting data set, as well as mobile devices like iPads, Android tablets and Chromebooks that do not support Java, and therefore cannot run the reporting data set locally. Note that Windows 8.1+ tablets DO support Java and will run the free Viewer. See documentation on configuring Omniscope Web Server [2]
Internal reporting and monitoring of Omniscope Server Edition activities can be managed from a light-weight web-accessible server known as the Admin Web Server. See documentation on configuring Omniscope Admin Web Server [3]
Server menu options (2.9+)
Various Server options are directly accessible from the Settings main toolbar:
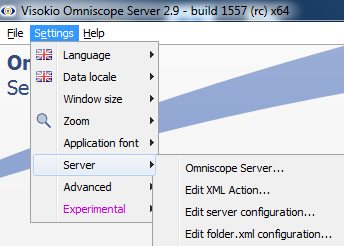
Settings > Server > Omniscope Server
Alternative way of launching Omniscope Server from within Omniscope Desktop. Takes over the Omniscope window.
Settings > Server > Edit XML Action
For creating, editing and saving XML actions using the Server UI. Useful if you wish to create an XML action template for subsequently auto-generating.
Settings > Server > Edit server configuration (Task List)
Edits a Server's Scheduler task list. Can be used from another PC to the server, if you have access to the server config XML file in a shared folder. For more on sharing Task List management, see shared Task Lists [4]
Settings > Server > Edit folder XML configuration
For editing "folder.xml" files, which define security settings for the enclosing folder within the Omniscope Mobile sharing folder.
The Advanced Settings menu contains some options for Server Editions:

Clear DataManager cache in scheduler actions:
Advanced. By default all Scheduler actions erase the DataManager disk cache before executing, to ensure all data is fresh. Advanced users can turn this off to improve performance, but will need to control caching using the "Clear Disk Cache" action instead.
Use folder inside installation for Scheduler configuration and logs:
Advanced. By default, the folder for the Scheduler's configuration and log files will be in the user profile. If selected, a folder inside the installation folder will be used; this must be writeable.
XML action test time:
Advanced. The time limit when testing XML actions after configuring them. Only applies when the scheduler is in "Fork" mode.
================================================
In order to keep the Server running regardless of login/logouts it can be advisable to run at least production instances of Server as a 24x7 Windows Service (or 'headless' in Linux). This enables always-on services to remain running regardless of user account logins or logout, and also prevents too many users on the same server, one of whom might cause a crash on a production server, interupting all scheduled jobs. More on running as a Windows service [5]
=================================================
The Scheduler is an automation tool that comes bundled with all Omniscope Server Editions. The Scheduler is a separate mouse-driven application requiring no special commands or development skills. The Scheduler allows business users with access to the 24/7 Server (principal or spare) to define a number of highly-customisable file actions/operations according to a recurring schedule. The defined repeated operations are typically related to data refresh and manipulation/distribution of Omniscope IOK files but can involve other file types, like Excel and/or static documents like PDF and PowerPoint as well. Scheduler tasks can also include more complex solution integration actions such as archiving time-stamped 'snapshot' source files, copying a scrubbed data set to a data warehouse table for import, delivering files via e-mail or FTP or downloading and merging many .CSV files from a remote cloud source.
The Scheduler uses existing already configured Omniscope IOK files (stored 'empty' or containing 'stale' versions of the data to be refreshed from source) as templates. Template IOK files are usually configured in Desktop Omniscopes and saved configured just as the file owner wants all future refreshed versions of the files to appear. The Scheduler manages future updates to these files from the defined data source(s) according to a defined time schedule. The Scheduler can also manage distribution of the refreshed files by email or FTP them to a website, or add timestamps (for example) as part of the Task List.

The Omniscope Server Scheduler can be also be used in a "non-forked" mode enabling non-forked task execution. In the Scheduler settings dialog, "Fork scheduled execution", when un-ticked, allows scheduled tasks to execute in the same Java VM process as the Omniscope scheduling loop. This avoids the JVM startup time which can save over 10 seconds. Additionally, a timings option has been added to "chain actions" and "file actions" allowing you to analyse performance.
The Omniscope Server Scheduler includes other processes as well as the chronological scheduling loop. One of these additional processes is a separate 'watch folder' process. This process watches a user-created folder called 'watch' continuously while the Scheduler is running. Any valid Omniscope .XML Actions files dropped into this folder are executed immediately and then deleted in sequence. This allows outside software processes to drive the Omniscope Server refresh publish and distribute file operations via XML-formatted text files custom generated either manually or programatically on-demand and saved into the Watch folder. More on using the watch folder [6]
The Tasks currently scheduled are displayed as a Task List as above. Use the buttons at the bottom of the Scheduled Task to Add, Edit, Remove, Export and move Tasks Up and Down in the order, alphabetically Sort tasks, and Expand the Scheduled Tasks Window to see long task names.
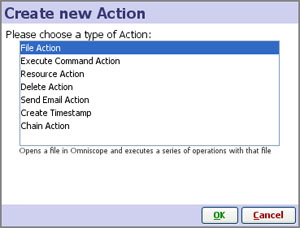
 | Types of Scheduler Task List Actions: File Action-performs operations such as Refresh from source on designed Omniscope files |
The links below give examples of specifying useful Actions.
Live Publishing [7]
In this example the Action is a 'Chain of Actions' action. The Edit Task dialogue is shown below:

The Schedule section lists the recurrences configured. Here, one recurrence is defined: "Every 30 minutes". You can configure multiple recurrences, such as "Every week starting 1 Feb 13" AND "Every week starting 2 Feb 13", meaning both every Wednesday and Thursday of the week. (See the Scheduler Recurrence dialogue below)
The Time out settings can be used to ensure 'hung' uncompleted tasks do not 'hang' the Scheduler. If a Task takes longer than this period, it will be killed, allowing subsequent schedules of the same task or other tasks to continue. You may need to increase this if you are running very long and complex actions.

The Recurrence dialog allows you to specify a simple repetition according to a specified period of minutes, hours, or days, etc. If you want more complex schedules you must create multiple recurrences. For example, weekdays would be represented by 5 recurrences each beginning on a different weekday.
Refresh cycles should be 'nested'. Updating Omniscope files requires that the 'up-stream' linked data source for each file also beup-to-date. If you have a live database this is given, but if you are using one of more Omniscope server-side 'datamart' files as sources for distributed 'child' files, or repeatedly merging in data from changing .CSV files, be sure to schedule the update/save of the upstream 'datamart' and its linked source merge files on a more frequent refresh cycle to ensure that the Scheduler always has the newest data to refresh 'downstream' files from.


==============================================================
To enable logging in either the Scheduler or the Windows service you need to edit the config.xml which is configured using the Scheduler. Note if you enable the debugging it will take effect for both the Scheduler and the Windows Service (if you have the service configured and running)
Start the scheduler application from Start > All program, click "Editing Task, Schedules & Settings" and enable "Log Debug" and/or "Log Detail" to get more detailed logging relating to tasks being processed. Note that "Log Debug" option is used in exceptional circumstances, in most cases "Log Detail" should be sufficient. Once you have configured the settings click "Save and apply", these changes will be saved to config.xml. If you are running as a Windows service you will need to restart the Visokio Enterprise service in order for new changes to take effect. The log files are kept in the same folder as the config file (log.txt).
In addtion to the Scheduler logging options above, the Windows service provides an additional logging configuration. This additional logging is helpful when you want to get more information if you are having problems with running as a service. To enable Windows Service logging modify the wrapper.conf file located in service folder in the Visokio Omniscope installation directory and then changing the wrapper.console.loglevel to either of the following options:
You can change the location of the Scheduler Task List to, for example, allow multiple Server account users on different machines to manage and edit tasks in a common Task List. The Task List is a single XML file, called config.xml, and its location path is speciified in the installconfig.properties file located in the installation directory.
Note: On Windows 7, a typical 64-bit Omniscope installation directory will be Users > {Account Name} > App Data > Local > Visokio Omniscope app >
------------------------------------------------------------------------------------------
To change the location of the Server Task List:
1. Using a Text Editor like NotePad running in Administrator mode, open the "installconfig.properties" located in the installation directory.
2. Copy part of a line starting with #ADDITIONAL_JVM_ARGS=
3. Remove the comment # in front and add the following property after the ="-DschedulerConfigLocation="{full path to new location}\config.xml"
For example: ADDITIONAL_JVM_ARGS=-DschedulerConfigLocation="\\fileserver\...\scheduler\config.xml"
4. Save the modified "installconfig.properties" file.
If the Scheduler will be running as a Windows Service (i.e. with no user login/logout account, always running so long as the machine is running), you must also add to the service wrapper configuration file:
4a. Update wrapper.conf with this change as follows:
1. Open installation folder\service\wrapper.conf.
2. Find this line
#wrapper.java.additional.1=
3. Remove the # in front and replace with this line
wrapper.java.additional.1=-DschedulerConfigLocation={full path to new location}\config.xml
4. Save modified wrapper.conf .
5. If you already have the Scheduler running as a Windows service, stop the Scheduler or Windows services and restart them for the above changes to take effect.
6. Also, you will need to restart Omniscope if you have an instance of Omniscope open.
---------------------------------------------------------------------------------------
Now all Server Scheduler accounts sharing the same Task List will be pointing to the same (mutually accessible with read/write privileges) folder location and all these installations will share a common Task List file.
Common use cases for shared Task List locations include allowing more than one user to administer the Task List without sharing logins and passwords, ensuring 24/7 coverage of the Task List by multiple employees in multiple locations around the world, and allowing Windows-based staff with a spare Server key giving them the Scheduler interface to manage the Task List running on a 'headless' Linux server, which cannot display the interface. If you are running Server Edition 'headless' on Linux, the Scheduler interface can only be managed from a Windows machine running a spare Server license, and the resulting edited XML Task List file shared or copied across to the headless Linux Server for continuous automated execution. Note that each user administering a shared Task List must have a spare Server license on their installation in order to see the Scheduler Task List administration interface.
Access to the Task List XML file location is a single point of failure for 24/7 automation file refresh and delivery, and the Task List config.xml file should be replicated to UAT and Failover/DR machines as part of ensuring resiliency.
======================================
By separate licensing agreement, it is possible to enable activation of the Server license on multiple User Accounts on a single server machine (this option is known as system-wide activation). This option is usually used in cases of clustered servers, but can also be used in cases where there are multiple Task List Administrators among the Omniscope users sharing the same machine without sharing an account. Given that multiple users on the production machine increases the risk of the machine crashing, this 'workgroup' configuration is not recommended for very time-sensitive automated solutions.
This example page describes how to configure an Scheduler XML Action to publish an auto-refreshing .IOK file [8] with updated data from an IOK data source held centraly, i.e. a server-based IOK 'datamart' source. This XML Action example demonstrates the procedure needed for live data publishing, where a changing data source is available only behind closed doors on a server, and the end user only has access to a web-hosted Omniscope 'datamart' file, rather than adding load to the transactional databases. We call this use case scenario 'self-sourced publishing'.
The downloadable file pack includes a "Refresh and publish.xml" XML Action with full comments in the XML source. To get started, download this example file pack .ZIP file:
Self-sourced publishing example [9]
and extract as "C:\Self-sourced publishing example\".
Note: In general, XML Actions are normally be edited in this way [10], and are executed by the Scheduler, either from the Watch Folder [6], or on-demand using a Scheduler Task List command.
The XML action does the following:
After executing this action, you will have:
To demonstrate this procedure in action using the sample files from the pack, we use the Enterprise Scheduler's Watch Folder [6] feature to execute the action as described below.
1) Check the action works
- simulate data changing by editing the CSV file
- drop the XML action into the watch folder
- check the internal master IOK has the updated data but retains its formulas
- check the external file has the updated data and retains its formulas, leaving Omniscope open, without any prompts
(2) Check live refresh works in the external file
- simulate data changing by editing the CSV file
- drop the XML action into the watch folder
- check the external file refreshes automatically, without any prompts
(3) Check refresh on open works in a local user copy
- simulate a "local user copy" by opening the external file, creating a different view configuration,
and saving as a different file with HOLD pressed. Close the file.
- simulate data changing by editing the CSV file
- drop the XML action into the watch folder
- open the local user copy and check it refreshes on open
(4) Check live refresh works in the local user copy
- In the local user file, un-press the HOLD button, and leave the file open
- simulate data changing by editing the CSV file
- drop the XML action into the watch folder
- check the local user file file refreshes automatically, without any prompts
The 'watch folder' function allows you to execute an XML Action [10] from an external trigger (i.e. programmatically). It is an alternative to configuring scheduled tasks manually using the Scheduler user interface [11], or running tasks programmatically by creating a new Java process [12]. Creating a new Java process to execute an XML action (as described in XML Actions [12]) has an overhead of approximately 10 seconds which is avoided when using the 'watch folder'.
The Omniscope Server Scheduler includes other processes as well as the chronological scheduling loop. One of these is a process which watches a nominated folder (the 'watch folder') continuously while the Scheduler is running. Any XML Action [10] files saved into this folder are detected by the Scheduler and executed immediately, then deleted in sequence, providing event-driven control of Server Scheduler.
Please note: the Scheduler must be running for the watch folder to work.
(You can choose to configure the Server Scheduler to run as an always-on Windows service [5]).
Create an XML Action file, with the extension ".xml", as described in XML Actions [10]. You can create this using the Omniscope Server Scheduler user interface to create a sample XML file, export the file, then use it as a model for modifying a custom XML text file to suit, either manually or programatically.
To execute an XML Action file on demand, copy it into the watch folder, by default found in "scheduler\watch" within the Omniscope installation folder. The location is configurable and depends on where you installed Omniscope. This would typically be one of the following locations:
Windows 7 and Vista:
C:\Users\<username>\AppData\Local\Visokio Omniscope app\scheduler\watch
C:\Documents and Settings\<username>\Local Settings\Application Data\Visokio Omniscope app\scheduler\watch
Note: <username> needs to be replaced with the actual user name of the person on that machine.
If the Scheduler is running, this file will immediately be executed then deleted. After testing, refer to the Scheduler log to check for errors:
If you are repeatedly testing changes to an XML Actions file, be careful to copy (and not move) the XML Actions file to the watch folder, because it willl be automatically deleted after being executed. Also be sure to refresh the web browser showing the log frequently to check for errors.
Note: files dropped into the watch folder are executed in sequence and in no specific order, using the same JVM as the Scheduler. It is not currently possible to execute multiple tasks in parallel.
Omniscope Server Editions can create and consume XML Actions files that permit programmatic guidance of Scheduler Actions, either chronological or event-driven, starting from model XML Action Descriptors. These XML files are used to automate the steps involved in refreshing, manipulating and distributing/publishing Omniscope files..
Although you can author XML Actions Descriptors manually, at least initially the easiest way to discover the best XML Actions syntax is to use the Server Edition user interface to configure tasks, then export the XML Actions files resulting and inspect the syntax/tagging of the XML files created. This ensures that each action is well-formed, and you can benefit from the hints given in the dialogs.
The Scheduler uses Enterprise Action Descriptor XML files to define task lists for automation. You configure these tasks using the Enterprise Edition user interface, or manually coded XML copied from and based upon XML Actions files previously created using the Scheduler Task List user interface.
A sample documented specification [14] is posted, but this is not always kept up-to-date. Current syntax of XML Actions files for your version can always best be observed by exporting an XML Actions file configured from your current version of Omniscope Server+. Examples of actions which can be automated include:
From the Main Toolbar, go to
(2.6) Settings > Server > Edit Enterprise Action Descriptor
(2.8+) Settings > Server > Edit XML Action
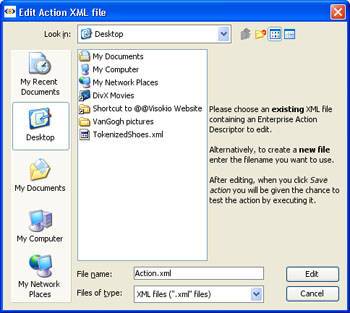
A file dialog will appear. Choose where you will want to save the new file:
The Create new Action dialog will appear. Choose the type of action you want:
Configure using the dialog that appears; then click OK to save the file in the location you chose.
For more help configuring actions, see Using the Scheduler [15]
From the Main Toolbar, go to:
(2.8+) Settings > Server > Edit XML Action
The file dialog above will appear. Choose the existing file you want to edit. The action configuration dialog will appear. Make your changes and click OK. The existing file will be overwritten.
(see XML Actions Specification [14] for an in-depth guide to the XML structure with examples)
Once you have created your XML Actions file(s), open command prompt and type cd to this location (C:\Program Files\Visokio Omnisope), execute the following system command (all on one line):
"C:\path\to\Omniscope\OmniscopeEnterprise.exe" -executeAction "C:\Path\To\My action file.xml"
For example in 2.6+ on 64-bit Windows with a system-wide installation:
"C:\Program Files (x86)\Visokio Omniscope\OmniscopeEnterprise.exe" -executeAction "C:\Path\To\My action file.xml"
For example in 2.6+ with a per-user installation:
"C:\Users\[username]\AppData\Local\Visokio Omniscope app\OmniscopeEnterprise.exe" -executeAction "C:\Path\To\My action file.xml"
Using this method, each action is executed in a separate Omniscope instance which is started before and closed after executing the action. This has a startup and shutdown overhead of 10 seconds on a moderately powered server. Alternatively you can use the watch folder [6] function to avoid this overhead.
Other options for OmniscopeEnterprise.exe:
...\OmniscopeEnterprise.exe -streamAction
(expects the XML on the process input stream, e.g. piped from another process)
...\OmniscopeEnterprise.exe -scheduler
(starts the Scheduler)
Please note: this page is illustrative and is not maintained and therefore does not represent a full specification. For the current specification, refer to the user interface for editing action descriptors [10].
For further documentation, or to check exact syntax in the current version of Omniscope, use an installed Server+ version and, from the Main Toolbar, choose Settings > Server> Edit Enterprise Action Descriptor. The Omniscope dialog for configuring the action has full and accurate documentation fro that version. More info [10]
Below is an illustration of the Enterprise Actions XML sytax structure as used to automate actions in Visokio Omniscope. Most elements apply to both products; where this is not the case they are documented. Instead of using an XML schema (XSD), the elements are described in a more freeform style in the "STRUCTURE" section below, which is more readable at source level than XSD. See the "EXAMPLES" section for some brief examples of use.
All path values allow local file paths (C:\MyFile.txt), FTP paths (ftp://user:pass@host/folder/file.csv') and HTTP URLs (http://mysite.com/file.iok'). You can use FTP paths as targets, so you can, for example, use SchedulerResourceAction to download or upload a file. Most attributes are optional and this is usually clear (e.g. email bcc field).
  <!-- Opens an IOK/FFC file and does things with it -->
  <schedulerFileAction
      source="[path to file to open, e.g. C:\MyFile.IOK]">
    <subActions>
      [1 or more "File Sub Action" elements]
    </subActions>
  </schedulerFileAction>

  <!-- Executes a native OS command -->
  <schedulerExecAction
      command="[OS command]"
      waitUntilTerminated="[true/false]"
      ignoreError="[true/false - relevant only if waitUntilTerminated is true]" />

  <!-- Copies or moves a file or folder of files -->
  <schedulerResourceAction
      source="[path to source file to process, e.g. C:\MyFile.IOK]"
      destination="[target path]"
      eraseFirst="[true/false - do you want to silently erase the destination
              (recursively) before beginning the copy/move operation?]"
      move="[true/false - are we moving or copying?]"
      replace="[true/false - do you want to silently replace destination files
              (folders will be merged)?]"
      ignoreError="[true/false]" />

  <!-- Deletes a file or folder of files -->
  <schedulerDeleteAction
      path="[path to file to delete, e.g. C:\MyTemporaryFile.CSV]"
      allowRecursive="[true/false]"
      ignoreError="[true/false]" />

  <!-- Sends an email -->
  <schedulerSendEmailAction
      mailServerHost="[text]"
      mailServerPort="[number]"
      username="[text]"
      password="[text]"
      from="[emails separated by commas]"
      to="[emails separated by commas]"
      cc="[emails separated by commas]"
      bcc="[emails separated by commas]"
      subject="[text]"
      messageText="[text]"
      attachment="[path to file to attach]" />

  <!-- Creates a timestamp string (second accuracy, formatted like "2005-10-19_16-35-42")
              and does things with that string -->
  <schedulerCreateTimestampAction>
    <actions>
      [1 or more "Timestamp Action" elements]
    </actions>
  </schedulerCreateTimestampAction>

  <!-- Executes a sequence of actions, and catches errors, aborting the chain,
              executing an optional failure action, then returning to enclosing action successfully. -->
  <schedulerChainAction title="Text">
    <actions>
      [1 or more "Action" elements]
    </actions>
    <failureAction><!-- optional -->
      [one "Action" elements]
    </failureAction>
  </schedulerChainAction>
  <!-- Describes an external data source file such as a CSV file. Normally
              you would only need to specify the location attribute. -->
  <datasetfile
      locale="[optional locale code]"
      autoRecogniseDates="[true/false]"
      autoRecogniseNumbers="[true/false]"
      separatorChar="[e.g. comma character for CSV files]"
      skipFirstRowsCount="[number of rows to skip before field names row is expected]"
      xslLocation="[only specified if an XML file needing an XSL translation; path to XSL file]"
      location="[path to external file, e.g. C:\MySource.CSV]" />

  <!-- Describes a JDBC database external data source -->
  <jdbc
      tableName="[name of table to retrieve from; optional and mostly irrelevant
              for JDBC; only used in database wizard]"
      humanName="[arbitrary name to summarise this query]"
      userName="[username, if authenticated]"
      password="[password, if authenticated]"
      sqlCount="[optional sql query to count rows ahead of query, only used
              for progress display in UI app]"
      sqlRetrieve="[sql query to retrieve data, such as SELECT * FROM MyTable]"
      driverClass="[fully-qualified java classname of JDBC driver]"
      jdbcUrl="[full JDBC url; syntax is specific to the JDBC driver you are using]"
      jarFile="[jar file containing JDBC driver; list multiple files separated by semicolons]">
    <mappings><!-- Optional field mappings.  If present, only columns present will be
              imported, optionally renamed.  If mappings element is missing, all are imported. -->
      <field source="[original field name]" dest="[renamed field name, optional]" />
    </mappings>
  </jdbc>

  <!-- Describes a Microsoft Sql Server 2000 database external data source -->
  <sqlserver2k
      tableName="[see jdbc]"
      humanName="[see jdbc]"
      userName="[see jdbc]"
      password="[see jdbc]"
      sqlCount="[see jdbc]"
      sqlRetrieve="[see jdbc]"
      hostName="[hostname of database server]"
      hostPort="[TCP/IP port number of database server, default 1433]">
  </sqlserver2k>

  <!-- Describes an ODBC database external data source -->
  <odbc
      tableName="[see jdbc]"
      humanName="[see jdbc]"
      userName="[see jdbc]"
      password="[see jdbc]"
      sqlCount="[see jdbc]"
      sqlRetrieve="[see jdbc]"
      odbcName="[Name of ODBC data source]">
  </odbc>

  <!-- Describes an Oracle database external data source -->
  <oracle
      tableName="[see jdbc]"
      humanName="[see jdbc]"
      userName="[see jdbc]"
      password="[see jdbc]"
      sqlCount="[see jdbc]"
      sqlRetrieve="[see jdbc]"
      hostName="[see sqlserver2k]"
      hostPort="[TCP/IP port number of database server, default 1521]"
      sid="[oracle database SID]">
  </oracle>
(These all apply to the .IOK/.FFC opened by the enclosing "schedulerFileAction" element)
  <!-- Refreshes from the linked source -->
  <schedulerFileActionRefreshFromSource />

  <!-- Re-links to a new external data source, then refreshes, which can be
              used to replace with entirely new data.
    It's recommended that the new source be of a compatible/similar field structure. -->
  <schedulerFileActionUpdateWithFileDataSource>
    <newSource>
      [1 "Dataset Source" element]
    </newSource>
  </schedulerFileActionUpdateWithFileDataSource>

  <!-- Removes the link to an external source -->
  <schedulerFileActionUnlinkFromSource />

  <!-- Updates the cover page.  Only applicable to Omniscope. -->
  <schedulerFileActionUpdateCoverPage
      replaceBodyText="[text; if set, the cover page text is replaced with this]"
      addTimeStamp="[true/false; if true, a timestamp is appended to the cover page text]" />

  <!-- Applies security settings to the file.  Only applicable to Omniscope.  -->
  <schedulerFileActionSecureFile
      lockData="[true/false - if true, file cannot be edited, saved or copied out of,
              by others]">
    <restrictToDomains><!-- optional; lists domain suffixes that the file must be opened
              directly from -->
      <schedulerFileActionDomainEntry
          domainName="[domain suffix to restrict to, e.g. visokio.com]" />
    </restrictToDomains>
  </schedulerFileActionSecureFile>

  <!-- Sets an expiry to be a period of time from time of execution.
              Only applicable to Omniscope.  -->
  <schedulerFileActionSetExpiry
      amount="[number]" unit="[minutes|hours|days|weeks|months|years]"
      allowWithWarning="[true/false - if true file can still be opened beyond expiry]"
      message="[text to show on opening expired file]" />

  <!-- Saves as an IOK file to a specific location.  Only applicable to Omniscope. -->
  <schedulerFileActionSaveIok location="[path to save to]" />

  <!-- Saves as an FFC file to a specific location.  Only applicable to FeatureFinder. -->
  <schedulerFileActionSaveFfc location="[path to save to]" />

  <!-- Creates and saves a SWF file for the opened FFC file.
              Only applicable to FeatureFinder. -->
  <schedulerFileActionSaveFfSwf location="[path to save to]" />
(These all do things with a timestamp string created by the enclosing "schedulerCreateTimestampAction" action)
  <!-- Copies a file, creating a new file whose name comprises the timestamp with a
              prefix and suffix. -->
  <schedulerCopyTsRes
      sourceFile="[path]"
      destinationFolder="[path]"
      filenamePrefix="[text]"
      filenameSuffix="[text]"
      ignoreError="[true/false]" />

  <!-- Emails a file, using the timestamp in the name of the attachment -->
  <schedulerEmailTsRes
      sourceFile="[path to file to attach]"
      filenamePrefix="[text]"
      filenameSuffix="[text]"
      mailServerHost="[text]"
      mailServerPort="[number]"
      username="[text]"
      password="[text]"
      from="[emails separated by commas]"
      to="[emails separated by commas]"
      cc="[emails separated by commas]"
      bcc="[emails separated by commas]"
      subject="[text]"
      messageText="[text]" />

  <!-- Copies and filters a web page (or in fact any text file), changing
              specified keywords into timestamp text -->
  <schedulerFilterWebPage
      sourceWebPage="[path to source file with embedded keywords]"
      destinationWebPage="[path to destination file]">
    <filters>
      <schedulerFilterWebPageFilter
          searchText="[search keyword]"
          replaceOption="[Full filename of last timestamped file|Full filename
              of last timestamped file, without extension|Date and time as
              web-filename-safe text|Date and time as readable text]" />
    </filters>
  </schedulerFilterWebPage>

  <!-- Only valid following a schedulerCopyTsRes element timestamp action. Saves a
              TXT file containing the filename of the last timestamped file. -->
  <schedulerPlainTextLink
      destination="[path to TXT file to create]" />

  <!-- Only valid following a schedulerCopyTsRes element timestamp action.
    Creates an Omniscope link file (ILF) in the same folder as the last uploaded timestamp file,
    required if you are hosting links to IOK files which use domain locking.
    Only applicable to Omniscope.
    -->
  <schedulerOmniscopeLinkFile
      filename="[path to link file to create]" />
To refresh an IOK file from source and copy to a network share:
  <schedulerFileAction source="C:\MyFile.IOK">
    <subActions>

      <schedulerFileActionRefreshFromSource />

      <schedulerFileActionSaveIok location="Z:\public\LatestFile.IOK" />

    </subActions>
  </schedulerFileAction>
To open a "master" or "template" IOK file, update with a new client-specific subset dataset from a database, and copy to an FTP site:
  <schedulerFileAction source="C:\MasterReport.iok">
    <subActions>

      <schedulerFileActionUpdateWithFileDataSource>
        <newSource>
          <oracle tableName="sales" humanName="Sales" userName="dbuser" password="apples"
              sqlCount="SELECT COUNT(*) FROM sales" sqlRetrieve="SELECT * FROM sales"
              hostName="officeserver" hostPort="1521" sid="LIVE">
          </oracle>
        </newSource>
      </schedulerFileActionUpdateWithFileDataSource>

      <schedulerFileActionSaveIok location="ftp://steve:oranges@ftp.bluechip.com/reports/Report3.iok" />

    </subActions>
  </schedulerFileAction>
Always check the Forum to see if your issue is addressed there. This link will access all posts tagged "Scheduler":
http://forums.visokio.com/discussions/tagged/Scheduler [16]
Make sure you have configured the service to use the same user account as has been activated.
See also Windows Service troubleshooting [17].
Make sure that the memory has been configured in the wrapper.conf in your installation folder
See also Windows Service troubleshooting [17].
Excel error
Error communicating with Application. Please try again.
Invoke of: Open
Source: Microsoft Excel
Description: Microsoft Excel cannot access the file '...'. There are several possible reasons:
• The file name or path does not exist.
• The file is being used by another program.
• The workbook you are trying to save has the same name as a currently open workbook.
You may encounter a problem when trying to save Scheduler settings with a message relating to "config.xml cannot be found". The most common cause for this is that the config.xml file is saved in a write-protected location, for example, in Program Files.
In order to fix this, you need to make sure that the config.xml file is in a non-protected location, or that Scheduler has administrative privileges. This is a limitation of Windows where non-administrative privileges application are not allowed to write to certain location such as Program files.
Note: By default config.xml is placed in local user account, and not in write-protected location.
Omniscope Web Server is a separate program that is included in all Server Editions. It enables you to deploy HTML5 browser versions of your IOK report/dashboard files as interactive web interfaces only, with the reporting data set retained in-memory and live on your hosting Omniscope Server. Omniscope Server Editions are priced based on maximum numbers of simultaneous active browser sessions that can be supported on a single server machine. Note that there is no limit on total users, only simultaneous active users. Once any end user web browser session has had no activity for 15 minutes, it is no longer considered active and does not count against the limit on simultaneous users. Unlimited Server licenses with no pre-defined, fixed limit on simultaneous active users are available.
Note that the RAM memory requirements for Server Editions can be much higher than Desktop Editions dealing with the same files. This is because Desktop Editions generally deal with one file at a time, whereas Server hosting of interactive web browser views for numerous different IOK files may require that all the files to be held in memory at the same time. As an illustration, a reporting solution for 15 users with 15 different personalised files averaging 30,000 rows and 30 columns will run comfortably as a 24/7 Windows service with no more than 4 GB RAM. (The RAM footprint of each IOK file depends on many factors, but primarily on the number of rows and columns in the reporting data set)
The Configuration button launches a menu with 4 expandable sections, the first of which is General options:

Enable server: Configures whether the Omniscope Mobile web server starts automatically.
Sharing folder: The webroot for the server, containing folders and IOK files. Can be a local path, a network drive or a UNC path.
Administrator contact: Contact email that is shown in any error or administration related pages.
The second grouping of settings on the Web Server Configuration menu are titled Networking:

Listening address: The bind address for the HTTP and/or HTTPS server. By default "*" meaning it binds to all addresses for all network adapter(s) on the server.
HTTP: Tick to enable insecure HTTP client access. Not recommended without "Redirect HTTP to HTTPS" if you are using authentication. Only recommended for insecure internal servers, or public unauthenticated servers.
Listening HTTP port: The TCP/IP port number. For production use, 80 is recommended, but this may require the server process to run with administrative privileges, and is known to conflict with the default Skype configuration if running the Server on a desktop computer or laptop. Alternatively pick a free port above 1000, such as 8000, 8080, 8001, etc.
HTTPS: Tick to enable secure HTTPS client access - i.e. the padlock icon in the client's browser. Recommended for secure servers using authentication. For production use this will require you to purchase and configure an SSL certificate.
Listening HTTPS port: The TCP/IP port number. For production use, 443 is recommended, but this may require the server process to run with administrative privileges. Alternatively pick a free port above 1000, such as 8443.
Redirect HTTP to HTTPS: Relevant when both HTTP and HTTPS are ticked. Auto redirects all HTTP connections to HTTPS. Useful if your clients are likely to enter a domain name or URL, since they will not need to enter "https://" with this ticked.
SSL Configuration: The configuration of the SSL certificate necessary for the HTTPS server to work without trust warnings in the client browser. We provide a test certificate which will work for testing purposes, albeit with trust warnings.
URL redirection: Advanced option for redirecting users to/from URLs or domains.
The third grouping of Configuration options are titled Permissons:

Allow write permission: If unticked, a master kill-switch preventing any web-based clients from administering / adding / changing / deleting files and folders in the sharing folder - a "read only" mode - irrespective of user- or group-specific security permissions.
Show actions requiring login: Controls whether you see actions such as "Rename file" when your user session does not have permissions. If shown, and clicked, you will be prompted to login again.
Allow client error reporting: Controls whether to allow clients to send application error reports to Visokio. If unticked, any application errors will be stored on the server for an administrator to review and report separately if needed.
Allow client to display embed option: Controls whether each IOK file's app-wide menu shows an option to generate the HTML code to embed the file as an IFRAME within another site.
Allow walled garden files: For servers whose license key is a member of a walled garden. Controls whether walled-garden IOK files in the sharing folder are accessible or not. Default unticked, since it is up to the administrator to ensure the files are restricted separately through equivalent login/security options.
Default folder configuration: The default "folder.xml" configuration which applies to any subfolder in the sharing folder where there is no "folder.xml" file present. The server looks in the same folder as the IOK file, and every enclosing folder up to the root, and if it does not find a "folder.xml" file, it will use the security settings defined here.
Advanced Settings
Finally there are some Advanced settings options:

Preload-on-start pattern: Advanced performance option which causes specific IOK file(s) to be loaded into memory on server startup, to improve the response time of the first user who visits those file(s).
Keep-loaded pattern: Advanced. As per "Preload-on-start pattern", but additionally keeps the IOK file permanently in server memory. If used with too many or too large IOK files, or with too little memory on the server, may cause the server to run out of memory.
Usersnap project API key: Experimental option for integrating with usersnap for error reporting and screenshot capture.
Allow automation: Internal advanced option for automated testing of the server. Do not use unless advised.
Automation scripts folder: Internal advanced option for automated testing of the server. Do not use unless advised.
Threads number: The number of concurrent requests that can be serviced simultaneously. If more requests come in, they will be queued. Do not alter unless advised.
Always check the Forum to see if your issue is addressed there. This link will access all posts tagged "Omniscope Web Server":
http://forums.visokio.com/discussions/tagged/Omniscope Web Server [19]
The Admin(istrative) Web Server is part of all Omniscope Server Editions, and is a separate, lightweight web server typically for internal use by a system administrator, showing diagnostics, errors, logs and status for server Edition processes.
The Configuration button launches a menu of options:

Enable server: Configures whether or not the Admin Server starts automatically.
Admin credentials: For setting the username and password used to access the Admin server.
This is the first step to being able to access log files etc.:

Listening address: As per Omniscope Web Server [20].
HTTP: As per Omniscope Web Server [20].
HTTP listening port: As per Omniscope Web Server [20].
HTTPS: As per Omniscope Web Server [20].
HTTPS listening port: As per Omniscope Web Server [20].
Redirect HTTP to HTTPS: As per Omniscope Web Server [20].
SSL configuration: As per Omniscope Web Server [20].
Always check the Forum to see if your issue is addressed there. This link will access all posts tagged "Omniscope Admin Web Server":
http://forums.visokio.com/discussions/tagged/Omniscope Admin Web Server [21]
Links:
[1] http://kb.visokio.com/kb/scheduler
[2] http://kb.visokio.com/kb/web-server
[3] http://kb.visokio.com/kb/admin-server
[4] http://kb.visokio.com/kb/shared-task-list
[5] http://kb.visokio.com/kb/windows-service
[6] http://kb.visokio.com/kb/watch-folder
[7] http://kb.visokio.com/kb/live-publishing
[8] http://kb.visokio.com/kb/auto-refresh
[9] http://kb.visokio.com/files/Resources/KB/KBAutomation138/Self-sourcedPublishingExample.zip
[10] http://kb.visokio.com/kb/xml-actions
[11] http://kb.visokio.com/scheduler-help
[12] http://kb.visokio.com/kb/xml-actions#exec
[13] http://localhost:24679/
[14] http://kb.visokio.com/node/385
[15] http://kb.visokio.com/node/139
[16] http://forums.visokio.com/discussions/tagged/Scheduler
[17] http://kb.visokio.com/kb/windows-service#troubleshooting
[18] http://bytes.com/topic/c-sharp/answers/819740-c-service-excel-application-workbooks-open-fails-when-called-service
[19] http://forums.visokio.com/discussions/tagged/Omniscope_Web_Server
[20] http://kb.visokio.com/kb/web-server#networking
[21] http://forums.visokio.com/discussions/tagged/Omniscope_Admin_Web_Server